Troubleshooting
2
0
2
2
-0
2
59
8
Troubleshooting
8.1
What to Do in Case of a Fault
Before you have the device repaired, perform the following actions:
Checklist
•
If none of the above remedies the problem, please contact our service center. Please
have the error images and the version number of the firmware available. The firmware ver-
sion number can be found at the top right of the user interface.
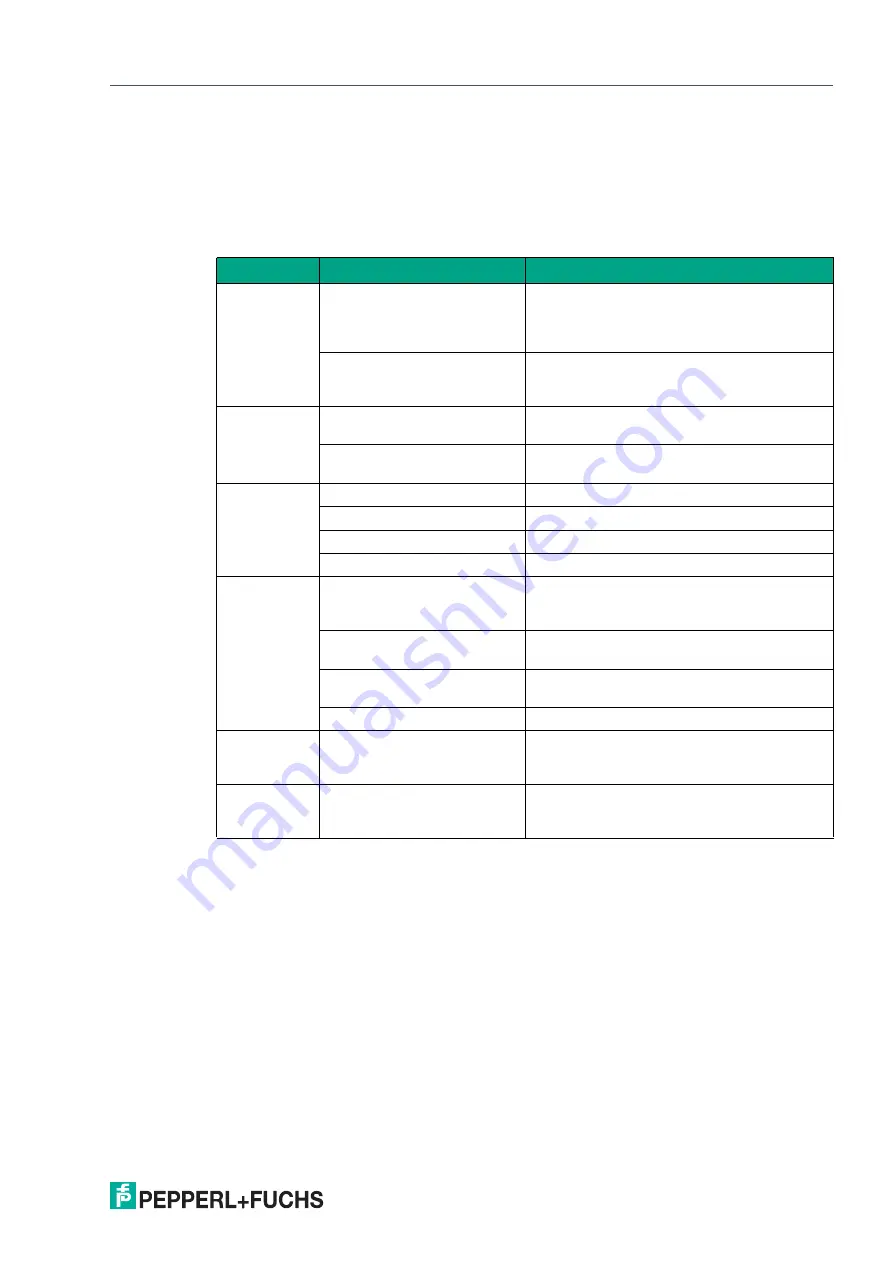
Fault
Cause
Remedy
"Power" LED
does not light
up
The power supply is switched
off
Check whether there is a reason why the
power supply is switched off (installation or
maintenance work, etc.). Switch on the power
supply if necessary.
Wiring fault in the splitter or
switch cabinet, cable break
Check the wiring carefully and repair any
faults with the wiring. Check the cables to
ensure that they are functioning properly.
Control panel
receiving no
measurement
data
Connection cable not con-
nected
Connect the connection cable.
Incorrect connection cable
used
Use the appropriate connection cable only.
Measurement
object not rec-
ognized
Reflections
Avoid reflections
Foreign exposure
Avoid foreign exposure
Exposure time control
Set exposure (see chapter 6.7.2)
Teach-in range set incorrectly Set teach-in range (see chapter 6.7.3)
Measurement
errors
Surfaces with pronounced
scored structure and reflective
surfaces
Improved arrangement of sensor components
to the measurement object
Temperature change in the
sensor
Allow sensor to warm up for around 15 min-
utes before the measuring process is started.
Incorrect distance to the mea-
suring object
Note distance values
Housing incorrectly mounted
Install housing correctly (see chapter 3.4)
Presentation
mode not
working
Presentation mode not acti-
vated
Enable
Presentation mode
and
Autotrigger
and confirm using "Save settings"
No connec-
tion to the sen-
sor
Alternating-current voltage or
supply voltage too high
Connect sensor to direct-current voltage (DC)
only. Ensure that the supply voltage level is
within the specified sensor range.


