1
In
troduc
tion
9
h
Rear e-dial (
R
)
Changes the value for camera settings such as exposure. (p.36)
You can change the menu tabs when a menu screen is
displayed. (p.17)
You can change the settings when the control panel is
displayed. (p.16)
In playback mode, use this to magnify an image or display
multiple images at the same time. (p.34, p.60)
i
AF button (
I
)
Available for adjusting focus, instead of pressing the shutter
release button halfway. (p.42)
j
AE Lock button (
H
)
Locks the exposure value before shooting.
In playback mode, the JPEG image that was just taken can
also be saved in RAW format. (p.34)
k
Green button (
M
)
Resets the values being adjusted.
Switches to ISO AUTO when adjusting the sensitivity.
l
Stills/Movies switch
Switches between
A
(Still capture) mode and
C
(Movie
recording) mode. (p.31)
m
OK button (
E
)
When a menu or the control panel is displayed, press this
button to confirm the selected item.
n
Change AF Point/Card slot switch button (
c
/
d
)
In capture mode, press this button to enable changing the
AF point. (p.44)
In playback mode, press this button to switch between the
memory cards inserted in the two slots, SD1 and SD2.
(p.34)
o
Four-way controller (
ABCD
)
Displays the Drive Mode/Flash Mode/White Balance/
Custom Image setup menu. (p.16)
When a menu or the control panel is displayed, use this to
move the cursor or change the item to set.
Press
B
in single image display of playback mode to display
the playback mode palette. (p.59)
When selecting the area of an image to magnify or to use as
a focusing area, you can move the area diagonally by
pressing two keys at the same time.
p
MENU button (
F
)
Displays a menu. Press this button while the menu is
displayed to return to the previous screen. (p.17)
With this camera, you can take pictures while looking through
the viewfinder or while viewing the image on the monitor.
When using the viewfinder, you can take pictures while
checking the status screen displayed on the monitor and the
viewfinder. When not using the viewfinder, you can take
pictures while viewing the Live View image displayed on the
monitor.
The camera is in “standby mode” when it is ready to shoot, such
as when the status screen or Live View image is displayed.
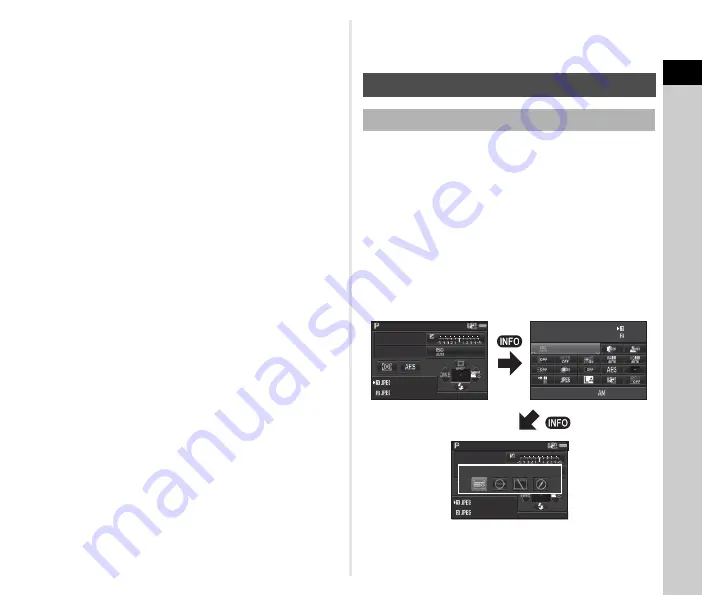
Press
G
in standby mode to display the “control panel” and
change settings. (p.16) You can change the type of information
displayed in standby mode by pressing
G
while the control
panel is displayed. (p.12)
Monitor Display
Capture Mode
100-3200
100-3200
10:30
10:30
12345
12345
12345
12345
12345
12345
12345
12345
1/
1/
FF
2 5 0
2 5 0
1 6 0 0
1 6 0 0
5.6
5.6
12345
12345
12345
12345
1/
1/
FF
2 5 0
2 5 0
1 6 0 0
1 6 0 0
5.6
5.6
Status Screen
Status Screen
ISO AUTO Setting
ISO AUTO Setting
Adjustment Range
Adjustment Range
09/09/2013
09/09/2013
Standby mode
(Status Screen)
Shooting Info Display selection screen
Control panel
Summary of Contents for K-3
Page 101: ...6 Appendix 99 X sync socket 84 Z Zone Select AF point 44 ...
Page 110: ...Memo ...


