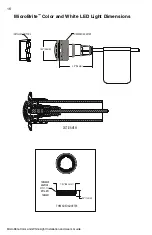


MicroBrite Color and White Light Installation and User’s Guide
MicroBrite Color and White Light Installation and User’s Guide
7
WET CONDUIT INSTALLATION
(Continued)
4. With the MicroBrite light in your hands, roll the body of the light several turns
counter-clockwise, so that the cord of the MicroBrite light receives several
“pre-twists” in a counter-clockwise direction.
Read Step 5 before continuing
with Step 6.
5.
Dry/Sealed Conduit Installation (use provided kit), see page 9: If
code requires an O-Ring to be installed on the light for a dry conduit
installation, install the O-Ring as described on page 9, then continue with
Step 6 below.
6. Insert the MicroBrite light into the 1.5” wall fitting. By hand start the process of
threading the male threads on the MicroBrite’s white threaded adaptor ring into the
female threads of the wall fitting.
By hand, turn light body
counter-clockwise to
twist cord
Cord should be twisted
counter-clockwise
BEFORE INSTALLATION
By hand turn light clockwise.
Insert adaptor male thread
adaptor ring into female
thread of wall fitting
DURING INSTALLATION
Cord will un-twist
as light is turned
clockwise into fitting
Summary of Contents for MICROBRITE
Page 21: ...MicroBrite Color and White Light Installation and User s Guide 17 Blank Page...
Page 22: ...MicroBrite Color and White Light Installation and User s Guide 18 Blank Page...
Page 23: ...MicroBrite Color and White Light Installation and User s Guide 19 Blank Page...
Page 45: ...Gu a de instalaci n y del usuario de la luz de colores y blanca MicroBrite 17 P gina en blanco...
Page 46: ...Gu a de instalaci n y del usuario de la luz de colores y blanca MicroBrite 18 P gina en blanco...
Page 47: ...Gu a de instalaci n y del usuario de la luz de colores y blanca MicroBrite 19 P gina en blanco...