background image

PENTAGRAM Designer (P 2700)

Panele dotykowe i przyciski trybów

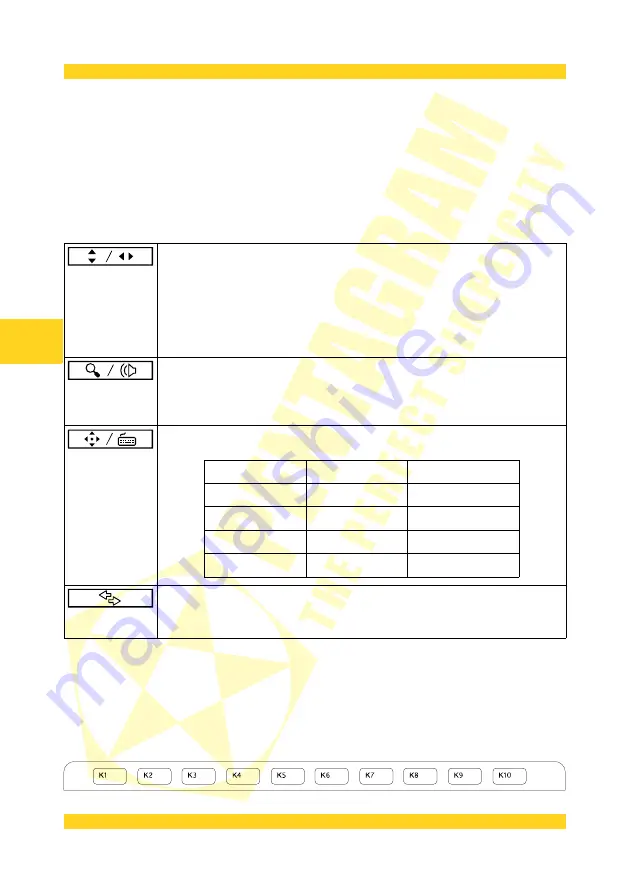
Panele dotykowe (touchpady) znajdujące się z lewej i prawej strony tabletu mogą pełnić szereg 

funkcji, które zostały przydzielone do sześciu trybów. Tryby te można zmienić korzystając z 
przycisków   trybów.   Trzy   pierwsze   przyciski   (od   lewej)   posiadają   przypisane   dwa   tryby: 

podstawowy i pomocniczy. Naciśnięcie przycisku powoduje jego podświetlenie oraz aktywację 
jego   podstawowego   trybu.   Do   przełączania   między   głównym   a   pomocniczym   trybem 

aktywnego przycisku służy ostatni przycisk (prawy skrajny). W tabeli poniżej znajduje się opis 
dostępnych trybów każdego z tych przycisków. W niektórych aplikacjach, zachowanie paneli 

dotykowych może się różnić od podanego w tabeli.

Tryb podstawowy: przewijanie w pionie
Tryb pomocniczy:

przewijanie w poziomie

Aby   użyć  panelu   dotykowego   w   którymś   z   tych   trybów,  dotknij   palcem 
panelu przy jego krawędzi, a następnie nie odrywając palca, przesuń nim po 

obwodzie panelu. Reakcja na ruch palca jest zależna od jego kierunku:
• kierunek zgodny z ruchem wskazówek zegara - zwiększenie wartości

• kierunek przeciwny do ruchu wskazówek zegara - zmniejszenie wartości.

Tryb podstawowy: zmiana powiększenia (zoom)
Tryb pomocniczy:

regulacja głośności systemowej

Sposób korzystania z paneli dotykowych w obu trybach tego przycisku jest 
identyczny jak w przypadku poprzedniego przycisku.

Tryb podstawowy: przypisanie do panelu klawiszy klawiatury

Tryb pomocniczy:

przypisanie do panelu klawiszy klawiatury

symbol na panelu tryb podstawowy tryb pomocniczy

klawisz 

klawisz Page Up

klawisz 

klawisz Page Down

klawisz 

klawisz Home

klawisz 

klawisz End

Przełączenie   między   podstawowym   a   pomocniczym   trybem   aktywnego 

przycisku.   Podświetlenie   tego   przycisku   oznacza,   że   aktywny   jest 
pomocniczy tryb przycisku.

Pola funkcyjne

Pola funkcyjne znajdują się tuż nad obszarem roboczym tabletu i oznaczone są  K1-K10. Po 

zainstalowaniu sterowników tabletu, w aplikacji Macro Key Manager można przypisać do tych 
pól różne funkcje, np. skróty klawiszowe. Pola funkcyjne obsługuje się piórkiem. Przytrzymanie 

piórka nad polem spowoduje wyświetlenie jego opisu na ekranie monitora. Stuknięcie piórkiem 
w pole spowoduje uruchomienie przypisanej mu akcji.

6

PL

Summary of Contents for P 2700

Page 1: ...PENTAGRAM Designer P 2700 2009 11 26 EN PL DE Installation and Operation Manual Installations und Bedienungsanleitung Instrukcja instalacji i obsługi ...

Page 2: ......

Page 3: ...PENTAGRAM Designer P 2700 PL Instrukcja instalacji i obsługi PENTAGRAM Designer P 2700 1 PL Najnowsze wersje instrukcji sterowników i oprogramowania dostępne są na stronie www pentagram pl PL ...

Page 4: ...PENTAGRAM Designer P 2700 2 PL ...

Page 5: ...MENTY TABLETU 5 Panele dotykowe i przyciski trybów 6 Pola funkcyjne 6 Przyciski boczne 7 WYMIANA RYSIKA 7 INSTALACJA TABLETU 8 KORZYSTANIE Z TABLETU 9 KONFIGURACJA TABLETU 10 WINDOWS VISTA 7 10 WINDOWS 2000 XP 10 Okno Diagnostic 10 Zakładka Pen 11 Zakładka Mapping 13 Zakładka ExpressKeys 15 APLIKACJA MACRO KEY MANAGER 17 Menu kontekstowe aplikacji 17 Okno Settings 17 Główne okno aplikacji 18 3 PL ...

Page 6: ... od monitora CRT kineskopowego i innych źródeł silnego pola elektromagnetycznego gdyż mogą one zakłócić pracę tabletu Informacja dot zużytego sprzętu elektronicznego Oznaczenia na urządzeniu i załączonej dokumentacji wskazują na fakt że urządzenie nie może zostać wyrzucone razem z nieposegregowanymi odpadami komunalnymi po jego zużyciu Urządzenie należy poddać procesowi recyklingu lub innego przet...

Page 7: ... 2 szt 5 Pęseta do wyciągania końcówki piórka 6 2 płyty CD ze sterownikami i oprogramowaniem 7 Płyta DVD z programem Adobe Photoshop Elements 7 8 Instrukcja instalacji i obsługi 9 Kabel USB Minimalne wymagania systemowe PC System Windows 2000 XP Vista 7 Mac System MacOS X 10 4 lub wyższy Wolny port USB Napęd lub napędy optyczny odtwarzający płyty CD i DVD do instalacji sterowników i oprogramowania...

Page 8: ...go kierunku kierunek zgodny z ruchem wskazówek zegara zwiększenie wartości kierunek przeciwny do ruchu wskazówek zegara zmniejszenie wartości Tryb podstawowy zmiana powiększenia zoom Tryb pomocniczy regulacja głośności systemowej Sposób korzystania z paneli dotykowych w obu trybach tego przycisku jest identyczny jak w przypadku poprzedniego przycisku Tryb podstawowy przypisanie do panelu klawiszy ...

Page 9: ...iana przypisanej im funkcji w sterowniku tabletu Wymiana rysika Po dłuższym okresie używania piórka jego końcówka ulegnie skróceniu na skutek ścierania się o powierzchnię tabletu Stępiona końcówka nie będzie dokładnie odzwierciedlać pozycji oraz siły nacisku dlatego należy ją wymienić Do tabletu zostały dołączone dwa dodatkowe rysiki a także pęseta ułatwiająca ich wymianę Wykonaj poniższe kroki ab...

Page 10: ...tart Wszystkie programy Akcesoria Uruchom następnie w polu Otwórz okna Uruchom wpisz X setup gdzie X to litera napędu optycznego i naciśnij klawisz Enter 4 W oknie menu kliknij Tablet Driver aby uruchomić instalator sterowników i aplikacji 5 Postępuj zgodnie z instrukcjami pojawiającymi się na ekranie aby zainstalować sterowniki i aplikację Macro Key Manager 6 Po zakończonej instalacji jeśli wyświ...

Page 11: ...one w sterowniku tabletu Po podłączeniu tabletu do komputera w systemach Windows Vista i 7 włączona zostanie także systemowa obsługa tabletu Jeśli sterowniki nie zostały zainstalowane przed podłączeniem tabletu do komputera oraz w niektórych przypadkach również po zainstalowaniu sterowników gdy tablet już został podłączony do komputera mogą zostać włączone dodatkowe opcje systemowej obsługi tablet...

Page 12: ...to w taki sam sposób jak w przypadku systemów Windows 2000 oraz XP i jest opisane poniżej Aby ikona sterownika tabletu w Panelu sterowania była widoczna może być konieczne włączenie klasycznego widoku małe duże ikony Panelu sterowania Windows 2000 XP Dostęp do konfiguracji sterownika tabletu można uzyskać poprzez ikonę Pen Pad w systemowym Panelu sterowania lub poprzez wybranie pozycji Pen Pad w m...

Page 13: ...śli piórko znajduje się poza polem sczytywania tabletu Close zamyka okno Diagnostic Zakładka Pen Na tej zakładce możliwa jest konfiguracja ustawień piórka tabletu Tilt Sensitivity zmiana czułości z którą tablet będzie reagował na pochylenie piórka Skala czułości pochylenia zawiera się między wartościami Normal normalna a High wysoka Tip Feel zmiana twardości końcówki piórka czyli stosunku faktyczn...

Page 14: ...i stosunku faktycznej siły nacisku piórka na powierzchnię tabletu do siły nacisku rejestrowanej przez tablet Skala twardości końcówki piórka zawiera się między wartościami Soft miękka a Firm twarda Click Threshold zmiana progu kliknięcia czyli faktycznej siły nacisku piórka na powierzchnię tabletu wymaganej do zarejestrowania kliknięcia przez tablet Skala progu kliknięcia zawiera się między wartoś...

Page 15: ...y tabletu jest na stałe przypisany do obszaru ekranu Umieszczenie piórka nad konkretnym punktem obszaru roboczego tabletu spowoduje przemieszczenie kursora na ekranie monitora do punktu przypisanego punktowi obszaru roboczego Working Area Setting pole to reprezentuje cały obszar ekranu czerwona ramka zaś obszar ekranu do którego przypisany jest obszar roboczy tabletu Monitor Area wybór obszaru ekr...

Page 16: ...ysz obszar roboczy tabletu jest przypisywany do obszaru ekranu za każdym razem gdy piórko zostanie umieszczone nad obszarem roboczym tabletu Zbliżenie piórka do obszaru roboczego przypisuje aktualną pozycję kursora na ekranie do tego punktu obszaru roboczego a ruch piórkiem powoduje ruch kursora z ostatniego miejsca w którym się on znajdował Dzięki temu piórko może być używane w taki sam sposób ja...

Page 17: ...dzielenie do przycisku kombinacji lub ciągu klawiszy klawiatury Wybranie z listy tej funkcji otwiera Okno Define KeyStroke Po skonfigurowaniu tej funkcji pod rozwijaną listą przycisku widoczna będzie nazwa kombinacji ciągu nadana podczas jego konfiguracji Open Run wybór aplikacji która zostanie uruchomiona po naciśnięciu tego przycisku Wybranie z listy tej funkcji otwiera Okno Open Run Po skonfigu...

Page 18: ...powoduje dodanie ich do listy Keys Możliwe jest także dodanie specjalnej kombinacji klawiszy korzystając z listy Add Special Kliknięcie OK powoduje przejście do okna umożliwiającego nadanie nazwy skonfigurowanej kombinacji ciągowi Kliknięcie Cancel powoduje zamknięcie okna bez wprowadzania zmian do aktualnej funkcji przycisku Kliknięcie Delete kasuje ostatni wpis z listy a Clear wszystkie Okno Ope...

Page 19: ...czególne pozycje tego menu About Otwiera okno z informacjami o wersji aplikacji Software Version wersji sterownika Driver Version i wersji oprogramowania Firmware Firmware Version Show Wyświetla główne okno aplikacji Ten sam efekt można osiągnąć wykonując dwuklik na ikonie aplikacji Disable Enable Wyłącza włącza pola funkcyjne tabletu Setting Otwiera okno z ustawieniami aplikacji Pen Pad Otwiera o...

Page 20: ... funkcyjne Hint Wpisz w pole zawartość dymka który będzie wyświetlany na monitorze gdy piórko znajdzie się nad wybranym polem funkcyjnym Use hot key Wybierz kombinację klawiszy która będzie symulowana po naciśnięciu wybranego pola funkcyjnego Linking Wpisz ścieżkę do pliku który będzie uruchomiony po naciśnięciu wybranego pola funkcyjnego Aby przeglądać foldery w poszukiwaniu pliku naciśnij przyci...

Page 21: ...ypadkach może powodować że aplikacja ta będzie uruchamiana przy każdym użyciu pola funkcyjnego gdy ta aplikacja będzie wybrana na liście aplikacji 4 Po kliknięciu przycisku wyświetlone zostanie okno Installed Software zawierające listę zainstalowanych w systemie aplikacji Zaznacz aplikację którą chcesz dodać do listy i kliknij przycisk OK aby wybrać aplikację i zamknąć to okno Kliknij przycisk Can...

Page 22: ...PENTAGRAM Designer P 2700 20 PL ...

Page 23: ...EN Installation and Operation Manual PENTAGRAM Designer P 2700 EN The latest versions of manual drivers and applications are available on www pentagram eu EN ...

Page 24: ...PENTAGRAM Designer P 2700 2 EN ...

Page 25: ...REMENTS 5 TABLET COMPONENTS 5 Touch pads and mode buttons 6 Function fields 6 Side buttons 7 STYLUS REPLACEMENT 7 TABLET INSTALLATION 8 USING THE TABLET 9 TABLET CONFIGURATION 10 WINDOWS VISTA 7 10 WINDOWS 2000 XP 10 Diagnostic window 10 Pen tab 11 Mapping tab 13 ExpressKeys tab 15 MACRO KEY MANAGER APPLICATION 17 Application context menu 17 Setting window 17 Application main window 18 3 EN ...

Page 26: ...istance between the tablet and a CRT monitor and other strong electromagnetic field sources which might interfere with the tablet operation Information concerning waste electronic equipment The markings on the device and in the attached documentation indicate that it cannot be disposed of along with unsegregated general black bag waste when withdrawn from use The device must be recycled or process...

Page 27: ...2 pcs 5 Tweezers for removing stylus 6 2 CDs with drivers and software 7 DVD with Adobe Photoshop Elements 7 program 8 Installation and operation manual 9 USB cable Minimum system requirements PC Windows 2000 XP Vista 7 operating system Mac MacOS X 10 4 or higher operating system Free USB port Optical drive s for playing CDs and DVDs in order to install drivers and software Tablet components 1 Mod...

Page 28: ... on the direction CW increases the value CCW decreases the value Main mode magnification change zoom Auxiliary mode system volume adjustment For the way of touch pad operation in both button modes see above Main mode assignment of keyboard keys to the panel Auxiliary mode assignment of keyboard keys to the panel symbol on the panel main mode auxiliary mode key Page Up key key Page Down key key Hom...

Page 29: ...lus replacement When the pen is used for a longer period its tip stylus will shorten because of rubbing off against the tablet surface The blunt tip does not precisely reflect the position and pressure level so you should replace it The tablet is supplied with two additional tips and tweezers facilitating the replacement To replace the stylus perform the following steps 1 Hold the stylus with the ...

Page 30: ...ws Vista and 7 systems Start All programs Accessories Run In the Open field of the Run window enter X setup where X is the optical drive letter and press Enter 4 In the menu window click Tablet Driver to launch the drivers and application installer 5 Follow the on screen instructions to install the drivers and Macro Key Manager application 6 After the installation the dialog window will display as...

Page 31: ...s to the pen side buttons using the tablet driver When you connect the tablet to a computer with Windows Vista and 7 the system tablet support will be activated If you did not install the drivers prior to connecting the tablet to the computer or in some cases after installing the drivers with the tablet already connected some additional system support functions may become active In such a case to ...

Page 32: ...ems and is described below To make the tablet driver icon visible in the Control panel you may have to switch to the Control panel Classic view Windows 2000 XP You can access the tablet driver configuration with the Pen Pad icon of the system Control Panel or by selecting the Pen Pad item in the Macro Key Manager icon context menu Regardless of the selected tab the About button at the window botto...

Page 33: ...indow Pen tab You can configure the tablet pen settings here Tilt Sensitivity change of the sensitivity with which the tablet reacts to the pen tilt The tilt sensitivity level ranges from Normal to High Tip Feel pen tip hardness change i e the ratio of the real pen pressure level against the tablet surface to the pressure level registered by the tablet The pen tip hardness scale ranges from Soft t...

Page 34: ...e tablet The pen tip hardness scale ranges from Soft to Firm Click Threshold change of the click threshold i e the real pen tip pressure level on the tablet surface which is currently registered as a click by the tablet The click threshold scale ranges from Low to High Profile field representing the current pressure sensitivity settings The X axis corresponds to the real pen tip pressure on the ta...

Page 35: ...a Locating the pen above a particular tablet working area point causes moving the cursor on the screen to the point assigned to the working area point Working Area Setting this field represents the whole screen area The red frame represents the screen area to which the tablet working area is assigned Monitor Area selection of the screen area that the tablet working area will be assigned to All Scr...

Page 36: ...mode the tablet working area is assigned to the screen area each time the pen is located above the tablet working area Moving the pen close to the working area assigns the current screen cursor position to this working area point The pen movement causes the cursor movement from the last position it was at Thus the pen can be used as the normal mouse Mouse Acceleration change of the mouse pointer a...

Page 37: ...fying keys will be shown KeyStroke assign a key combination or stroke to a button Selecting this function opens the Define KeyStroke window When configured the name of the combination or stroke given during the configuration will be visible under the button drop down list Open Run select the application which will launch after pressing this button Selecting a function from the list opens the Open ...

Page 38: ...ombination using the Add Special list Click OK to advance to the window in which you can give a name to the configured combination stroke Click Cancel to close the window without changing the current button function Click Delete to delete the last entry from the list Clear deletes all entries Open Run window Click Browse to open the window in which you can select the application to launch when the...

Page 39: ...and firmware version information Show displays the main application window You can also do it by double clicking the application icon Disable Enable disables enables the tablet function fields Setting opens the application settings window Pen Pad opens the driver configuration window Help displays the application help file Setting window MacroKey Response time the time for which the pen touches a ...

Page 40: ...d function field Hint enter into the field the tool tip content which will be displayed on the monitor when the pen is located above the selected function field Use hot key select the key combination which will be simulated after pressing the selected function field Linking enter the path to the file which will be run after pressing the selected function field To browse the folder for the file cli...

Page 41: ...me and in some cases this application might be run each time the function field is used if the application is selected on the list of applications 4 After clicking the button the Installed Software will display It contains the list of applications installed on the system Select the application you want to add to the list and click OK to select it and close the window Click Cancel to close the wind...

Page 42: ...PENTAGRAM Designer P 2700 20 EN ...

Page 43: ...DE Installations und Bedienungsanleitung PENTAGRAM Designer P 2700 DE Die neueste Fassung der Anleitung Treiber und Software sind auf der Seite www pentagram eu erhältlich DE ...

Page 44: ...PENTAGRAM Designer P 2700 2 DE ...

Page 45: ...ührungspanels und Tasten für Betriebsmodi 6 Funktionsfelder 7 Seitentasten 7 AUSWECHSELN DER SPITZE 7 INSTALLATION DES TABLETTS 8 BENUTZUNG DES TABLETTS 9 KONFIGURATION DES TABLETTS 10 WINDOWS VISTA 7 10 WINDOWS 2000 XP 10 Diagnostic Fenster 10 Pen Registerkarte 11 Mapping Registerkarte 13 ExpressKeys Registerkarte 15 MACRO KEY MANAGER 17 Kontextmenü der Anwendung 17 Fenster Setting 18 Hauptfenste...

Page 46: ... sicher dass Ihr Tablett vom CRT Monitor Bildröhrenmonitor und anderen Quellen starken elektromagnetischen Feldes entfernt steht denn sie können den Betrieb des Tabletts beeinträchtigen Information über Elektro Altgeräte Die Angaben am Gerät und in der mitgelieferten Dokumentation deuten darauf hin dass das Gerät nach seiner Abnutzung mit dem ungetrennten Haushaltsmüll nicht entsorgt werden darf D...

Page 47: ... zum Herausziehen der Stiftspitze 6 2 CDs mit Treiber und Software 7 DVD mit der Anwendung Adobe Photoshop Elements 7 8 Installations und Bedienungsanleitung 9 USB Kabel Mindestsystemvoraussetzungen PC mit Windows 2000 XP Vista 7 Mac mit MacOS X 10 4 oder höher unbelegter USB Port optisches Laufwerk bzw Laufwerke zur Wiedergabe von CDs und DVDs für Installation des Treibers und Anwendungen Tablett...

Page 48: ...er Tabelle beschriebenen abweichen Basismodus vertikal scrollen Hilfsmodus horizontal scrollen Um das Berührungspanel mit einem der Betriebsmodi zu benutzen mit dem Finger das Panel an seinem Rand berühren danach ohne den Finger vom Panel zu trennen den Finger am Umfang des Panels entlang schieben Die Reaktion auf die Fingerbewegung hängt von der Bewegungsrichtung ab im Uhrzeigersinn Werterhöhung ...

Page 49: ...seine Funktionalität erweitern Die obere Taste ruft in den meisten grafischen Anwendungen die Radiergummi Funktion auf Die übrigen Tasten fungieren standardmäßig als Tastaturtasten siehe Abbildungen nebenan eine Umstellung auf eine andere Funktion ist in der Treiberanwendung des Tabletts möglich Auswechseln der Spitze Nach längerem Stifteinsatz verkürzt sich die Spitze infolge der Reibung an der T...

Page 50: ...r DVD CD wird eingeblendet unter Windows Vista und 7 kann es erforderlich sein zusätzlich auf die Schaltfläche Ausführen setup exe im Fenster Autostart zu klicken 3 Wird das Menüfenster nicht automatisch eingeblendet Start Ausführen unter Windows Vista und 7 Start Alle Programme Zubehör Ausführen wählen anschließend im Feld Öffnen im Ausführen Fenster X setup X steht für den Buchstaben Ihres optis...

Page 51: ...ell zwei Mal nacheinander die Tablettoberfläche an einer Stelle antippen dabei den Stift nicht verschieben oder die obere Seitentaste am Stift drücken Die Funktionsweise der am Stift seitlich angeordneten Tasten kann im Treiberprogramm des Tabletts geändert werden Nachdem das Tablett an den Computer angeschlossen worden ist wird unter Windows Vista und 7 auch die systembedingte Unterstützung des T...

Page 52: ...rs in Anspruch zu nehmen Dies erfolgt auf die gleiche Art und Weise wie unter Windows 2000 und XP und ist nachstehend beschrieben Damit die Ikone für den Tabletttreiber in der Systemsteuerung sichtbar wird kann es notwendig sein auf die klassische Ansicht kleine große Ikonen der Systemsteuerung umzuschalten Windows 2000 XP Zum Konfigurationsfenster des Tabletttreibers bekommen Sie Zugang über die ...

Page 53: ...r prozentmäßiger Wert des Anpressdrucks des Stiftes X Tilt Y Tilt jeweilige Stiftneigung gegenüber der Arbeitsfläche die letztlich erkannte falls sich der Stift außerhalb der Lesereichweite des Tabletts befindet Close Diagnostic Fenster schließen Pen Registerkarte Auf dieser Registerkarte können Einstellungen des Tablettstiftes konfiguriert werden Tilt Sensitivity Einstellung der Empfindlichkeit m...

Page 54: ...n auf dieser Registerkarte Feel Details Fenster Sensitivity Einstellung der Spitzenhärte d i des Verhältnisses des Stiftandrucks auf die Tablettoberfläche zur Druckkraft die vom Tablett erkannt wird Der Härtebereich der Stiftspitze liegt zwischen den Werten Soft weich und Firm hart Click Threshold Einstellung des Klickgrenzwertes d i der tatsächlichen Andruckkraft des Stiftes auf die Tablettoberfl...

Page 55: ...er Bildschirmfläche entspricht Landscape Portrait Landscape Flipped Portrait Flipped Mode Umstellung des Erkennungsmodus des Stiftes auf den absoluten Pen Modus Stift bzw den relativen Mouse Modus Maus Pen Modus In dem Pen Erkennungsmodus Stift ist die Arbeitsfläche des Tabletts dem Bildschirmbereich fest zugewiesen Das Setzen des Stiftes auf einen bestimmten Punkt der Arbeitsfläche des Tabletts b...

Page 56: ... das Verhältnis der Abmessungen des aktiven Bereichs dem Verhältnis der Abmessungen des Bildschirmbereichs Default Zurücksetzung auf Voreinstellungen auf dieser Registerkarte Mouse Modus In dem Mouse Erkennungsmodus Maus wird die Arbeitsfläche des Tabletts dem Bildschirmbereich jedes Mal zugewiesen wenn der Stift über der Arbeitsfläche des Tabletts gehalten wird Die Annäherung des Stiftes an die A...

Page 57: ... einer Tastenkombination bzw einer Reihe von Tasten aus der Tastatur Die Auswahl dieser Funktion aus der Liste öffnet das Define KeyStroke Fenster Nach der Konfiguration dieser Funktion ist unter der Popup Liste der jeweiligen Taste die Bezeichnung der Tastenkombination Reihe von Tasten sichtbar die während der Konfiguration definiert wird Open Run Auswahl einer Anwendung die nach dem Drücken dies...

Page 58: ...weilige Tastenfunktion übernommen werden Define KeyStroke Fenster Das Drücken auf eine Taste oder Tastenkombination auf der Tastatur bewirkt deren Hinzufügen zur Keys Liste Möglich ist auch das Hinzufügen einer besonderen Tastenkombination mittels Add Special Liste Durch einen Klick auf OK gelangt man zum Fenster in dem die konfigurierte Tastenkombination reihe benannt werden kann Das Anklicken vo...

Page 59: ...n Funktionen je nach aktiver Anwendung Voreingestellt sind die meist benutzten Tastenkombinationen Kontextmenü der Anwendung Nachdem Sie mit der rechten Maustaste auf die Ikone der Anwendung Macro Key Manager im Infobereich neben der Systemuhr geklickt haben erscheint das Kontextmenü Nachfolgend sind einzelne Posten des Menüs beschrieben About Fenster mit Angaben über die Version der Anwendung Sof...

Page 60: ...und Wählen Sie ob die Berührung der Tablettoberfläche mit dem Stift mit einem Sound ON oder nicht OFF angezeigt werden soll Hauptfenster der Anwendung Liste der Anwendungen Wählen Sie aus der Liste eine Anwendung für die Funktionsfelder konfiguriert werden sollen New Neue Anwendung zur Liste der Anwendungen hinzufügen Delete Eine Anwendung aus der Liste der Anwendungen entfernen Entfernung der vor...

Page 61: ...ie eine Tastenkombination die simuliert werden soll wenn das gewählte Funktionsfeld angetippt wird Linking Geben Sie den Pfad für eine Datei ein die gestartet wird wenn das gewählte Funktionsfeld angetippt wird Um Verzeichnisse in der Suche nach einer Datei durchzusuchen klicken Sie die Schaltfläche an Confirm Diese Schaltfläche anklicken um Einstellungen des gewählten Funktionsfeldes zu speichern...

Page 62: ...ätigung des Funktionsfeldes aufgerufen wird falls die jeweilige Anwendung in der Liste der Anwendungen gewählt bleibt 4 Nachdem Sie die Schaltfläche angeklickt haben wird das Fenster Installed Software mit einer Liste der im Betriebssystem installierten Anwendungen eingeblendet Anwendung markieren die Sie zur Liste hinzufügen wollen und auf OK klicken um die Anwendung zu übernehmen und das Fenster...

Page 63: ......

Page 64: ...a Niniejszy produkt spełnia zasadnicze wymagania zawarte w ustawie z dnia 13 kwietnia 2007 r o kompatybilności elektromagnetycznej Dz U Nr 82 poz 556 wdrażającej postanowienia europejskiej dyrektywy nr 2004 108 WE odnoszącej się do kompatybilności elektromagnetycznej i w następstwie nosi oznakowanie CE Zgodność z zasadniczymi wymaganiami została potwierdzona certyfikatem nr 0903091E 01 wystawionym...

Reviews: