4
13
Step 1: Put 2 batteries into each of your transmit-
ters. The handheld takes 2 AA batteries and
the battery compartment can be located by
unscrewing the bottom of the handle. The
beltpack takes 2 AAA batteries and the com-
partment can be located by swinging open the
door. See diagrams on pages 11 and 12.
Step 2: Attach the two antennae to the back of your
receiver. Attach by screwing onto the receiver
in the proper location. See picture of your
receiver on pages 6-10 for help with locating
the proper location.
Step 3: Connect your sound system to your wireless
microphone system using either 1/4” or XLR
cables but not both at the same time. You will
need to attach 1 XLR cable for each transmit-
ter that you will be operating.
For all receivers (except for the PM-WP2T)
only one 1/4” cable needs to be used regard-
less of how many transmitters you are
operating as long as you do not exceed the
number of transmitters that your system can
operate at once. However, the PM-WP2T sys-
tem requires one 1/4” per transmitter used.
Note: Generally a cleaner more clear sound can
be attained by using XLR cables. We highly
recommend the use of XLR cables instead of
1/4” cables with your system.
Step 4: Plug the AC power supply into the back of
your receiver and then into an electrical outlet.
Step 5: Power on your receiver using the power
switch. Push the power button for 3 seconds.
Step 6: Power on your transmitter.
Handheld: Use the three position sliding
switch sliding it all the way to the on position.
Beltpack: Power on using the button located
on the top of the beltpack. Push power button
for 3 seconds. See diagram on page 12.
Note: The handheld has a three position switch
allowing you to mute the transmitter without
powering it off by sliding the switch to the half
way position between the power on/off posi-
tions.
Step 7: Now you must sync your transmitter and
receiver to the same frequency or chan-
nel. By using the receiver controller on your
receiver you can toggle through the various
receiver settings and choose the IR sync
mode. Some receivers may allow you to
access IR sync mode by simply hitting the
button on your receiver that says “IR” next
to the button. Set your receiver to IR sync
mode. Once your receiver is set to IR sync
Getting Started
mode you should be able to begin the process
of syncing your transmitter with your receiver.
Note: If you are going to be using more than one
transmitter at a time then each transmitter
must be set to a different frequency or chan-
nel. You can use the receiver controller to
select different frequencies (or channels)
for additional transmitters. Choose a fre-
quency or channel for a specific receiver
channel and sync the next transmitter to a
different frequency or channel than the previ-
ous transmitter(s). Refer to the page in this
manual that gives instructions for your specific
receiver for detailed instructions.
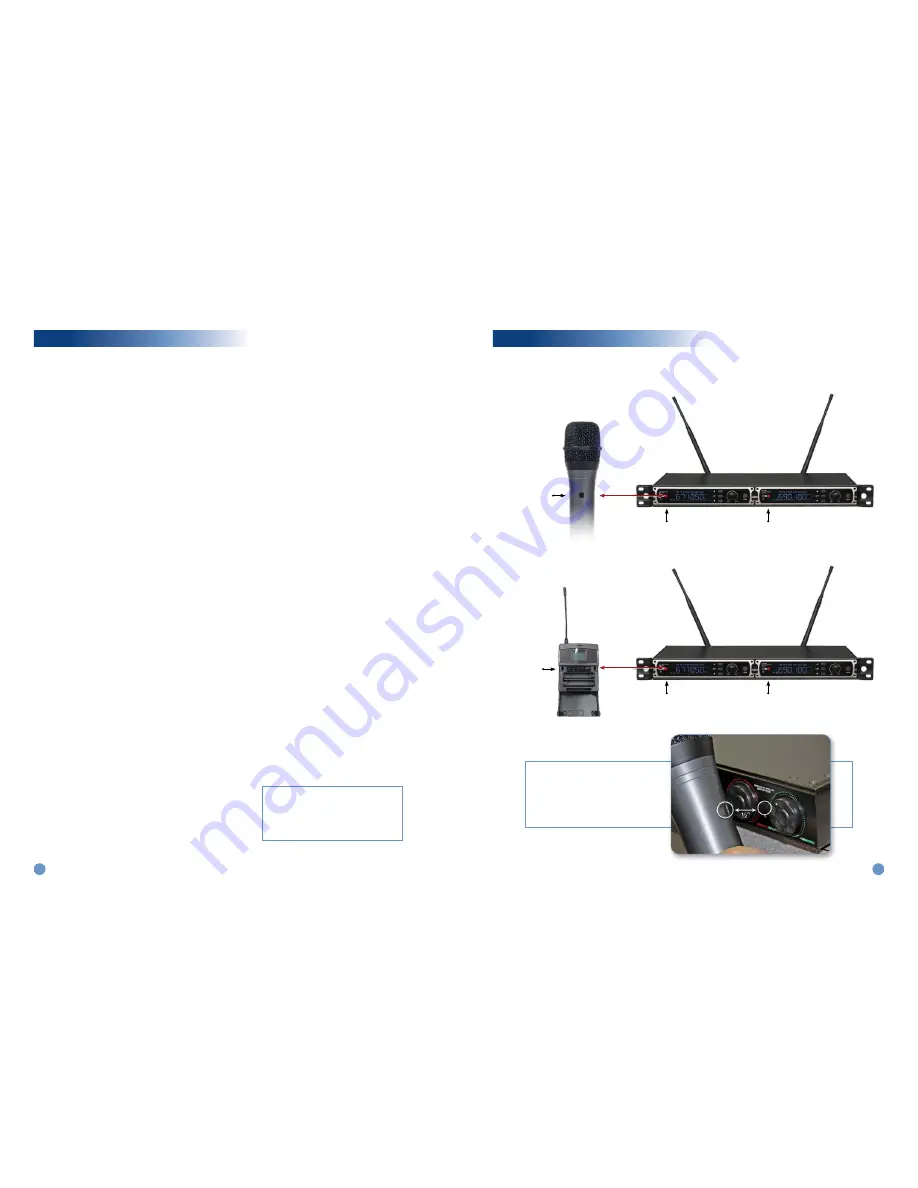
Step 8: Once the receiver is set to IR sync follow the
steps below:
Locate the IR sync window on the receiver.
Look for the letters IR on your receiver to
locate the window. Please see pictures on
pages 6-10 to help locate the IR sync window
location.
Handheld transmitter:
Point the back of your transmitter with the
small window on the back of your transmit-
ter facing toward the receiver to within about
one half inch of the IR sync window on the
receiver. Hold the handheld in this position.
When properly aligned the handheld should
automatically change frequency to match the
frequency of the receiver.
Beltpack transmitter:
Open the compartment where the batteries
are stored. Align the red IR sync window on
your beltpack to that on your receiver to auto-
matically sync the transmitter to the frequency
of the receiver.
Note: Frequency display can be found on page 11
for the handheld and page 12 for the beltpack.
Step 9: Make sure the volume knobs on your receiver
are turned up to the desired level.
Step 10: Your wireless microphone system should
now be operational as long as all your sound
equipment is set up properly as well. When
you are finished make sure to power off your
transmitter and receiver.
Ir Synching
IR Window
Location
See pages 6-10 to find the IR sync location for your specific receiver.
PM-hhP1 handheld
transmitter
IR Window on transmitter (hand-
held or beltpack) needs to be
within ½" of the IR Sync Window
on your receiver in order to synch
properly. See photo at right.
PM-WP2T Series
receiver
PM-WP2T Series
receiver
½"
½"
IR Window
Location
PM-BPP1
Beltpack
transmitter
IR Sync Window
IR Sync Window
For detailed instructions regarding
using the IR sync function of your
receiver please refer to the IR sync
instructions that follow for the specific
system that you purchased.
IR Sync Window
IR Sync Window


