


39
• Do not install Viaggio 1-2-3 Via in seats that are not in
the direction of travel or are transversal with respect to
the direction of travel.
• It is always advisable to fit the child seat on the rear
seats and on the passenger’s side.
• If the child seat is installed on the front seat, it is
advisable to place it as far as possible from the
dashboard.
• This item has a progressive serial number.
• If you experience problems during the installation of
Viaggio 1 2 3 Via, lift or remove the headrest.
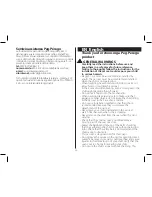
How to install the Viaggio 1-2-3 Via car
seat.
36•
Pull the yellow lever at the front of the seat base (1)
and fully eject the ISOFIX anchors (2).
37•
Secure the ISOFIX anchors in their housings until they
click; a red/green LED on the sides of the base will
indicate correct anchoring.
38•
Pull the yellow lever (1) and simultaneously push the
child seat (2) firmly against the car seat.
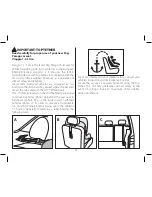
How to secure your child in the Viaggio
1-2-3 Via car seat
39•
Seat your child (fig_a) and pull the car 3-point harness
as illustrated (fig_b).
40•
Fasten the seat belt, ensuring that it clicks into place.
Position the two sections of the belt as shown in the
figure.
41•
To finish, pass the belt from the shoulder straps on the
head rest: insert the belt between the strap and head
rest (1) until is easily slides in the strap slot (2).
IMPORTANT: if the belt is loose, pull over the
strap (3). Verify that the belt is always tensioned
and untwisted.
42•
To remove the belt, remove it from the strap slot (1)
and slide it between the strap and head rest (2) until
fully removed.
How to adjust the seat and head rest
43•
the safety belts are correctly positioned if the
child’s shoulders are slightly below the intersection
point of the safety belts, as shown in the figure.
Adjust the head rest to the desired position using the rear
lever.
44•
Follow your child's growth to guarantee correct belt
passage. To further increase height, lift the backrest to the
desired position using the side buttons.
45•
The side flaps can be widened for further adjustments as
illustrated.
46•
Viaggio 1-2-3 Via reclining can be adjusted. Make sure
the belt is always correctly fastened. If the car has an
adjustable seat back, it can be reclined for maximum
Viaggio 1-2-3 Via reclining (fig_a). If the seat back cannot
be adjusted, if the car head rest interferes with the child
seat head rest, remove the car head rest (fig_b).
47•
To remove the child seat from the car seat, move the child
seat away from the car seat by pulling the lever (1) and
seat (2) simultaneously until the yellow side levers appear.
If used, release Top Tether.
48•
Once the side levers are visible, release as illustrated and
remove the child seat.
How to remove the fabric cover
The fabric seat of the Viaggio 1-2-3 Via can be removed
for cleaning.
49•
Follow the washing instructions on the seat package.
REMOVE THE LINING FROM THE HEADREST.
50•
Remove the lining from the head rest from the bottom
and then top
REMOVING THE LINING FROM THE BACKREST
51•
Remove the bottom part of the backrest lining
(fig_a) and lift the two side flaps vertically out of their
housings (fig_b). Lift the head rest for easier removal.
REMOVING THE LINING FROM THE SEAT:
52•
Unbutton the buttons on the side of the seat. Remove
the lining towards the front of the seat
Summary of Contents for VIAGGIO 1-2-3 VIVA
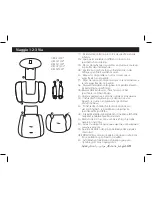
Page 2: ...PRODUCT OVER VIEW...
Page 4: ...NO NO NO UNIVERSAL CATEGORY 9 18 Kg Y ISOFIX TOP TETHER...
Page 5: ...click 4 1 2 1 3 2 1 2 UNIVERSAL CATEGORY 9 18 Kg Y ISOFIX TOP TETHER...
Page 6: ...2 1 5 6 7 8 UNIVERSAL CATEGORY 9 18 Kg Y ISOFIX TOP TETHER...
Page 7: ...A B C C 10 12 11 9 3 2 1 UNIVERSAL CATEGORY 9 18 Kg Y ISOFIX TOP TETHER...
Page 8: ...14 13 15 16 1 1 2 click UNIVERSAL CATEGORY 9 18 Kg Y ISOFIX TOP TETHER...
Page 9: ...2 1 2 1 17 19 18 20 1 2 2 UNIVERSAL CATEGORY 9 18 Kg Y ISOFIX TOP TETHER...
Page 10: ...21 2 1 22 1 2 23 24 UNIVERSAL CATEGORY 9 18 Kg Y ISOFIX TOP TETHER PRODUCT CONVERSION...
Page 11: ...2 1 25 26 27 28 PRODUCT CONVERSION...
Page 12: ...29 30 31 32 PRODUCT CONVERSION...
Page 13: ...33 34 35 1 1 PRODUCT CONVERSION...
Page 15: ...click 1 2 2 1 36 37 38 39 SEMI UNIVERSAL CATEGORY 15 36 Kg BELTED ISOFIX...
Page 16: ...2 cm 1 2 3 4 5 6 click 3 1 2 2 1 43 41 42 40 SEMI UNIVERSAL CATEGORY 15 36 Kg BELTED ISOFIX...
Page 17: ...2 cm 2 3 4 5 44 45 46 47 2 1 SEMI UNIVERSAL CATEGORY 15 36 Kg BELTED ISOFIX...
Page 18: ...48 SEMI UNIVERSAL CATEGORY 15 36 Kg BELTED ISOFIX CLEANING MAINTENANCE 50 49...
Page 19: ...CLEANING MAINTENANCE 51 52 53 54...
Page 20: ...57 56 55 CLEANING MAINTENANCE PRODUCT RE CONVERSION...
Page 21: ...58 59 60 61 PRODUCT RE CONVERSION...
Page 22: ...1 2 65 63 62 64 2 1 PRODUCT RE CONVERSION 1 2 2...
Page 23: ...PRODUCT RE CONVERSION 66 67 68 69...
Page 24: ...71 70...
Page 133: ...133 71 70 12 1 ISOFIX Top Tether B1 UN ECE R44 04 9 18 1 4 1 ISOFIX B1 Top Tether Top Tether...
Page 160: ...160 Viaggio 1 2 3 Via Viaggio 1 2 3 Via...
Page 169: ...169 _ AR Peg Perego Viaggio 2 3 Via 71 12 70...
Page 179: ......