


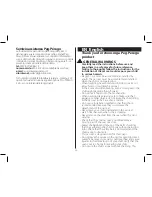


37
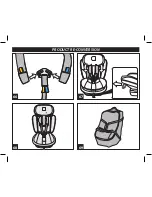
Article components
(fig. pag 2)
Inspect the content of the package and contact the
Customer Care if some items are missing.
The child car seat includes:
a) head rest
b) backrest
c) seat
d) ISOFIX anchors
e) Top Tether hook
f) shoulder pads
g) booster cushion
h) 5-point safety harness
i) ISOFIX anchor ejection lever
l) seat recliner lever
m) instruction manual compartment.
The car seat is ready for use: no assembly required.
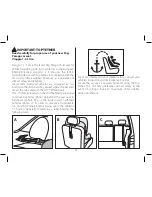
Instructions
UNIVERSAL CATEGORY ISOFIX & Top
Tether
Fastening with ISOFIX & Top Tether
1•
Pull the yellow lever at the front of the seat base (1)
and fully eject the ISOFIX anchors (2).
2•
Open the rear door and release the Top Tether hook.
3•
Lengthen the Top Tether hook according to your car
needs.
4•
Secure the ISOFIX anchors in their housings until they
click; a red/green LED on the sides of the base will
indicate correct anchoring.
5•
Pull the yellow lever (1) and simultaneously push the
child seat (2) firmly against the car seat.
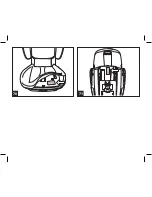
TOP TETHER HOOK
IMPORTANT: There are 3 main variations to the
Top Tether hook.
6•
Type A:
Lift the headrest and slip the straps underneath.
Fasten the TT hook of the straps to the clearly visible
vehicle hook, as shown in the figure.
Pull the strap tight and check correct tension.
7• Type B:
Lift the headrest and slip the straps underneath.
Fasten the TT hook to the vehicle anchor, placed on the
rear of the vehicle's backrest, as shown in the figure.
Tighten the belt and check belt tension is correct using
the mechanism highlighted in green.
8• Type C
:
Lift the headrest and slip the straps underneath.
Fasten the TT hook of the straps to the vehicle hook,
placed in the boot. This is generally marked by the Top
Tether symbol, as shown in the figure. Lift the cover
and fasten.
IMPORTANT: to fit the belts correctly, tighten
them firmly.
For any other fastening system, consult your vehicle's
instruction booklet.
9•
To remove the child seat from the car seat, release the
Top Tether (1); move the child seat away from the car
seat by pulling the lever (2) and seat (3) simultaneously
until the yellow side levers appear.
10•
Once the side levers are visible, release as illustrated
and remove the child seat.
How to secure your child in the Viaggio
1-2-3 Via car seat
11•
Before placing the child in the car seat, release the
harness using the red button on the crotch strap
buckle.
12•
Lift the safety belt to make room for your child.
13•
Place the child in the car seat and arrange the harness
over the child’s shoulders and waist, as shown in the
figure.
14•
Lock the harness by overlapping (1) the tongues and
inserting them into the buckle of the crotch strap (2)
until they click into place.
15•
The child is now sitting correctly with the harness
fastened properly.
16•
Finally, tighten the shoulder straps until they are snug
to the child’s body by pulling the central adjustment
strap towards you as shown in the figure, taking care
not to over-tighten the straps.
Summary of Contents for VIAGGIO 1-2-3 VIVA
Page 2: ...PRODUCT OVER VIEW...
Page 4: ...NO NO NO UNIVERSAL CATEGORY 9 18 Kg Y ISOFIX TOP TETHER...
Page 5: ...click 4 1 2 1 3 2 1 2 UNIVERSAL CATEGORY 9 18 Kg Y ISOFIX TOP TETHER...
Page 6: ...2 1 5 6 7 8 UNIVERSAL CATEGORY 9 18 Kg Y ISOFIX TOP TETHER...
Page 7: ...A B C C 10 12 11 9 3 2 1 UNIVERSAL CATEGORY 9 18 Kg Y ISOFIX TOP TETHER...
Page 8: ...14 13 15 16 1 1 2 click UNIVERSAL CATEGORY 9 18 Kg Y ISOFIX TOP TETHER...
Page 9: ...2 1 2 1 17 19 18 20 1 2 2 UNIVERSAL CATEGORY 9 18 Kg Y ISOFIX TOP TETHER...
Page 10: ...21 2 1 22 1 2 23 24 UNIVERSAL CATEGORY 9 18 Kg Y ISOFIX TOP TETHER PRODUCT CONVERSION...
Page 11: ...2 1 25 26 27 28 PRODUCT CONVERSION...
Page 12: ...29 30 31 32 PRODUCT CONVERSION...
Page 13: ...33 34 35 1 1 PRODUCT CONVERSION...
Page 15: ...click 1 2 2 1 36 37 38 39 SEMI UNIVERSAL CATEGORY 15 36 Kg BELTED ISOFIX...
Page 16: ...2 cm 1 2 3 4 5 6 click 3 1 2 2 1 43 41 42 40 SEMI UNIVERSAL CATEGORY 15 36 Kg BELTED ISOFIX...
Page 17: ...2 cm 2 3 4 5 44 45 46 47 2 1 SEMI UNIVERSAL CATEGORY 15 36 Kg BELTED ISOFIX...
Page 18: ...48 SEMI UNIVERSAL CATEGORY 15 36 Kg BELTED ISOFIX CLEANING MAINTENANCE 50 49...
Page 19: ...CLEANING MAINTENANCE 51 52 53 54...
Page 20: ...57 56 55 CLEANING MAINTENANCE PRODUCT RE CONVERSION...
Page 21: ...58 59 60 61 PRODUCT RE CONVERSION...
Page 22: ...1 2 65 63 62 64 2 1 PRODUCT RE CONVERSION 1 2 2...
Page 23: ...PRODUCT RE CONVERSION 66 67 68 69...
Page 24: ...71 70...
Page 133: ...133 71 70 12 1 ISOFIX Top Tether B1 UN ECE R44 04 9 18 1 4 1 ISOFIX B1 Top Tether Top Tether...
Page 160: ...160 Viaggio 1 2 3 Via Viaggio 1 2 3 Via...
Page 169: ...169 _ AR Peg Perego Viaggio 2 3 Via 71 12 70...
Page 179: ......