


THE VEHICLE DOES NOT WORK?
• Check that there are no disconnected cables under
the accelerator plate.
• Check the operation of the accelerator button and
replace it if necessary.
• Check that the battery is connected to the
electrical system.
THE VEHICLE LACKS POWER?
• Charge the batteries. If after charging the problem
persists, have the battery and charger checked by
an assistance centre.
PROBLEMS?
PEG PEREGO offers an after-sales customer
service, directly or through a network of
authorized assistance centres, for any repairs or
replacements and the sale of original spare parts.
To contact a service center, visit our website:
http://global.pegperego.com/toys-
site/support/
The item’s serial number must always be quoted.
See the page on spare parts to find out how to
identify the serial number.
CUSTOMER SERVICE
ASSEMBLY INSTRUCTIONS
WARNING
ASSEMBLY MUST ONLY BE CARRIED OUT BY
ADULTS. TAKE CARE WHEN REMOVING THE
VEHICLE FROM ITS PACKAGING. ALL THE
SCREWS AND SMALL PARTS ARE CONTAINED IN
A BAG INSIDE THE PACKAGING. THE BATTERY
MAY ALREADY BE FITTED INSIDE THE ITEM.
Do not use the toy if you find it damaged after
opening the packaging. Contact the shop where you
bought it or the customer support centre.
Take care in the presence of children while
assembling the toy, given the risks caused by small
parts (ingestion hazard) and the plastic bags that
contain them (choking hazard).
To assemble the toy, you will need a flat-head
screwdriver, a Phillips screwdriver, a hammer, and a
pair of pliers.
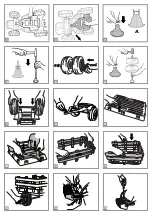
ASSEMBLY
1-2 • Unscrew and remove the bottom of the trailer
from the bottom of the tractor.
3 • Insert one of the 4 self-locking washers (the
tractor comes with 2 spare washers) into the
special tool provided with the tractor.
ATTENTION: the tabs on the self-locking washer
must be turned towards the interior of the tool
(see detail A).
4 • Remove the axle from the packing. Remove the
protective caps from the axle. Insert the axle by
pounding the special tool all the way in using a
hammer. Remove the tool.
5 • Slide the components onto the axle in the
following order: spacer washer, rim, wheel, other
wheel, rim, spacer washer.
WARNING: Make sure that the wheels are fitted
correctly, with the hub caps facing out.
6 • Place a self-locking washer in the special tool,
and insert the prepared axle, pounding it all the
way in.
7 • Attach the wheel unit to the base of the trailer
by pressing on it.
8 • Insert the red pin into the end of the trailer.
9 • Remove the 5 protective caps from the bottom
of the bed.
10 • Attach the bottom of the trailer (prepared
beforehand) to the bed by pressing, as shown in
the figure.
11 • Assemble the 3 sides of the trailer, ensuring that
the parts with the wooden effect are facing
outwards.
12 • Fit the assembled parts into the slots in the base
of the trailer.
13 • Attach the 2 hubcaps to the wheels on the
trailer (Attention, in the packaging you will find 6
hubcaps; the remaining 4 are to be attached to
the wheels of the tractor).
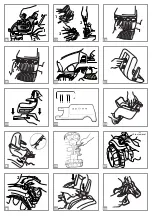
14 • Place green counterweight on the black chassis;
chassis pegs will pass through holes in
counterweight. Press lower sides of
counterweight into chassis to latch.
15 • Secure with 2 screws.
16 • Fit the 2 side inserts of the bonnet in their
respective slots in the chassis, as shown in the
figure.
17 • Install hood by inserting lower black hinged
tongue into slot on chassis. Rotate hood closed
and turn black latch with coin to secure.
18 • Press the 2 identical central headlights into place
paying attention to the 3 respective slots.
19 • Proceed to mount the remaining 2 side
headlights. Caution! The 2 headlights are not
identical: check the direction of insertion into the
slots.
20 • Press the side inserts into place on the body.
21 • Unscrew the knobs on the bottom of the seat.
22 • Line the seat up with the two holes on the seat
support.
23 • The seat can be adjusted to 2 positions to suit
the height of the child (see figure).
24 • After adjusting the seat, tighten the 2 knobs that
hold it in place.
25 • Insert front green seat support fingers into
chassis.
26 • Reposition the seat support on the body of the
tractor and tighten the 2 screws.
27 • Apply the stickers to the special areas on the
rear headlights as shown in the figure.
28 • Attach the headlights by pressing from the
bottom upwards.
29 • Install left & right black plastic covers into “C”
slots on each rear fender.
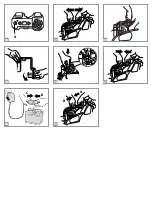
30 • Install 2 AA batteries in FM radio (through door
on back side)
31 • Attach radio to tractor; insert 2 fingers on radio
into the slots in the chassis beneath the steering
column. Secure with a screw.
32 • Press the ring nut into place under the steering
wheel and the cap.
33 • Push the steering column through the bottom of
the tractor to the upper part of the body.
34 • Hold the column in place and slip the steering
wheel onto it.
35 • Fasten the steering wheel with its screw and nut,
being careful to insert the screw into the circular
hole and to screw the nut onto the hexagonal
part.
36/7•Place exhaust stack into bracket and secure
with long screw.
38 • Attach the trailer to the tractor as follows: insert
the trailer coupling into the opening on the back
of the tractor, and rotate it (see fig. 39).
39 • Position 1: the trailer can be removed.
Position 2: the trailer is locked into place.
WARNING: The trailer will hold a load weighing
up to 10 kg.
40 • Open hood by turning black latch with 90
degrees with a coin. Rotate hood forward to
open.
41 • Connect the battery plug to the electrical
system.
42 • Close again the cab by repositioning the hook, as
done above.
FEATURES AND
INSTRUCTIONS FOR USE
43 • GEAR SHIFT LEVER. The vehicle has 3 speeds.
ATTENTION: when the vehicle is taken out of
the packing, it runs only in first gear and reverse
gear. To use the second speed, follow the
instructions in figure 44.
44 • Loosen the lock screw for the second speed (fig.
A). Turn the lock screw to the next notch (fig. B),
and tighten it. All of the gears are now ready for
use.
45 • ACCELERATOR PEDAL/ELECTRIC BRAKE.
When the foot is lifted from the accelerator
pedal, the electric brake automatically stops the
tractor.
46 • FM RADIO. To switch on, switch off and adjust
volume, turn the A button. To select the
frequency, press the 2 triangle buttons.
REPLACING THE BATTERY
PLEASE NOTE: THE PICTURES OF THE BATTERIES
ARE FOR ILLUSTRATIVE PURPOSES ONLY. YOUR
BATTERY MAY BE DIFFERENT FROM THE MODEL
SHOWN. THIS DOES NOT AFFECT THE
REPLACEMENT AND CHARGING PROCEDURES
DESCRIBED.
47 • Open the battery compartment, as shown in
before. Disconnect the battery power plugs.
48 • Unscrew the two screws of the battery holder
and remove it as shown in the figure. Extract the
battery.
49 • If you possess or have purchased a 12V/12Ah Peg
Perego battery, you should remove the plastic
filler (A) by slipping it off the battery holder.
50 • Put the new battery into place with the battery
holder, taking care to insert it sideways into the
false motors housing; fix the battery holder in
place with the two screws.
51 • Connect the battery and electrical system plugs.
Close the hood by repositioning the lock, as
shown before.
CHARGING THE BATTERY
WARNING: BATTERY CHARGING AND EVERY
OTHER OPERATION ON THE ELECTRICAL
SYSTEM MUST BE CARRIED OUT BY ADULTS
ONLY. THE BATTERY CAN ALSO BE CHARGED
WITHOUT REMOVING IT FROM THE TOY.
52 • Insert the battery charger plug in a domestic
power socket in accordance with the
instructions enclosed with it. Connect plug B
with the battery charger plug C. When the
battery is charged, remove the battery charger
from the domestic socket, then disconnect plug
C from plug B.
53 • Fully insert plug B into plug A, ensuring that they
click together. Insert the battery holder. Once
finished, always remember to close and lock the
lid of the battery compartment.