background image

PedigreeTechnologies.com   |  Support: (701)-499-0022

9

CameraView

APMM Power Module Installation 

(Cab-Mate One only) continued

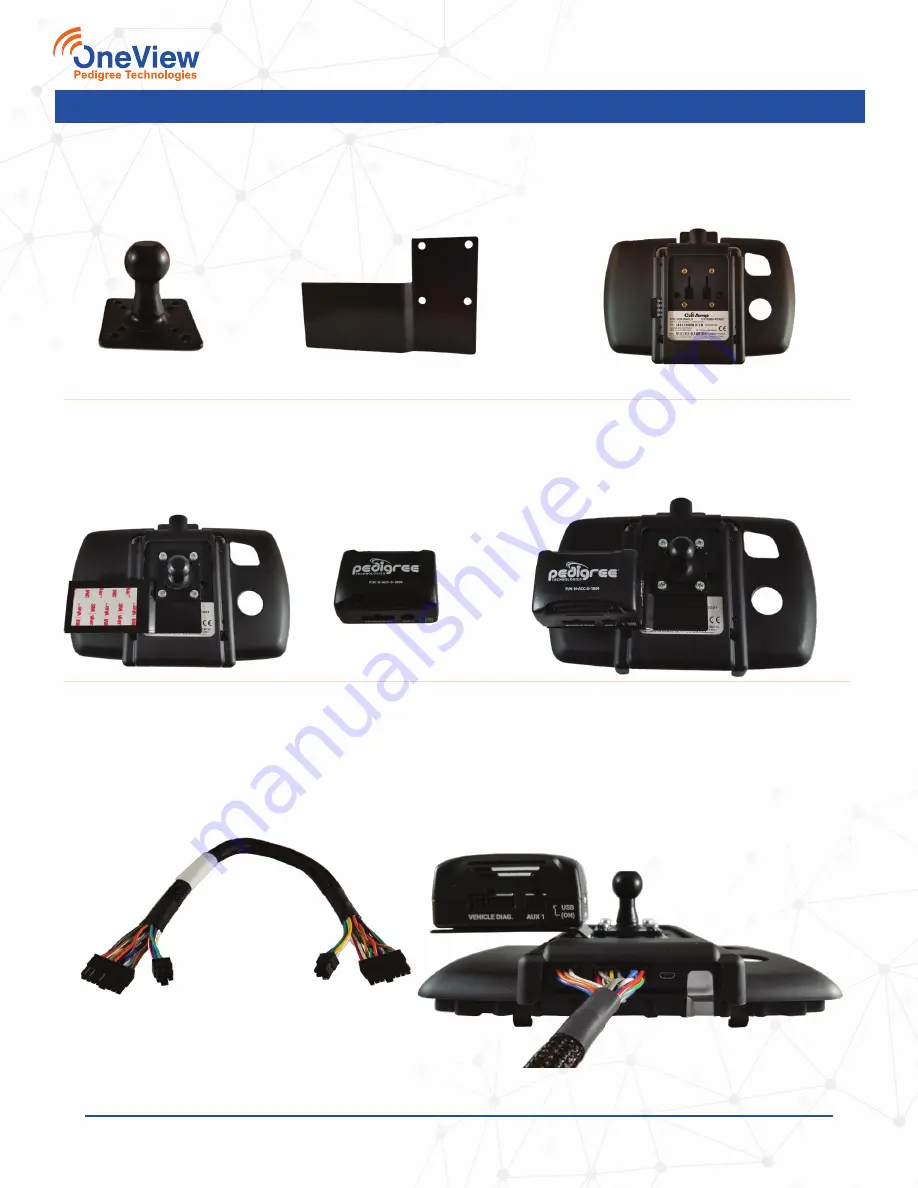
STEP FIVE

Secure the APMM bracket to the Cab-Mate One by sandwiching it between the Cab-Mate One 
and the ball mount using the supplied screw and washer pack. 

(Use the longer machine screws 

provided, paired with star washers.)

+

+

STEP SIX

Secure the APMM module to bracket using the supplied double-sided tape with the text side 
facing up as pictured below.

+

=

Ball Mount

APMM Bracket

Cab-Mate One

STEP SEVEN

Connect the 16pin and 6 pin plugs of the APMM harness to the ports on the bottom of the Cab-

Mate One. 

(For previously installed Cab-Mate One, remove 16 pin connector from bottom of Cab-

Mate One and replace with the APMM harness.)

APMM Harness

Bottom view

Summary of Contents for OneView CameraView

Page 1: ...CameraView Document ID IM xx xx Last Updated February 5 2020 Pedigree Technologies recommends using a professional installer for optimal results Please let your Pedigree Technologies representative suggest a provider if you need help with your hardware installations ...

Page 2: ... level camera during mounting Camera Power Module Before You Begin TIPS FOR PROPER CAMERA MOUNTING Ideal Location Center or as close to center as possible of the windshield Ideal Height Highest point behind a rearview mirror in the area swept by the wipers Field of View Should be clear of any occlustions EZPass rear view mirror etc Angle Camera should have a negative pitch angle it should look dow...

Page 3: ...dshield with alcohol not provided Remove all dirt oil and grime STEP THREE Remove protective plastic on the camera lens STEP FOUR Clean the lens with a soft lint free cloth not provided The lens should be free of scratches dirt and dust STEP FIVE Orient the camera to the windshield Camera should be level to the horizon line Point the lens forward with a slight downward angle so the camera picks up...

Page 4: ...installation is complete STEP THREE Connect the ground black wire to DC chassis ground It may be necessary to crimp a ring terminal to the ground wire Always connect the ground wire to an already established ground stud when possible The frame of the vehicle is an acceptable ground point if ground studs are not available The surface area must be clean and free of paint rust or anything that will c...

Page 5: ...y for switched ignition power Constant draw may drain battery while not in use Be sure to route the cable out of view as much as possible tucking it into the headliner and dash panels as needed APMM POWER MODULE see page 8 for install instructions An optional power harness is one that plugs into the Cab Mate One cradle for power Be sure to route the cable out of view as much as possible tucking it...

Page 6: ...ra Setup STEP FIVE The app will look for cameras near you and as long as there is power to your camera the app will find it It will take 30 to 60 seconds to find and connect the camera Once it connects you will see the view from the camera allowing you to adjust angle if necessary Connecting to camera automatically View from camera OPTIONAL MANUAL ENTRY OF SERIAL NUMBER If there are multiple activ...

Page 7: ...y be visible at the bottom of the screen No lighted accessories inside the vehicle should interfere with the camera including at night Horizon line is level There is nothing hindering the view of the camera Camera view is within the area covered by the wiper blades Good level horizon hood barely visible BAD MOUNTING Too much of the hood is visible The field of view is occluded Horizon is not level...

Page 8: ... NOT CONNECT DIAGNOSTIC CABLE TO CRADLE YET STEP THREE for new Cab Mate One installs Remove the ball mount from the Panavise mount With the other side the long piece locate the desired position on the dash of vehicle and secure with hardware Secure to Dash Secure to tablet in step five Panavise Mount STEP THREE for previously installed Cab Mate One Remove the ball mount from the Panavise mount and...

Page 9: ...e longer machine screws provided paired with star washers STEP SIX Secure the APMM module to bracket using the supplied double sided tape with the text side facing up as pictured below Ball Mount APMM Bracket Cab Mate One STEP SEVEN Connect the 16pin and 6 pin plugs of the APMM harness to the ports on the bottom of the Cab Mate One For previously installed Cab Mate One remove 16 pin connector from...

Page 10: ...MU DIAG ports on the top of the APMM module STEP NINE Mount the Cab Mate One APMM assembly to the dash using the Panavise ball mount not pictured STEP TEN Connect the diagnostic cable to the port on the APMM labled VEHICLE DIAG on the bottom of the APMM module STEP ELEVEN Connect the CameraView USB cable to the USB port on the side of the APMM module Top view Bottom view ...

Page 11: ... VEHICLE Start vehicle outdoors and let run for 3 5 minutes before calling Pedigre support to verify installation new Cab Mate One install only USB ON Upon proper operation and vehicle ignition the USB ON indicator light on the APMM module will turn on CAMERAVIEW ON After the APMM module turns on 30 45 seconds later the blue light on the front of the CameraView module will turn on APMM Light botto...

Reviews: