background image

3

1.1 Checking box contents

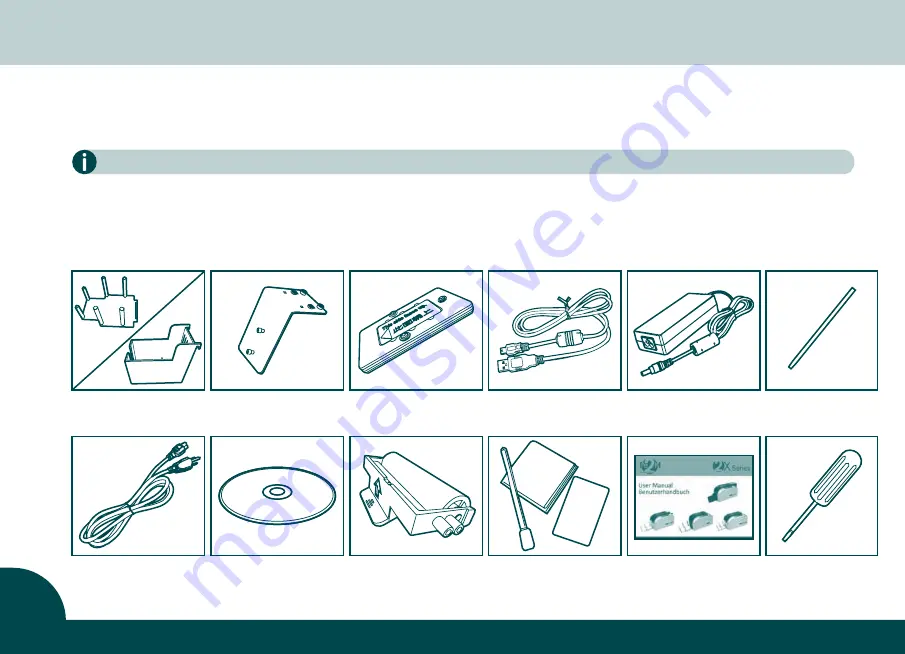
The different 2X Series Card Printers are supplied with several accessories. Please do take time to check  them closely.

The accessories contents list may vary depending on your printer type.

         If any of below item is missing, please contact your nearest customer support facility of your local card printer distributor.

Accessories provided with your 2X Series card printer:

Card output hopper

Weight module

USB cable

Power adaptor

Power cord

Master CD

Dust arrester

with cleaning roller

Cleaning kit

Card input hopper

(not with 2Xpress/2XCR100)

User manual

Crystal Rod

(not with 2Xpress)

Screw Driver

(not with 2Xpress)

Chapter 1. Getting ready

Summary of Contents for 2X Series

Page 1: ...User Manual Benutzerhandbuch XSeries ...

Page 2: ...ng geändert werden Knowing your new printer We thank you for choosing the 2X Series card printer Please ensure to use the original consumables from Pe2M Please take time to read through this carefully and complete the installation before start operating This will save you time during installation and use help you to understand more about this printer and its features Lernen Sie Ihren neuen Plastik...

Page 3: ...ing problems 18 4 5 Card jams 19 Technical Specifications 20 Hinweise Lernen Sie Ihren neuen Plastikkartendrucker kennen 01 Inhalt 02 Kapitel 1 Vorbereitung 1 1 Lieferumfang 21 1 2 Druckerbeschreibung Hauptfunktionen 22 1 3 Druckertreiber installieren 24 1 4 Druckereinstellungen 24 1 5 Einlegen des Farbbandes 25 1 6 Anschluss des Druckers 26 Kapitel 2 Drucken 2 1 Karten einlegen 27 2 2 Kartenausga...

Page 4: ...low item is missing please contact your nearest customer support facility of your local card printer distributor Accessories provided with your 2X Series card printer Card output hopper Weight module USB cable Power adaptor Power cord Master CD Dust arrester with cleaning roller Cleaning kit Card input hopper not with 2Xpress 2XCR100 User manual Crystal Rod not with 2Xpress Screw Driver not with 2...

Page 5: ...l Smart IC encoding expansion socket Optional ON OFF hard power switch button Manual releasing card jam screw socket flathead screwdriver Card output hopper 2Xpress Card output hopper 2XL XCR100 2Xtended Card input hopper 2Xpress Top cover opening lever LCM control panel 1 2 Appearance of the printer and key functions ...

Page 6: ...Thermal print head Ribbon ID key socket Card thickness adjustor Dust arrester socket Ribbon spool fitting position color coded Chapter 1 Getting ready 5 LED for print positioning 2XL and 2XCR100 ...

Page 7: ...tions From the Start button located bottom left on the Windows task bar select Printers and Faxes Select your CIAAT CTC 940 card printer and then follow by a click on right button of the mouse From the Printer menu select Printing Preference A pop up configuration screen for the card printer appears The main menu tabs include Device Option Printing Area Color Tools Heating Energy Magnetic Encoding...

Page 8: ...rinter every time the ribbon is changed a Open the top cover b Place the ribbon ID key into ID key socket c Insert the ribbon as shown Please ensure your ribbon format corresponds to the installed ribbon ID key Please make sure your ribbon film is facing top side during installation and also ensure the color of ribbon spool core is matching to the ribbon adapter holder blue to blue orange to orang...

Page 9: ...is connected into a properly protected and earthed electrical source c Switch ON from the ON OFF button to power up the printer then the LCM control panel should light up and display ready message which indicates the printer is under working condition For your own safety please make sure the power cable is always unplugged before attempting any service maintenance work USB Refer to the print drive...

Page 10: ... Please do not touch the printable surface and do not use any dusty damaged folded or embossed cards in your printer a Place card input hopper 2Xpress open card input hopper b Place the cards into card input hopper c Place the weight module upon the top laying card 2Xpress Close card input hopper a b c 9 Chapter 2 Start printing ...

Page 11: ...ng The printer has a manual adjustable card thickness mechanism which is located inside the printer unit when the top cover is open The thickness level accepts from 0 3mm to 1 0mm and the factory setting is at 0 8mm a Open the top cover b Adjust the thickness level by moving the lever from left to right to the preferred thickness setting c Close the top cover a b c Card thickness adjustor 10 ...

Page 12: ...nk some more times and then stop The position is now saved The colour of the LED displays the printing position as following 2XL Printers Blue central position with 140 mm 5 51 card length Green central position with 124 mm 4 88 card length Red bottom or top position with both card lengths 2XCR100 Printers Green central position Red bottom or top position possible printing positions on CR100 cards...

Page 13: ...st or liquids in the environment either on the print head or cards The frequency and quality of the cleaning and maintenance will not only extend the print head s life expectancy but also maintain the output printed quality Use of non Pe2M original consumables ribbons may affect the quality and reliability of print job low quality printed output and may also affect the printer s physical functions...

Page 14: ...aning card a Remove any remaining cards from input card feeder b Remove protection film from the cleaning card and then place it in the middle of the card input hopper c Go to print settings in the driver and access Printing Preference Choose tab Tools then apply Cleaning Tool a b c 13 Chapter 3 Printer maintenance ...

Page 15: ...3 4 Using dust arrester Each pack box of an 2X Series printer original consumables contains a dust arrester with cleaning roller If first to use a Take the dust arrester with cleaning roller from the accessory box of printer carton b Remove adhesive film protection from the cleaning roller and then put dust arrester into the printer If need to change cleaning roller of dust arrester new Place dust...

Page 16: ...ct to TPH with any metal sharp objects or your fingers The TPH and its components must be kept away from any discharge of static electricity In order to maintain original print out quality it is highly recommended to perform this process every time when a ribbon is changed a Lift opening lever to open cover gently The TPH is attached under the cover b Please use the sponge stick to clean the TPH ...

Page 17: ...igned to get user involvement down to a minimum level It is advised to gain some familiarity with basic warning messages knowledge during the operation 4 2 LCM control panel Basic descriptions The printer is equipped with a LCD display with four buttons to give the access to printer menu and two LED lights to show conditional status All printing status and warning error messages will be displayed ...

Page 18: ...egion code with matching printer s region code Ribbon Out Print Fail Failing to searching ribbon Fail to start printing process Reinstall the ribbon again with correct installation procedure Check the ribbon to see if it s snapped End of ribbon usage Reinstall a new ribbon with IC chip Card Out Card runs out Place more cards with card s weight module Get the setting of adjustor and card used consi...

Page 19: ...ler is clean Check the printing card is clean Check the print head Printed some small blemishes The card surface may be dirty or work on cleaning via dust arrestor Print head clogged Check the roller of dust arrester to see if there s need to replace it Printed horizontal white lines Check if ribbon is fitted correctly Check if printhead is dirty or damaged Printed vertical white lines TPH may be ...

Page 20: ...l removal Opening the top cover by force will result in severe printer damage During semi auto removal and manual removal process please do not put your hands into the card printer You can also perform the following steps to prevent card jams Do not print a card twice Check the card thickness settings is correctly adjusted from the printer driver option and thickness gauge Check the card thickness...

Page 21: ...less RFID encoding module ISO 14443A B ISO 15693 Mifare DesFire VHF Ethernet connection module General Information Card types thickness PVC cards from 0 25mm to 1 0mm 10mil 40mil Hoppers input 50 cards 0 8mm 30mil output 50 cards 0 8mm 30mil Dimensions without hoppers 197 8mm W x 354mm L x 204mm H Weight 4 9kg Connections USB port Ethernet TCP IP port as an option Ethernet 10 100 Mbps Power supply...

Page 22: ...erumfangs fehlen sollten nehmen Sie bitte umgehend Kontakt mit uns auf Zubehör das mit Ihrem 2X Series Plastikkartendrucker geliefert wird Kartenausgabemagazin Gewicht für Karteneinzug USB Kabel Netzteil 220V Power cord Treiber CD Master Reinigungsmodul mit Reinigungsrolle Reinigungs Set Kartenzuführung nicht bei 2Xpress 2XCR100 Bedienungs anlanleitung transparenter Stab nicht bei 2Xpress Schraube...

Page 23: ...naler Steckplatz für ein Chipmodul Ein Ausschalter Öffnung zur Behebung von Kartenstaus mittels Flachschlitz Schraubendreher Kartenausgabemagazin 2Xpress Kartenausgabemagazin 2XL 2XCR100 2Xtended Kartenzuführung 2Xpress Öffnungshebel der Druckerklappe LCD Kontrollanzeige Bedientasten 1 2 Druckerbeschreibung Hauptfunktionen ...

Page 24: ...hip Steckplatz für Farbband Chip Einstellhebel Kartenstärke Steckplatz für das Reinigungsmodul Aufnahmen für das Farbband farbcodiert Kapitel 1 Vorbereitung 23 LED Schalter für Druckpositionierung bei 2XL und 2XCR100 ...

Page 25: ...ter Einstellungen den Punkt Drucker und Faxgeräte wählen Klicken Sie mit der rechten Maustaste auf CIAAT CTC 940 das ist Ihr 2X Series Drucker Wählen Sie Druckeinstellungen aus Das Fenster Druckeinstellungen öffnet sich Im Hauptmenü finden Sie die Untermenüs Device Option Geräteoptionen Printing Area Druckbereich Color Farbe Tools Werkzeuge Heating Energy Drucktemperatur Magnetic Encoding Codierun...

Page 26: ... regelmäßig reinigen a Öffnen Sie die Druckerklappe b Stecken Sie den Farbband Chip in den Chip Steckplatz c Legen Sie das Farbband wie unten in Abbildung c gezeigt ein Bitte stellen Sie sicher dass Sie immer den zum Farbband passenden Farbband Chip in den Chip Steckplatz gesteckt und das Farbband richtig herum eingelegt haben und dass die Farbcodierung der Farbbandrollen mit der Farbcodierung der...

Page 27: ...ss der Netzstecker nur an eine ordnungsgemäß gesicherte und geerdete Stromquelle angeschlossen wird c Schalten Sie den Drucker ein indem Sie die Ein Austaste drücken Wenn die LCD Kontrollanzeige aufleuchtet und PRINTER READY angezeigt wird ist der Drucker einsatzbereit Zu Ihrer eigenen Sicherheit achten Sie bitte immer darauf dass das Netzkabel von der Stromquelle getrennt wird BEVOR Wartungsarbei...

Page 28: ...kationen entspricht Berühren Sie nicht die bedruckbare Oberfläche und verwenden Sie keine staubigen beschädigten geknickten oder geprägten Karten in Ihrem Drucker a Platzieren Sie die Kartenzuführung 2Xpress Öffnen Sie die Abdeckung der Kartenzuführung b Legen Sie die Karten in die Kartenzuführung c Legen Sie das Gewicht auf die Karten 2Xpress Schließen Sie die Abdeckung a b c ...

Page 29: ...ete Kartenstärke einzustellen Der abgebildete Mechanismus befindet sich nach Öffnen der Drucker klappe rechts innerhalb des Druckers und kann auf Kartenstärken von 0 30 bis 1 00 mm eingestellt werden Ab Werk ist eine Kartenstärke von 0 80 mm voreingestellt a Öffnen Sie die Druckerklappe b Stellen Sie die Kartenstärke durch Verschieben des Hebels von links nach rechts auf die gewünschte Stärke ein ...

Page 30: ...scheint und lassen die Taste unmittelbar los Die LED blinkt kurz weiter und hält dann die gewählte Farbe Die Farbe der LED zeigt dabei die gewählte Druckposition wie folgt an 2XL Drucker Blau Mittelposition bei 140 mm Kartenlänge Grün Mittelposition bei 124 mm Kartenlänge Rot Randpostion oben unten bei beiden Kartenlängen 2XCR100 Drucker Grün Mittelposition Rot Randpostion oben unten mögliche Druc...

Page 31: ...te beeinflusst Der Bediener sollte deshalb alle nötigen Vorkehrungen treffen um nur sauberes Kartenmaterial im Drucker zu verwenden Die Häufigkeit und die Sorgfältigkeit der Wartung und Pflege des Druckers verlängert nicht nur die Lebensdauer des Druckkopfes sondern sorgt auch für eine gleichbleibend hohe Druckqualität Die Verwendung von nicht originalen Pe2M Verbrauchsmaterial Farbbändern kann di...

Page 32: ...zelne Reinigungskarte a Entfernen Sie alle Karten aus dem Kartenzuführmagazin b Entfernen Sie die Schutzfolie n von der Reinigungskarte und legen Sie sie in das Kartenzuführmagazin c Gehen Sie in das Menü Treibereinstellungen und wählen Sie im Untermenü Tools dann Cleaning tool a b c Kapitel 3 Druckerwartung ...

Page 33: ...Verwendung der Reinigungsrolle Jedes Paket mit 2X Series Original Verbrauchsmaterial enthält ein Reinigungsmodul inkl Reinigungsrolle Erstmaliger Einsatz a Nehmen Sie das Reinigungsmodul inkl Reinigungsrolle aus der Zubehörbox des Druckerkartons b Entfernen Sie die Schutzfolie von der Reinigungsrolle und stecken Sie das Reinigungsmodul in den Drucker Wenn Sie nur die Reinigungsrolle tauschen wolle...

Page 34: ...t mit dem Druckkopf mittels metallischen scharfen Gegen ständen und Fingern Schützen Sie den Druckkopf vor statischen elektrischen Aufladungen Wiederholen Sie die Druckkopfreinigung regelmäßig um eine konstant gute Druckqualität sicherzustellen a Öffnen Sie die Druckerklappe Der Druckkopf ist unter der Druckerklappe befestigt b Nutzen Sie einen Reinigungsstick um den Druckkopf wie abgebildet zu re...

Page 35: ...ch wenige Meldungen auf der LCD Kontrollanzeige jederzeit den Status des Druckers erkennen und erhält alle nötigen Informationen zur Problemlösung 4 2 LCD Kontrollanzeige Bedientasten Der Drucker verfügt über eine LCD Kontrollanzeige und vier Tasten um in das interne Druckermenü zu gelangen Zwei LED Lämpchen signalisieren zusätzlich den Betriebszustand des Druckers Alle Meldungen zum Druckstatus z...

Page 36: ...nd wirklich zueinander passen Ribbon Out Print Fail Farbband nicht gefunden Fehler im Druckprozess Prüfen Sie ob Sie das Farbband richtig eingelegt haben Prüfen Sie ob Sie das Farbband richtig eingelegt haben Farbband verbraucht Legen Sie ein neues Farbband und den richtigen Farbband Chip ein Card Out keine Karte mehr auf dem Karteneinzughalter Karten auffüllen und ggf das mitgelieferte Gewicht au...

Page 37: ...zu stark verschmutzt ist und ersetzen Sie sie ggf Prüfen Sie ob die bedruckte Karte sauber war und versuchen Sie es mit einer anderen Karte Reinigen Sie den Druckkopf mit einem Reinigungsstick Druckbild mit kleinen Flecken und oder Fehlern Kartenmaterial kann verunreinigt sein ggf Reinigung durchführen ggf Reinigungsrolle erneuern Druckkopf kann verschmutzt sein ggf Reinigung durchführen Reinigung...

Page 38: ...wurfoptionen wählen Auto removal automatisch Semi auto removal halbautomatisch oder Manual removal manuelle Entnahme Das Öffnen der oberen Abdeckung mit Gewalt führt zu schweren Druckerschäden Während die Optionen Semi auto removal oder Manual removal ausgeführt werden greifen Sie bitte NICHT in den Drucker Die folgenden Maßnahmen helfen einen Kartenstau zu vermeiden Prüfen Sie die Einstellung der...

Page 39: ...u Rot Grün Silber Gold Options Easy Add Modules RFID Codiermodul für kontaktlose Chipkarten ISO 14443A B ISO 15693 Mifare DesFire VHF Ethernet Anschlussmodul Weitere Informationen Kartentyp stärke PVC Karten mit einer Stärke von 0 25 bis 1 0 mm 10 mil 40 mil Kapazität Zuführung für bis zu 50 Karten 0 8 mm Ausgabe für 50 Karten 0 8 mm Abmessungen ohne Ein Ausgabe 197 8 mm B x 354 mm L x 204 mm H Ge...

Page 40: ...Installieren Sie zuerst den Treiber und schließen Sie dann das USB Kabel des Druckers an Drucken Sie nicht zweimal mit YMCKO Farbe auf einer Kartenober fläche Das Band kann kleben bleiben reissen oder einen Karten stau verursachen Öffnen Sie die Abdeckung eines 2XL oder 2XCR100 Druckers bei Kartenstau niemals mit Gewalt Öffnen Sie sie ganz vorsichtig etwa 1 cm weit und drücken Sie dann next auf de...

Reviews: