background image

BEFORE FIRST USE 

1. Remove all packaging materials. Place the oven on a 

flat surface. 

2. Clean pans, racks and accessories with hot water, 

dishwashing liquid, and a non-abrasive sponge.  

3. Wipe the inside and outside of the appliance with a 

cloth.  

USING THE APPLIANCE  

1.

Plug the unit in. Note: The screen will display 

OFF 

when plugged in. Press the power buSon to turn on 
the oven. It will display the default seHng of French 
fry.


2.

Place the crumb tray in the boSom of the oven, 
depending on recipe place either the pan or rack in 
the oven in desired posi0on. Note: The basket must 
be placed the pan or rack never on the crumb tray. 

3.

To choose a func0on on the oven, rotate the dial to 
the desired func0on. Note: Default 0mes and 
temperatures of each func0on can be found in the 
cooking chart star0ng on page 9. 


4.

To adjust the temperature, rotate the 0me/temp 
dial. 

7

Summary of Contents for PDFM9010

Page 1: ...23L Air Oven Instruction Manual MODEL PDFM9010 1 ...

Page 2: ...WHAT S INCLUDED 2 Two Wire Racks Baking Pan Crumb Tray Air Oven Basket ...

Page 3: ...ed oven Do not place cord or oven by another hot surface as this may cause damage to the cord and oven Do not let the cord hang over the edge of a table or counter When opera0ng the oven keep at least four inches of space on all sides of the oven to allow for adequate air circula0on The unit will s0ll operate if the door is opened be sure to always cancel the cooking seHng before opening the door ...

Page 4: ...ass window on the oven during use as this will be extremely hot Also do not place utensils or anything against the glass window Do not leave the oven unaSended during use in case of fire Do not let children operate oven Do not place eyes or face in close proximity with the tempered safety glass door in the event that the safety glass breaks Cau0on should always be used when opening the oven due to ...

Page 5: ...p edges Avoid scratching door surface or nicking edges Do not use appliance for anything other than its intended use During the dehydrate func0on it is suggested to open the doors every thirty minutes to let out humidity To ensure con0nued protec0on against risk of electric shock connect to properly grounded outlets Do not use an extension cord with unit SAVE THESE INSTRUCTIONS 5 ...

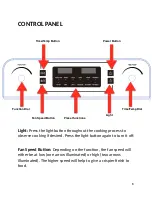
Page 6: ...t buSon again to turn it off Fan Speed BuLon Depending on the func0on the fan speed will either be at low one arrow illuminated or high two arrows illuminated The higher speed will help to give a crispier finish to food 6 Preset functions Power Button Time Temp Button Function Dial Light Time Temp Dial Fan Speed Button ...

Page 7: ... in Press the power buSon to turn on the oven It will display the default seHng of French fry 2 Place the crumb tray in the boSom of the oven depending on recipe place either the pan or rack in the oven in desired posi0on Note The basket must be placed the pan or rack never on the crumb tray 3 To choose a func0on on the oven rotate the dial to the desired func0on Note Default 0mes and temperatures...

Page 8: ...r the 0me and temperature have been confirmed press the power buSon to start the oven 7 The temperature will blink un0l it has reached the designated temperature Note The 0me and temperature can be adjusted throughout baking 8 Once the cooking 0me has elapsed the unit will beep and the screen will display OFF Note The oven will be extremely hot use cau0on 8 ...

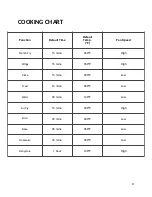
Page 9: ...eed French Fry 15 mins 450 F High Wings 15 mins 450 F High Pizza 15 mins 450 F Low Toast 15 mins 450 F Low Warm 30 mins 140 F Low Air Fry 15 mins 450 F High Broil 45 mins 450 F Low Bake 35 mins 350 F Low Rotisserie 45 mins 350 F Low Dehydrate 1 hour 140 F High ...

Page 10: ...liquid Rinse and dry thoroughly 3 Wipe the external surface of the oven with a sob damp cloth and dry surfaces with sob dry cloth Do not use detergent or abrasives as these may scratch the coa0ng Note Never immerse or place water inside the oven housing STORAGE 1 Unplug the cord 2 Make sure all parts are clean and dry 10 ...

Page 11: ...___ _________________________________ _________________________________ _________________________________ _________________________________ _________________________________ _________________________________ _________________________________ _________________________________ _________________________________ _________________________________ _________________________________ ______________________...

Page 12: ... 10 00AM 4 00PM CST or send an email to customercare alliedrich net Please provide the model number listed on the boSom of this page when contac0ng us THIS LIMITED WARRANTY COVERS UNITS PURCHASED AND USED WITHIN THE UNITED STATES AND DOES NOT COVER Damages from improper installa0on Damages in transit Defects other than manufacturing defects Damages from misuse abuse accident altera0on lack of prop...

Reviews: