background image

2. Connecting the SmartNode to the network

37

SmartNode 4300 Series User Manual 

4


• Getting Started with the SmartNode 4300 Series

2. Connecting the SmartNode to the network

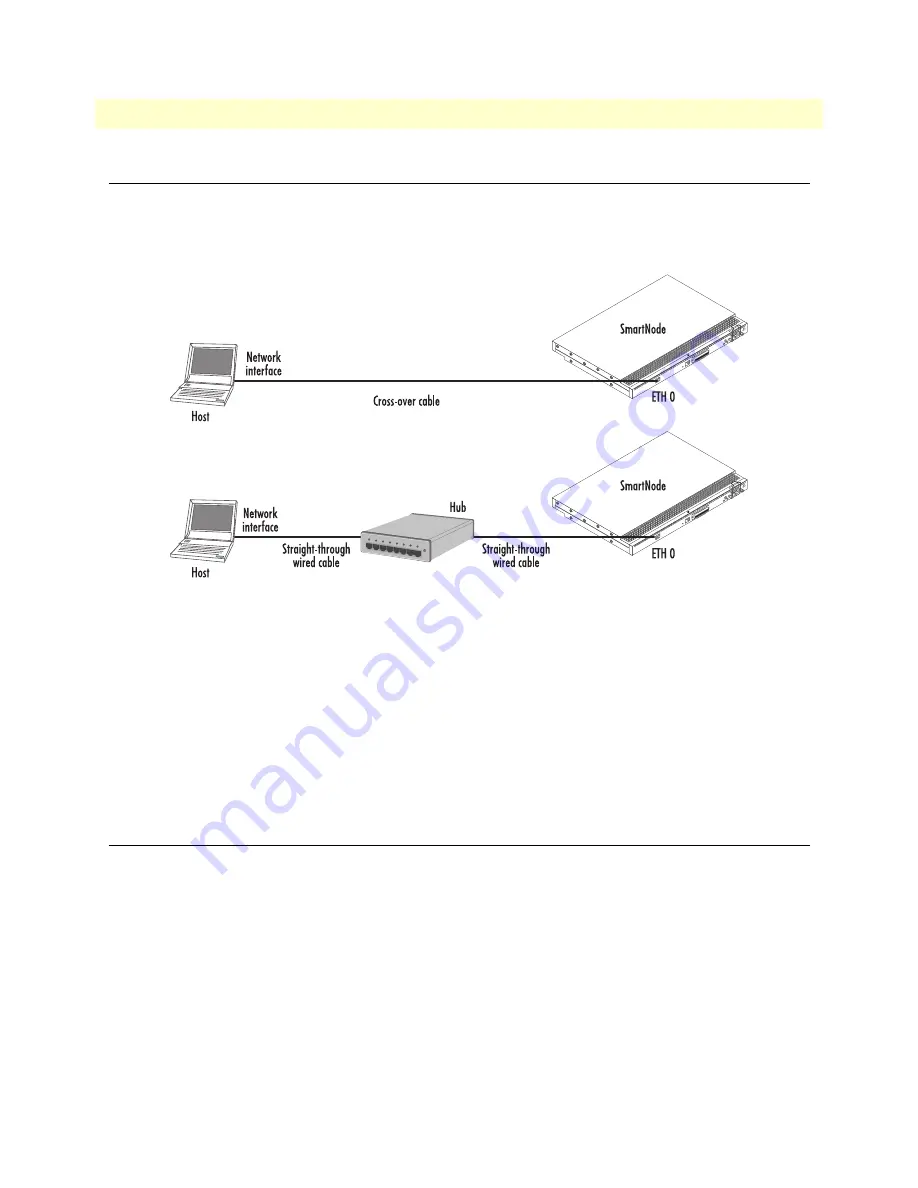
In general, the SmartNode will connect to the network via the ETH 0/0 (WAN) port. The SmartNode 4300 
Series is equipped with an Auto-MDI-X Ethernet port, so you can use a straight-through or crossover cables for 
host or hub/switch connections (see figure 14).

100-24

0V

(5

0-6

0 Hz

)

1 AM

P

UNIT EQ

UIPPED 

WIT

H DU

AL SUPPLIES

DISCONN

ECT BO

TH SU

PP

LIES

BEF

ORE SER

VICING

ET

0/

0

Co

ns

ole

Te

lco

 P

or

ts

50

Re

se

t

100

-240V

(5

0-

60 

Hz

)

AMP

UNIT EQ

UI

PP

ED 

WITH D

UAL 

SUPP

LIE

S

DISCO

NN

ECT BO

TH 

SUPP

LIES

BE

FO

RE S

ER

VICING

ET

H 0

/0

Co

ns

ole

Te

lco

 P

or

ts

50

Re

se

t

Figure 15. Connecting the SmartNode to the network

You can check the connection with the ping command from the SmartNode to another host on the network.

172.16.1.99(if-ip)[eth0]#ping <IP Address of the host>

Respectively from the host: 

ping 172.16.1.99

Note

To ping outside your local LAN, you will need to configure the default gate-
way.  (For information on configuring the default gateway, refer to section 
"Set IP addresses" in Appendix C, "Command Summary" of the SmartNode 
Series SmartWare Software Configuration Guide.)

3. Loading the configuration (optional)

Patton provides a collection of configuration templates on the support page at 

www.patton.com/smartnode

one of which may be similar enough to your application that you can use it to speed up configuring the Smart-
Node. Simply download the configuration note that matches your application to your PC. Adapt the configu-
ration as described in the configuration note to your network (remember to modify the IP address) and copy 
the modified configuration to a TFTP server. The SmartNode can now load its configuration from this server.

Note

If your application is unique and not covered by any of Patton’s configura-
tion templates, you can manually configure the SmartNode instead of load-
ing a configuration file template. In that case, refer to the 

SmartNode Series 

SmartWare Software Configuration Guide

 for information on configuring the 

SmartNode device.

Summary of Contents for SmartNode 4300

Page 1: ...a Class A device and is not intended for use in a residential environment Sales Office 1 301 975 1000 Technical Support 1 301 975 1007 E mail support patton com WWW www patton com Part Number 07MSN43...

Page 2: ...t is furnished under a license and may be used or copied only in accordance with the terms of such license For information about the license see Appendix E End user license agreement on page 61 or go...

Page 3: ...rdware installation 23 4 Getting Started with the SmartNode 4300 Series 34 5 Contacting Patton for Assistance 42 A Compliance Information 45 B Specifications 47 C Port Pin outs 53 D Factory Configurat...

Page 4: ...r panels 18 Reset button behavior 19 2 Applications Overview 20 Introduction 21 SmartNode 4300 Series applications 21 Enterprise FXS concentration and extension over IP and T1 E1 21 Bulk analog line e...

Page 5: ...ort 35 2 Connecting the SmartNode to the network 37 3 Loading the configuration optional 37 Bootloader 38 Start Bootloader 38 Start up with factory configuration 39 Load a new application image SmartW...

Page 6: ...ystem 51 Dimensions 51 Weight and power dissipation 51 Power supply 51 Universal AC version 51 DC version 51 Identification of the SmartNode devices via SNMP 52 C Port Pin outs 53 Introduction 54 Cons...

Page 7: ...application 22 7 Model SN4300 Ethernet port 29 8 Straight through RJ 45 to RJ 45 Ethernet cable diagram 29 9 Cross over RJ 45 to RJ 45 Ethernet cable diagram 29 10 DB 9 to RJ 45 cable diagram 30 11 I...

Page 8: ...nets for SN4300 26 7 Factory default IP address and network mask configuration 35 8 SmartNode weight and maximum power specifications 51 9 SmartNode Models and their Unique sysObjectID 52 10 Band mark...

Page 9: ...on page 34 describes getting started with the SmartNode IP Channel Bank Chapter 5 Contacting Patton for Assistance on page 42 contains information on contacting Patton tech nical support for assistan...

Page 10: ...TANT heading calls attention to important information CAUTION The alert symbol and CAUTION heading indicate a potential haz ard Strictly follow the instructions to avoid property damage CAUTION The sh...

Page 11: ...necting cables are rated for proper voltage current anticipated temperature flamma bility and mechanical serviceability WAN LAN PSTN ports connections may have hazardous volt ages present regardless o...

Page 12: ...t the clip to an unpainted surface of the chassis frame to safely channel unwanted ESD voltages to ground To properly guard against ESD damage and shocks the wrist strap and cord must operate effectiv...

Page 13: ...arts of commands which are related to elements already named by the user are in boldface italic font Italicized Futura type Variables for which you supply values are in italic font Futura type Indicat...

Page 14: ...eneral Information Chapter contents SmartNode 4300 Series overview 15 SmartNode 4300 Series detailed description 16 SmartNode 4300 Series front panel 17 SmartNode 4300 Series rear panels 18 Reset butt...

Page 15: ...pChannel Bank 4312 12 VoIP calls IpChannel Bank 4316 16 VoIP calls IpChannel Bank 4324 24 VoIP calls IpChannel Bank 4332 32 VoIP calls Refer to appendix B Specifications on page 47 for a complete feat...

Page 16: ...ollowing base model numbers are available SN4312 JS UI 12 FXS ports UI power supply SN4312 JO UI 12 FXO ports UI power supply SN4316 JS UI 16 FXS ports UI power supply SN4316 JO UI 16 FXO ports UI pow...

Page 17: ...he following LEDs figure 2 shows the front panel LED indicators and table 2 pro vides a description of the LED indicators behavior UNI T EQU IPP ED WIT H DUA L SUP PLI ES DIS CO NNE CT BOT H SUP PLI E...

Page 18: ...half duplex RJ 45 auto detection and auto MDI X connects the unit to an Ethernet WAN device for example a cable modem DSL modem or fiber modem Console RS 232 control port Used for service and maintena...

Page 19: ...n The SmartNode will restart with the current startup configuration To restart the unit with factory default configuration Press the Reset button for 5 seconds until the Power LED starts blinking The...

Page 20: ...Overview Chapter contents Introduction 21 SmartNode 4300 Series applications 21 Enterprise FXS concentration and extension over IP and T1 E1 21 Bulk analog line extensions 22 Legacy MTU MDU migration...

Page 21: ...s applications Like all members of the SmartNode family of VoIP solutions the SmartNode 4300 Series supports all indus try standard VoIP signaling protocols including SIP H 323 T 38 fax relay plus fax...

Page 22: ...PChannel Bank offers an ideal way for Service Providers SP to migrate their existing networks to standards based VoIP networks By using the Telco Connector port the existing closet wiring in the MTU M...

Page 23: ...Model SN4300 series IpChannel Bank 27 IpChannel Bank chassis installation 27 Connecting cables 28 Connecting the FXS FXO ports 28 Connecting the Ethernet port 29 Connecting the 10 100Base T Ethernet...

Page 24: ...up the device See table 4 for an example of installment checklist that may be necessary for a smoother installation Completing the pre installation checks enables you to install and set up your IpChan...

Page 25: ...cuments available SmartWare release build number verified Rack desktop or wall mounting of chassis completed Initial electrical connections established ASCII terminal attached to console port Cable le...

Page 26: ...esses subnets for SN4300 Port Device IP Address IP Subnet Ethernet WAN ETH 0 0 H 323 Gatekeeper if used IP address of central PSTN gateway H 323 based calls IP address of central TFTP server for confi...

Page 27: ...allation procedures Installing the IpChannel Bank Unpacking the Model SN4300 series IpChannel Bank Inspect the shipping carton for external damage Note any damage before removing the container content...

Page 28: ...ion port DCE con figured on page 30 4 Installing the power input see Connecting power on page 30 WARNING Do not work on the system or connect or disconnect cables during periods of lightning activity...

Page 29: ...for the SN4300 or for a NIC card in a workstation PC are shown in figure 7 Connect a CAT 5 cable one wired as shown in figure 8 or figure 9 between the SN4300 and the hub switch RJ 45 Jack TX Transmi...

Page 30: ...In connecting to the power source it is important to establish a good grounding connection first then the power connection This section explains Making the ground connection for either AC or DC units...

Page 31: ...ed by a circuit breaker WARNING The Model SN4300 is not shipped with power cables For AC powered units ensure that the power cable used meets all applicable standards for the country in which it is to...

Page 32: ...ter 5 Contacting Patton for Assistance on page 42 to find out how to replace it with compatible power cord 5 Connect the male end of the power cord to an appropriate power outlet 6 Verify that the gre...

Page 33: ...positive lead into the DC input of the terminal block Tighten the screw until the power lead is firmly fastened Repeat the procedure for the negative lead using the DC input of the terminal block Mak...

Page 34: ...ings 35 Connect to the RS 232 console port 35 2 Connecting the SmartNode to the network 37 3 Loading the configuration optional 37 Bootloader 38 Start Bootloader 38 Start up with factory configuration...

Page 35: ...tNode You do not have to load a con figuration file 1 Configure IP address Factory default IP settings The Ethernet interface is activated upon power up The factory default configuration for the Ether...

Page 36: ...O TH SU PP LIE S BE FO RE SE RV IC IN G ET H 0 0 Co ns ole Te lco Po rts 50 Re se t 1 Configure IP address 36 SmartNode 4300 Series User Manual 4 Getting Started with the SmartNode 4300 Series Figure...

Page 37: ...ping 172 16 1 99 Note To ping outside your local LAN you will need to configure the default gate way For information on configuring the default gateway refer to section Set IP addresses in Appendix C...

Page 38: ...nfiguration will be overwritten and lost 172 16 1 99 if ip eth0 reload Running configuration has been changed Do you want to copy the running config to the startup config Press yes to store no to drop...

Page 39: ...ed to receive the new application image mask_len is the length of the network address or the number of 1 s within the subnet mask See Note below 2 optional RedBoot ip_address g gateway Sets the IP add...

Page 40: ...ge SmartWare RedBoot ip l 172 16 40 98 19 RedBoot ip g 172 16 32 1 RedBoot ping h 172 16 32 100 Network PING from 172 16 40 98 to 172 16 32 100 PING received 10 of 10 expected RedBoot load r v h 172 1...

Page 41: ...ommand first then start the transfer from the terminal program with the command Send file via X Modem or similar 5 RedBoot fis delete n 1 Deletes the first application image Reply with y to the confir...

Page 42: ...r contents Introduction 43 Contact information 43 Warranty Service and Returned Merchandise Authorizations RMAs 43 Warranty coverage 43 Out of warranty service 44 Returns for credit 44 Return for cred...

Page 43: ...1 975 1007 Alternate Patton support for Europe Middle East and Africa EMEA Online support available at www patton inalp com E mail support e mail sent to support patton inalp com will be answered with...

Page 44: ...ll be issued upon receipt and inspection of the equipment 30 to 60 days We will add a 20 restocking charge crediting your account with 80 of the purchase price Over 60 days Products will be accepted f...

Page 45: ...liance Information Chapter contents Compliance 46 EMC compliance 46 Low Voltage Directive Safety 46 PSTN 46 Radio and TV Interference FCC Part 15 46 CE Declaration of Conformity 46 Authorized European...

Page 46: ...in a particular installation If the device does cause interference to radio or television reception which can be determined by disconnecting the unit the user is encouraged to try to correct the inter...

Page 47: ...ay support 49 Voice processing signaling dependent 49 Fax and modem support 49 Voice signaling 50 Voice routing session router 50 Management 50 Operating environment 51 Temperature 51 Humidity 51 Alti...

Page 48: ...5 connector supporting 100Base TX half full duplex operation 10Base TX half full duplex operation Auto detection and fallback Console port The RS 232 port provides for initial configuration of the Mod...

Page 49: ...IPCP Voice processing signaling dependent Voice codecs G 711 A Law Law 64 kbps G 726 ADPCM 40 32 24 16 kpbs G 723 1 5 3 or 6 3 kbps G 729ab 8 kbps Transparent pass through G 168 echo cancellation Up t...

Page 50: ...P SIPv2 RFC3261 RFC3263 SIP call transfer redirect DTMF relay Voice routing session router Local switching Interface huntgroups Routing Criteria Interface Calling called party number Time of day day o...

Page 51: ...nsions 1 75 inches 4 44 cm height standard 19 inch 48 26 cm width 12 inches 30 48 cm depth Weight and power dissipation See table 8 Table 8 SmartNode weight and maximum power specifications SmartNode...

Page 52: ...4 14 4 SN4332 JS RUI 1 3 6 1 4 1 1768 100 4 14 5 SN4312 JO RUI 1 3 6 1 4 1 1768 100 4 14 6 SN4316 JO RUI 1 3 6 1 4 1 1768 100 4 14 7 SN4324 JO RUI 1 3 6 1 4 1 1768 100 4 14 8 SN4332 JO RUI 1 3 6 1 4 1...

Page 53: ...53 Appendix C Port Pin outs Chapter contents Introduction 54 Console port 54 Ethernet 10Base T and 100Base T port 54 FXS FXO ports 55...

Page 54: ...ogether RJ 45 Jack Signal Name DB 9 Configuration settings Asynchronous data rate of 9600 bps 2 bits no parity 1 stop bit no flow control Figure 16 EIA 561 RJ 45 8 pin port Note Pins not listed are no...

Page 55: ...ed wiring key for the 64 pin RJ 21X connector Tip Ring Pair Number 64 Pin Positions Tip 1 Pair 1 33 Ring 1 1 Tip 2 Pair 2 34 Ring 2 2 Tip 3 Pair 3 35 Ring 3 3 Tip 4 Pair 4 36 Ring 4 4 Tip 5 Pair 5 37...

Page 56: ...ir 22 54 Ring 22 22 Tip 23 Pair 23 55 Ring 23 23 Tip 24 Pair 24 56 Ring 24 24 Tip 25 Pair 25 57 Ring 25 25 Tip 26 Pair 26 58 Ring 26 26 Tip 27 Pair 27 59 Ring 27 27 Tip 28 Pair 28 60 Ring 28 28 Tip 29...

Page 57: ...ir 3 28 Ring 3 3 Tip 4 Pair 4 29 Ring 4 4 Tip 5 Pair 5 30 Ring 5 5 Tip 6 Pair 6 31 Ring 6 6 Tip 7 Pair 7 32 Ring 7 7 Tip 8 Pair 8 33 Ring 8 8 Tip 9 Pair 9 34 Ring 9 9 Tip 10 Pair 10 35 Ring 10 10 Tip...

Page 58: ...9 19 Tip 20 Pair 20 45 Ring 20 20 Tip 21 Pair 21 46 Ring 21 21 Tip 22 Pair 22 47 Ring 22 22 Tip 23 Pair 23 48 Ring 23 23 Tip 24 Pair 24 49 Ring 24 24 Tip 25 Pair 25 50 Ring 25 25 Table 11 Band marked...

Page 59: ...59 Appendix D Factory Configuration Chapter contents Introduction 60...

Page 60: ...vices are as follows 4300 Series Factory configuration file sntp client sntp client server primary 129 132 2 21 port 123 version 4 system ic voice 0 low bitrate codec g729 context ip router interface...

Page 61: ...61 Appendix E End user license agreement Chapter contents End User License Agreement 62 1 Definitions 62 2 Title 62 3 Term 62 4 Grant of License 62 5 Warranty 62 6 Termination 63 7 Other licenses 63...

Page 62: ...nable and non exclusive license to the End User to use the Program s only with the Desig nated Equipment at a site owned or leased by the End User B The End User may copy licensed Program s as necessa...

Page 63: ...destroying all copies of the licensed Program s B Patton Electronics Company may terminate this Agreement should End User violate any of the provi sions of section 4 Grant of License on page 62 C Upo...

Page 64: ...64 Appendix F Installation checklist Chapter contents Introduction 65...

Page 65: ...llation checklist Task Verified by Date Network information available recorded in site log Environmental specifications verified Site power voltages verified Installation site pre power check complete...

Page 66: ...66 Appendix G Accessories Chapter contents Introduction 67...

Page 67: ...ts Table 13 Accessory cables Description Part Number 64 pin telco to open end cable 10 ft 3 048 m 64 pin FSX port 10 493264 10 50 pin telco to open end cable 20 ft 6 m 10 3096TM50 20 50 pin telco 16 e...

Reviews: