background image

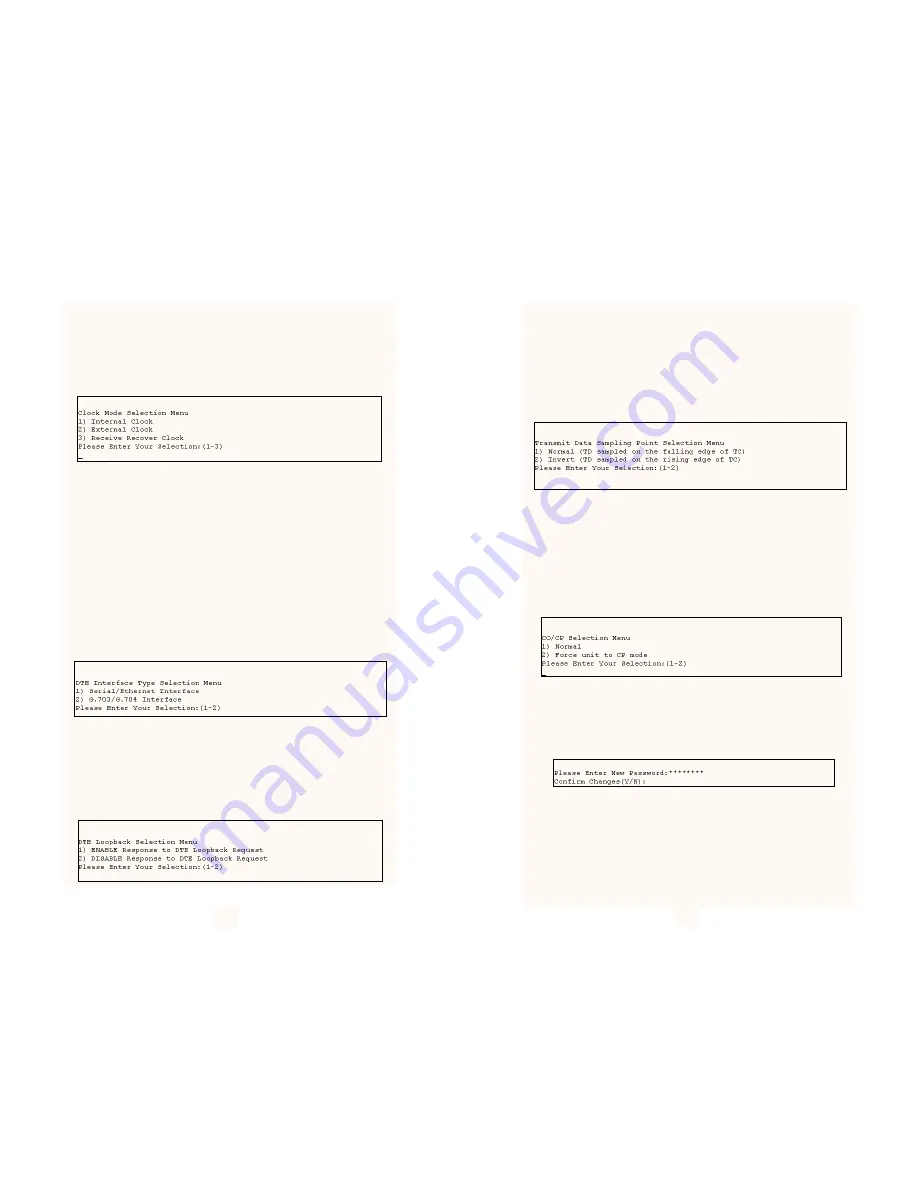
3.3.4 Option #2 Clock Mode Selection Menu

If option 2 is selected in the Software Configuration Menu, the Model
1095 will display the Clock Mode Selection Menu. This menu will allow
the user to set the clock mode for the Model 1095 stand alone unit.
After making your selection the Model 1095 will display the Software
Configuration Menu.

3.3.5 Option #3 DTE Interface Type

If option 3 is selected in the Software Configuration Menu, the Model
1095 will display the DTE Interface Type Menu. This menu allows the
user to select the type of Quick Connect Module that is installed in the
unit. By default, the Model 1095 is set for Serial/Ethernet Interface. This
selection will cover almost all of the Patton Quick Connect Modules
except the IM1/K G.703/G.704 Quick Connect Module.
If you are using this interface, and it supports n x 64K G.704 network
extension, then you should set your Interface Type for 2) G.703/G.704
Interface.

NOTE: Early versions of the Model IM1/K do not support G.704

network extension. Review your manual to be sure. If your IM1/K is
revision B or earlier, it does not support G.704 extension. Leave your
Model 1095 set for Serial/Ethernet Interface.

3.3.6 Option #4 DTE Loopback Requests

If option 4 is selected the Model 1095 will display the DTE Loopback
Request menu. This menu will allow the user to enable or disable loop-
backs from the DTE interface. The DTE Loopback Request menu is
shown in the following diagram. If the IM1/I Quick Connect Module is
installed, select 2) Disable Response to DTE Loopback Request.

3.3.7 Option #5 Transmit Data Sampling Point

If option 5 is selected the Model 1095 will display the Transmit Data
Sampling Point menu. This menu allows the user to set the sampling
point for the transmit data entering the Model 1095 from the DTE inter-
face. Under normal conditions this variable should be set to normal.
The Transmit Data Sampling Point menu is shown in the following dia-
gram.

3.3.8 Option #6 CO/CP Mode

If option 6 is selected the Model 1095 will display the CO/CP Mode
menu. This option is only needed when the Model 1095 is using the
IM1/K and it is connected to another DSL modem using the
G.703/G.704 interface module (i.e. 1088/K, 1095RC/K, 1095/K, etc). In
that particular application, both the 1095 units should be set for the
external clock mode and one unit will need to be forced into the CP
mode for the DSL line to function properly.

3.3.9 Option #7 Change Password

If option 7 is selected the Model 1095 will request a new password
from the user. After the password is entered the Model 1095 will
request that you confirm the changes.

3.3.10 Exiting the Configuration Mode

After making configuration changes, select option #9 (Exit and Save
Changes
) to implement the configuration changes. If you do not want
the configuration changes to be implemented, select option #8 (Exit
Without Saving Changes
).

13

14

Summary of Contents for NetLink 1095

Page 1: ...1095 NetLink mDSL Multi Rate Symmetric DSL Modem Part 07M1095 F Doc 033051UF Revised 06 08 00 SALES OFFICE 301 975 1000 TECHNICAL SUPPORT 301 975 1007 http www patton com C E R T I F I E D An ISO 9001...

Page 2: ...above Under no condition shall Patton Electronics be liable for any damages incurred by the use of this product These damages include but are not limited to the following lost profits lost savings an...

Page 3: ...the ability to deliver the maximum bit rate that a twisted pair line can accommodate Supporting multiple line rates from 144kbps to 2 320Mbps the NetLink provides megabyte speeds to leased line LAN to...

Page 4: ...position See Figure 2 5 Figure 2 Close Up of Configuration Switches all sets are identical in appearance Figure 1 Underside of Model 1095 Showing Location of DIP Switches Front Back On S3 S2 S1 Off 3...

Page 5: ...ositions of DIP Switch S3 Detailed descriptions of each switch follow the table Switch S3 1 DTE Rate Use Switch S3 1 through S3 6 to set the DTE bit rate S3 1 S3 2 S3 3 S3 4 S3 5 S3 6 DTE Rate kbps Of...

Page 6: ...Model 1095 To construct an RS 232 to EIA 561 patch cable refer to the control port pinout dia gram in Appendix F Refer to Appendix B to order a pre made cable 2 Power up the terminal and set its RS 2...

Page 7: ...ing up your unit to ensure security for your network After entering the correct password the Model 1095 will display the Software Configuration Menu described below 3 3 2 Software Configuration Menu W...

Page 8: ...disable loop backs from the DTE interface The DTE Loopback Request menu is shown in the following diagram If the IM1 I Quick Connect Module is installed select 2 Disable Response to DTE Loopback Requ...

Page 9: ...ed system using the Model 1001MC and 1095RC cards installed in Patton s 2U rack system In this application the system administrator can configure the entire rack through the Network Management Station...

Page 10: ...p with the socket inside the chassis 4 With the card edge contacts aligned with the socket firmly seat the module by using your thumbs to apply pressure directly to the right and left edges of the mod...

Page 11: ...ranging from 100 to 253 VAC with no re configuration necessary see Appendix B for available domestic and international power cords DC Power Supply option Model 1095 DC operates in 48 VDC environments...

Page 12: ...l Port Local Normal Remote 511E Normal 511 Figure 6 Model 1095 Front Panel NetLinkTM mDSL Model 1095 High Speed Modem 21 22 ER blinks ON OFF after a 511 511E test has timed out See Section 5 3 3 Test...

Page 13: ...rds the local DTE In a Remote Loop the data is looped back to the line but it is also allowed to pass through to the framer and to the remote DTE 23 24 Restart Procedure The restart procedure is in pl...

Page 14: ...In the second path data presented at the far end DTE will be transmitted to the local DTE and then looped back within the local DTE Loop Control block with the Processor After the Local Loop is desel...

Page 15: ...Framer Line 27 28 Remote Digital The Remote Loop uses the EOC channel an Loop out of band signaling channel to establish the remote link Upon the RDL switch being thrown or DTE initiation a RDL_ON Req...

Page 16: ...Mode it is possible to 511 511E Pattern turn on the 511 511E pattern generators on Generators both ends of the link Once a 511 511E pattern is selected on one end of the link the pattern generator wil...

Page 17: ...ne to the other Model 1095 While one operator initiates test the other monitors for errors 31 32 APPENDIX A PATTON ELECTRONICS MODEL 1095 SPECIFICATIONS Transmission Format Synchronous Transmission Li...

Page 18: ...07M1090SVC 1090 Series Service Manual 12F 561 DB 25 to EIA 561 12M 561 DB 25 to EIA 561 33 34 APPENDIX C PATTON ELECTRONICS MODEL 1095 INTERFACE PIN ASSIGNMENT RS 232 RS 530 Interface Pin Description...

Page 19: ...4 42980 8 1 13 2 55260 10 4 17 0 64470 12 2 19 8 70610 13 4 21 7 90784 17 2 27 9 272 192 256 20300 3 8 6 2 30600 5 8 9 4 42840 8 1 13 2 55080 10 4 16 9 61200 11 6 18 8 70380 13 3 21 7 90488 17 1 27 8...

Page 20: ...DTE Connected With DTE Connected Mark O O G G G off off off O O G G G off off off Space G G G G G off off off G G G G G off off off Data GO GO G G G off off off GO GO G G G off off off Link Brk DSL L...

Reviews: