background image

4.0  INSTALLATION

Once the Model 1184 or 1185 is properly configured, it is ready to

connect to the fiber interface, to the serial port, and to the power
source.  This section tells you how to make these connections.  

4.1  CONNECTION TO THE FIBER INTERFACE

The Model 1184 supports communication between two terminal

equipment at distances to 3 miles (4.8km) and data rates to 128 kbps
(sync) or 19.4  kbps (async).   Model 1185 also supports distances up
to 3 miles (4.8km), but at rates up to 256 kbps (sync) or 38.4 (async).
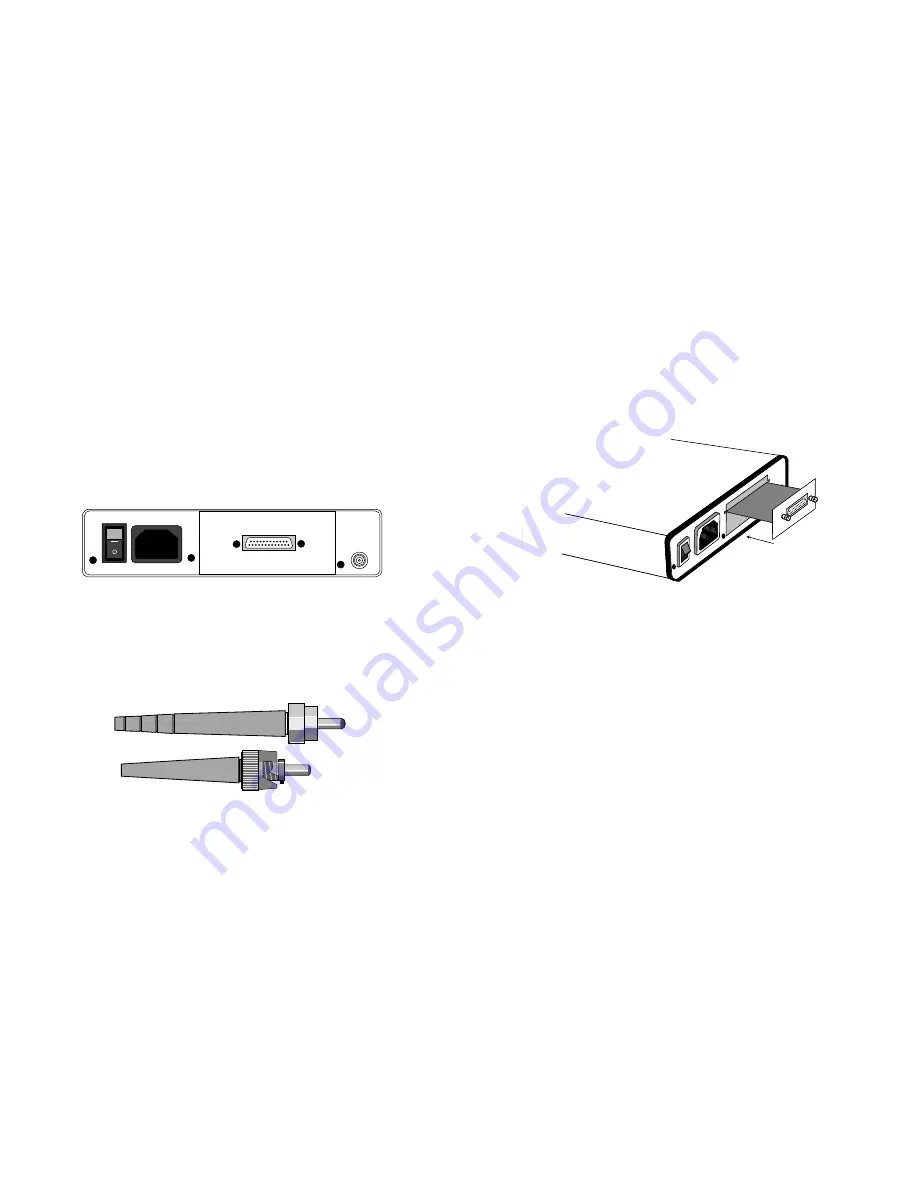
Figure 3 shows the position of the interface connectors on the Model
1184 or 1185 back panel.

These short range modems are designed to work in pairs.  You will

need one at each end of single 50 or 62.5 micron multi-mode fiber
cable.  The fiber cable connects to each Model 1184 or 1185 using
either an ST or an SMA connector.  Figure 4 below shows a close-up of
both connector types. 

9

4.2   CONNECTION TO THE SERIAL PORT 

The serial port interface on the Model 1184 and 1185 uses

interchangeable QuickConnect™ Modules.   Each QuickConnect™
Module has a 50-pin card edge connector on one side and a serial port
interface on the other.  Figure 2  below shows how a QuickConnect™
Module plugs into the back of the Model 1184/1185. 

4.2.1   Changing QuickConnect™ Modules

When you purchase a particular version of the Model 1184 or

1185, it should be shipped to you with the appropriate QuickConnect™
Module already installed.  If you need to install a different
QuickConnect™ Module, follow these steps:

Removing the Existing QuickConnect™ Module 

1)  Turn the power switch off.  Leave the power cord plugged into a

grounded outlet to keep the unit grounded.

2)  Loosen the two thumbscrews on the module by turning them

counterclockwise.

3)  Grasp the two thumbscrews and gently pull the module from

the unit.  Apply equal force to the thumbscrews to keep the
module straight during the removal process.

10

0 OFF

1 ON

Line

Interface Port

Figure 5. Installation of Model 1184/1185 Plug-in Serial Interface Module

ST

SMA

Figure 4.

Close-up of ST and SMA Connectors

Figure 3. Rear Panel of Model 1184/1185, Showing Interface and Power Connectors

Line

1 On

0 Off

Interface Port

Quik-Connect
Interface Module

Fiber

Summary of Contents for Kilolight 1184

Page 1: ...UAL MODEL 1184 MODEL 1185 Kilolight Single Fiber Modems SALES OFFICE 301 975 1000 TECHNICAL SUPPORT 301 975 1007 http www patton com Part 07M1185 C Doc 035011U C Revised 08 16 99 An ISO 9001 Certified...

Page 2: ...lly disclaims all other warranties expressed or implied and the installation or use of this product shall be deemed an acceptance of these terms by the user 1 1 RADIO AND TV INTERFERENCE The Model 118...

Page 3: ...ptic cable Point to point distances up to 3 miles Internal external or receive recovered clocking options Field Replaceable DTE DCE QuickConnect interface modules V 24 RS 232 V 35 RS 422 530 X 21 and...

Page 4: ...itch package that allows configuration to a wide range of applications These switches are located on the bottom side of the PC board Figure 1 shows the switch locations with respect to the other compo...

Page 5: ...d from terminal interface Off Off Received Recover Transmit clock derived from the received line signal NOTE Because communication between two Model 1185s is always synchronous you must set these swit...

Page 6: ...ngeable QuickConnect Modules Each QuickConnect Module has a 50 pin card edge connector on one side and a serial port interface on the other Figure 2 below shows how a QuickConnect Module plugs into th...

Page 7: ...between manufacturers If you have any questions about a specific application contact Patton Technical Support at 301 975 1007 support patton com or at http www patton com 11 4 2 4 Re configuring the...

Page 8: ...en indicates that the remote modem s carrier is being received DTR Glows green to indicate that the Data Terminal Ready signal from the terminal is active ER Glows red to indicate the likelihood of a...

Page 9: ...pment is operating properly and can be used for a test If a fault is indicated call a technician or replace the unit 3 Perform a BER bit error rate test on each unit using a separate BER tester If the...

Page 10: ...V 35 X 21 Ethernet Bridge and G 703 Power 115 230 VAC switch selectable 50 60 Hz 5 Watts 85V 256 VAC 50 60 Hz universal input option 48 VDC option 5 Watts Regulatory FCC part 15 Class A Compliance UL...

Page 11: ...est Control B APPENDIX C cont RS 232 RS 530 and V 35 Interface Pin Description DB 25 Female Connector Pin Signal 1 FG Frame Ground 2 TD Transmit Data 3 RD Receive Data 4 RTS Request to Send 5 CTS Clea...

Page 12: ...ming A 7 BT Byte Timing A 8 SGND Signal Ground 9 T Transmit Data B 10 C Control B 11 R Receive Data B 12 I Indication B 13 S Signal Element Timing B 14 BT Byte Timing B 21 22 APPENDIX C cont G 703 Int...

Reviews: