SCHEMA
DESCRIPTION
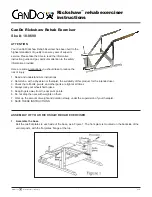
1 handle
2 handle adjusting lever
3 handle adjusting safety pin
4 Backrest frame
5 Backrest
6 cross-frame
7 safety belt
8 seat frame
9 parking brake
10 rear wheel
11 back safety crossbar
12 transport safety-catch
13 seat reinforcement
14 seat crossbar
15 seat safety pin
6
16 footrest adjusting lever
17 front wheel
18 calf rest
19 footrest safety
20 footrest
21 arrestment device spring
22 seat
23 extension seat adjustment
24 side frame
25 side frame cover
26 backrest height extension
27 frame
28 seat clip reinforcement
26
7
24
20
23
22
28
21
25
15
9
8
16
6
5
4
3
2
1
17
18
19 14
13
12
11
10
27
OPERATING INSTRUCTION
Opening the buggy:
stand buggy on wheels, unlock storage clip, grasp one handle and push down on the opposite seat tube.
Press down firmly on seat tubes to ensure the buggy is completely opened. Use foot to lock the rear brace
into a straight position. Wrap the armrest padding around the armrests. Mount the footrest on the buggy.
(Lock the seat brace - size - 38)
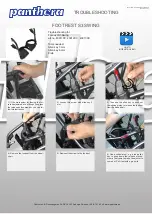
Footrest:
install
- put on the floor almost decomposed braked stroller and release both safety levers. Take the
footrest, press spring button placed at the rear top of the tube and pull both tubes into the both footrest
attachments until they are locked in the lowest position by the rear spring button.
height adjustment - release both safety levers, pull both spring buttons of the footrest and adjust it into
desired position. Tighten both safety levers to secure the footrest in position.
uninstall
- put on the floor almost decomposed braked stroller. Place the footrest into its lowest position,
press the rear spring buttons and pull out the footrests both side tubes at the same time.
Seat depth adjustment:
the seat should support the tights on their whole length. To change the seat depth undo the velcro panel
connecting the seat and backrest and partially fold the buggy to relieve fabric tension. Grasp end of seat
tube, press seat spring button and move seat tube until spring button relocates into the desired hole. Repeat
for other side of seat. Fully open the buggy and fasten the velcro panel connecting the seat and backrest.
Backrest and handles height adjustment:
undo the velcro straps of the backrest extension and partially fold the buggy to relieve fabric tension. Grasp
the handle, release handle safety lever, pull out the handle quick release, move the handle until it relocates
into desired position. Release the handle quick release by moving the handle. Tighten the handle safety
lever. Repeat for other handle and fully open the buggy. Fasten all velcro straps of the backrest extension.
Brakes:
lock
- pull the brake lever down to lock the wheel
unlock
- pull the brake lever up to unlock the wheel
Five-point belt:
release all plastic quick fasteners (fork type), place the child into the buggy and adjust of desired lengths
the belt. Choose the hole in backrest to adjust the proper position of the shoulders straps. The hole should
be level with or higher than the top of the shoulders. The shoulders straps must be mounted on backrest
and backrest extension at once when possible.
Getting into the Buggy:
ensure the parking brakes are on, to make access easier, the footrest can be taken off; if possible, place the
back of the buggy against a wall or immovable object (alternatively, another helper may hold the buggy
steady); place child carefully into the buggy, fasten safety belt and fit the footrest. The child must always
feel comfortable.
Getting out the Buggy:
ensure the parking brakes are on; if possible, place the back of the buggy against a wall or immovable
object (alternatively, another helper may hold the pushchair steady); unfasten safety belt and lift the child
carefully.
Negotiating the Kerb or Single Step:
down
- take the rear wheels to the edge of the kerb, hold the handles firmly and tip the buggy slightly
backwards. Balance on the rear wheels, lower the buggy down the kerb on its rear wheels. Never tip the
buggy forward at a kerb.
up
- take the rear wheels to the kerb. With a firm grip on the handles, tip the buggy backwards and place
the rear wheels on top of the kerb. Position the front wheels at the kerb bottom and lift to the upper level.
Negotiating Steps:
−
make use of ramps and lifts when they are available
−
where possible steps should be avoided, if there is no alternative to negotiating steps then ensure at least
one helper is available to give assistance
−
do not attempt to take the buggy up or down a flight of steps unless you and your helper are sure you
have control of the buggy and can take the weight of its occupant
−
during this operation, the attendant and helper must be well balanced and have secure grip on the buggy
3