


C h e m i s t r y M u l t i M e a s u r e S e n s o r
Sp e c if ic a t i o n s
10
012-09523B
Appendix C: SPARK SLS Calibration
For a two-point calibration of the pH Probe, you will need two “known stan-
dards,” such as two buffer solutions of pH 4 and pH 7. If the sensor is con-
nected to a SPARK SLS interface used as a standalone data-logger, start the
interface.
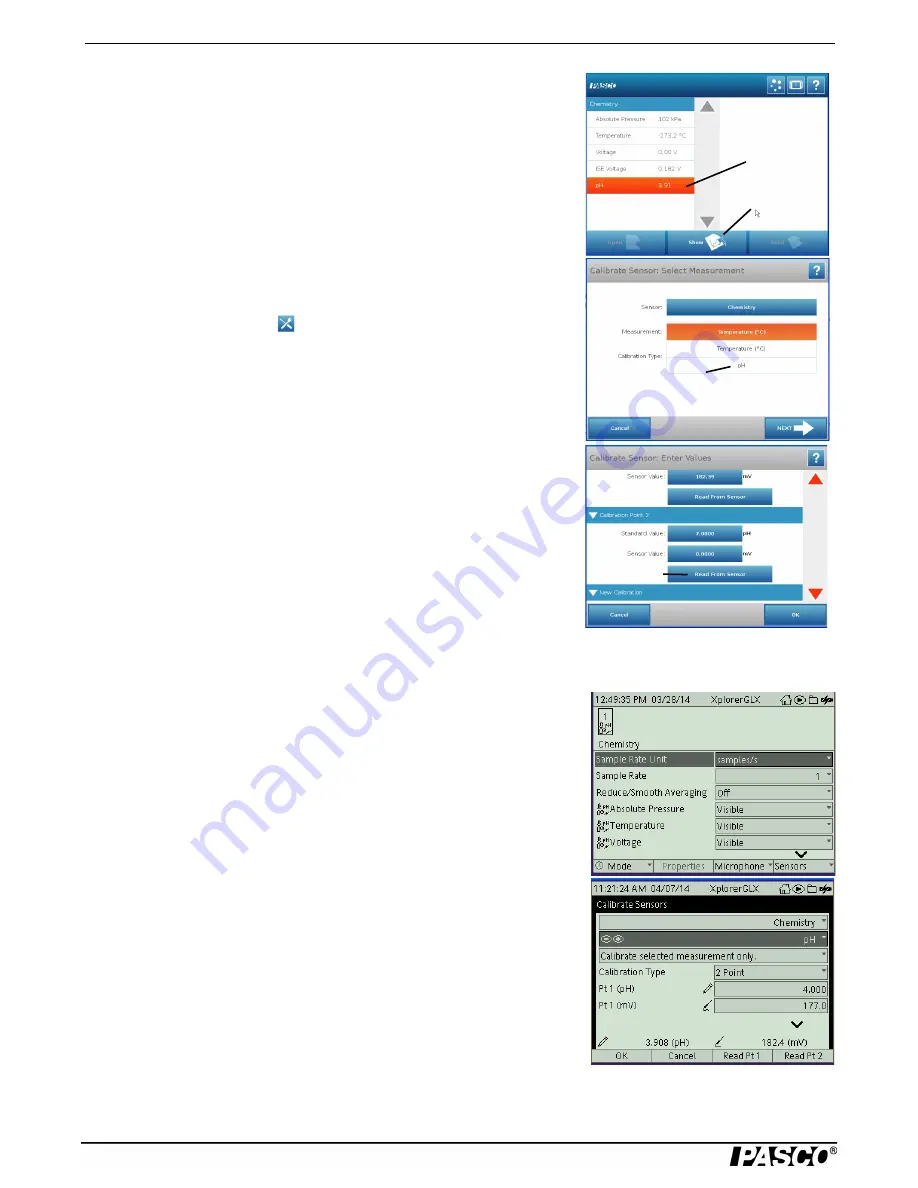
After startup, the SPARK SLS screen will show the list of measurements for
the Chemistry Sensor.
1.
For this example, touch “pH” and then touch “Show”.
•
The screen will show a Graph display of ‘pH” and Time.
2.
Touch “Experiment Tools” (
) to open the Experiment Tools screen.
3.
In the Experiment Tools screen, touch “Calibrate Sensor” to open the Cali-
brate Sensor screen. The screen shows the Sensor (Chemistry), the Measure-
ment (the default is “Temperature”), and the Calibration Type (2 point
(Adjust Slope and Offset)). Touch “Temperature” and then touch “pH” from
the menu to change the Measurement. Touch “Next
to open the “Calibrate Sensor: Enter Values” screen.
4.
For Calibration Point 1, place the sensor’s probe into the first “known stan-
dard”, such as the pH 4 buffer solution. Wait a few moments and then touch
“Read From Sensor”. Carefully rinse the probe in distilled water.
5.
For Calibration Point 2, touch the down arrow () to scroll down to the bottom
of the screen. Place the probe’s sensor into the second “known standard”,
such as the pH 7 buffer solution. Wait a few moments and then touch “Read
From Sensor”. Rinse the probe in distilled water.
6.
Click “OK” until the screen of the Graph display returns.
Appendix D: Xplorer GLX Calibration
For a two-point calibration of the pH Probe, you will need two “known stan-
dards,” such as two buffer solutions of pH 4 and pH 7.
If you are using the Chemistry Sensor with the Xplorer GLX in standalone
mode, connect the sensor to one of the ports on the top of the Xplorer GLX and
turn the interface on.
•
Optional: Go to the Home Screen (
h
), Press F4 (
I
) to go to the Sensors
screen. Use the down arrow (
d
) and the “Check” button (
c
) to change the
visibility of the measurements as needed.
1.
Press F4 (
I
) again to open the Sensors menu. Use the down arrow (
d
) to
select “Calibrate” and press “Check” (
c
).
2.
The Calibrate Sensors screen shows the sensor (Chemistry) and the default
Measurement (Temperature (°C)). Use the down arrow ()
d
to select “Tem-
perature”. Press “Check” (
c
) to change the measurement to “pH”. The Cali-
bration Type should be “2 Point”. (If not, use the down arrow to highlight
“Calibration Type” and press “Check” (
c
) to select “2 Point” from the
menu.)
Touch here.
Next, touch
here.
Touch here.
Touch here.


