


3. The graph will auto-populate with the measurement you
selected on the y-axis (or y-axes if you selected multiple
measurements) and time on the x-axis. If this is not
appropriate for your experiment, click the name of the
measurement you wish to change and select the
appropriate measurement from the list.
4. Click Start
when you are ready to begin collecting data.
Changing the sample rate
The sample rate for the Motion Sensor II can be adjusted in
Capstone or SPARKvue using the following steps:
•
SPARKvue: From the Experiment Screen, click
Sampling Options
in the bottom left corner, then select
Motion Sensor as the sensor and adjust the sample rate
using the left and right arrow buttons.
•
PASCO Capstone: In the Sample Rate selection of
the Controls palette, select Motion Sensor as the active
sensor, then adjust the sample rate using the up and down
arrow buttons.
The normal range of sampling rates is between 1 Hz and 50 Hz.
At the default rate, the Motion Sensor can measure distance up
to 8 m. This maximum distance decreases with increasing
sample rate:
• At 100 Hz, the maximum distance will be 1.72 m.
• At 200 Hz, the maximum distance will be 0.86 m.
• At 250 Hz, the maximum distance will be 0.69 m.
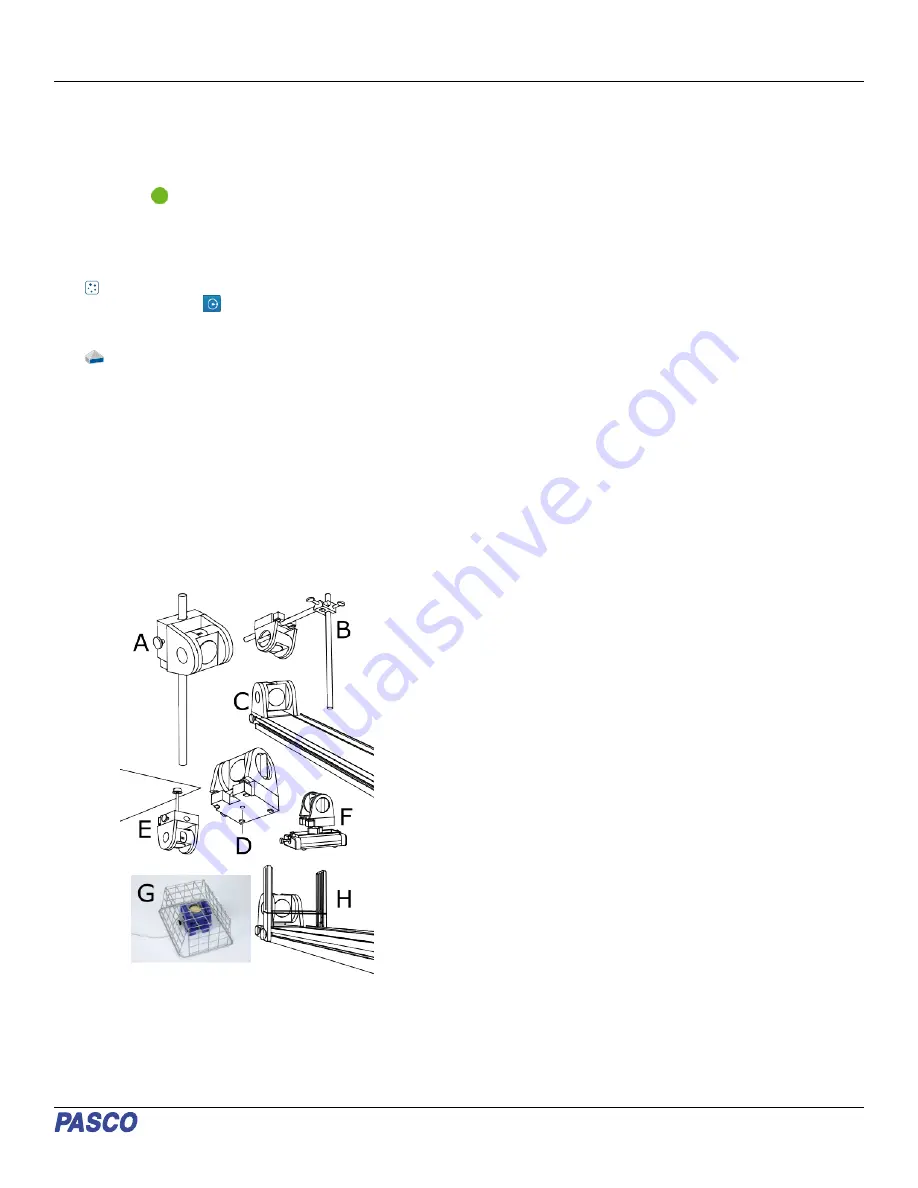
Equipment mounting
Figure 1. A variety of options for mounting the Motion Sensor II
As illustrated in Figure 1, the Motion Sensor II can be mounted
on a vertical rod (A) or a horizontal rod (B).
Integrated clips allow the sensor to be attached to the end of a
dynamics track (C).
The bottom of this unit includes a threaded hole (D). This hole
allows the sensor to be attached to the PS-2546 Motion Sensor
Bracket (E), the ME-6743 Cart Adapter (F), and other 1/4-20
threaded mounting devices, such as a camera tripod.
To protect the Motion Sensor II from being hit by an object, use a
device such as the SE-7256 Motion Sensor Guard (G) or the
ME-9806 Photogate Brackets with a rubber band stretched
between them (H). The sensor is able to "see through" a wire
screen or rubber band placed close to the transducer.
Troubleshooting
If the Motion Sensor II fails to perform satisfactorily, try these
steps:
• Ensure that the target object is no closer than 15 cm.
• Switch the range switch to the other setting.
• Adjust the aim left, right, up, or down. In certain cases, the
Motion Sensor II works best when it is aimed slightly above
or to the side of the target in order to exclude interfering
objects.
• Improve the target by adding a larger or harder surface to
better reflect ultrasound. A small object can be a better
reflector than a large object if it has a harder surface.
• Remove interfering objects near the target object or sensor.
• Increase or decrease the sample rate.
Theory of Operation
The Motion Sensor II uses an electrostatic transducer as both a
speaker and a microphone. When triggered by the interface, the
transducer transmits a burst of 16 ultrasonic pulses with a
frequency of about 49 kHz. This burst of pulses can be heard as
a single click. The ultrasonic pulses reflect off an object and
return to the sensor. The target indicator on the sensor flashes
when the transducer detects an echo.
Sound intensity decreases with distance; to compensate, the
sensor increases the gain of the receiver amplifier as it waits for
the echo. The increased gain allows the sensor to detect an
object up to 8 m away under ideal conditions. The lower gain at
the beginning of the cycle reduces the circuit’s sensitivity to
echoes from false targets.
The interface measures the time between the rising edge of the
trigger and the rising edge of the echo. PASCO Capstone or
SPARKvue uses this time and the speed of sound to calculate
the distance to the object. To determine velocity, the software
uses consecutive position measurements to calculate the rate of
change of position. Similarly, it determines acceleration using
consecutive velocity measurements.
Product Guide | 012-09624C
3


