


Connect to the software
Once you have connected the Motion Sensor II to the
ScienceWorkshop-compatible interface, follow the steps below
to connect the sensor to the software.
PASCO Capstone
1. Turn on the interface. Connect the interface to a computer if
required.
2. Launch PASCO Capstone, then click Hardware Setup
from the Tools palette. Capstone should automatically
recognize and connect to the interface.
3. On the image of the interface in Hardware Setup, click the
yellow circle over the Digital Input port that the Motion
Sensor II is connected to, then select Motion Sensor from
the list of sensors.
SPARKvue
1. Turn on the interface. Connect the interface to a computer if
required.
2. Launch SPARKvue, then click Data Summary from the
main menu. SPARKvue should automatically recognize and
connect to the interface.
3. From the Select Measurements for Templates menu,
click the Select sensor or timer
icon next to the name
of the digital channel to which the Motion Sensor II is
connected.
4. From the Assign Digital Channels menu, click Sensors,
then select Motion Sensor and click OK.
Data collection
Aiming the Motion Sensor II at an object
1. Set the range switch to either short range (represented by
the shorter wave icon) or long range (represented by the
longer wave icon).
- Select short range for measuring a cart on a track.
- Select long range for tracking most other objects.
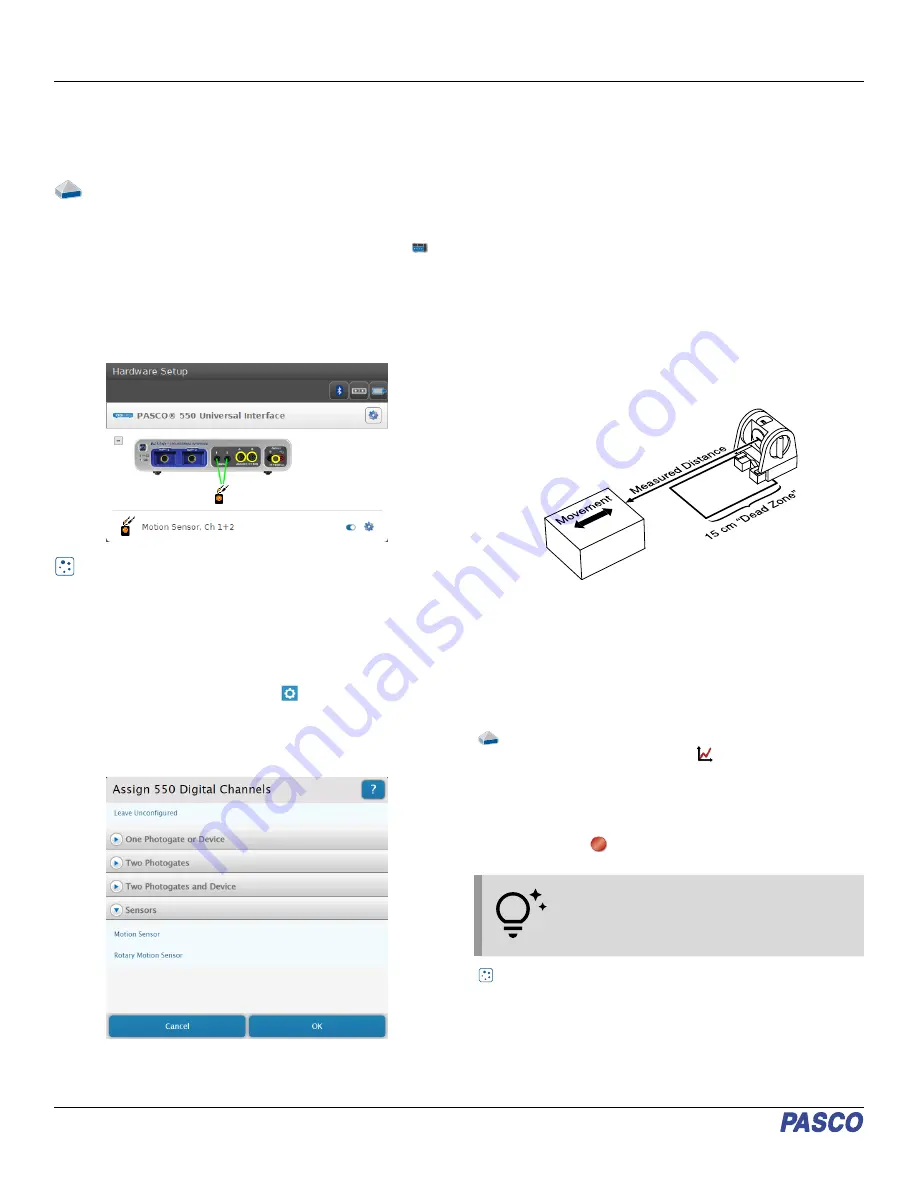
2. Arrange the Motion Sensor II and the object so that the
sensor’s transducer faces the object.
- If the object will move, it should move directly toward
or away from the Motion Sensor.
- Aim the motion sensor slightly up to avoid detecting
the tabletop.
- The object should always be at least 15 cm from the
transducer to avoid the "dead zone" shown below, in
which measurements will not be accurate.
3. Remove any objects that may interfere with the
measurement. These include any objects between the
sensor and target object, either directly in front of the
sensor or to the sides.
Collecting data
To collect data from a connected Motion Sensor II, follow these
steps depending on your program of choice.
PASCO Capstone
1. Double-click or drag the Graph
icon in the Displays
palette to create a new graph display.
2. Assign the variables for each axis by clicking each <Select
Measurement> box and selecting a measurement from the
list.
3. Click Record
when you are ready to begin collecting
data.
TIP: You can change the Recording Mode on
the Controls palette from Continuous Mode to
Fast Monitor Mode to display live data without
recording it.
SPARKvue
1. From the Sensor Data menu, select the measurements
you would like to record by clicking the checkboxes next to
their names from the Select Measurements for
Templates menu.
2. Click the Graph option from the Templates list to open the
Experiment Screen.
Motion Sensor II | CI-6742A
2


