


Figure 5. Smart Timer
Data collection
1. On the Smart Timer, press the 3 Start/Stop button. This
will cause the Smart Timer to beep and an asterisk (*) to
appear on the display, indicating that the device is ready to
start timing.
2. Press the Timer Switch button to release the button from
the Drop Box. When the object hits the Time-of-Flight pad,
the Smart Timer will display the fall time.
To time another object, hang the object from the Drop Box, wait
until the LED on the Drop Box stops blinking, and repeat the
previous two steps.
Timing option 2: SPARKvue with
computer interface
Setup
1. Start SPARKvue on your computer, then click Sensor
Data.
2. Connect the interface to your computer or tablet.
SPARKvue may automatically recognize the interface; if it
does not, connect the interface to SPARKvue. (For precise
instructions, see the manual for the individual interface or
the SPARKvue online help.)
3. Connect the remaining plug of the Timer Switch to Digital
Input 1 of the interface.
4. Connect the Time-of-Flight Accessory to Digital Input 2 of
the interface.
NOTE: If you are using a PASPORT interface
with a Digital Adapter (PS-2159), connect the
Digital Adapter to a PASPORT port of the
interface, then plug the Timer Switch and Time-
of-Flight Accessory into Digital Inputs 1 and 2 of
the adapter.
5. In the Select Measurements for Templates column, click
the Settings
icon next to the listing for the interface’s
Digital Channels.
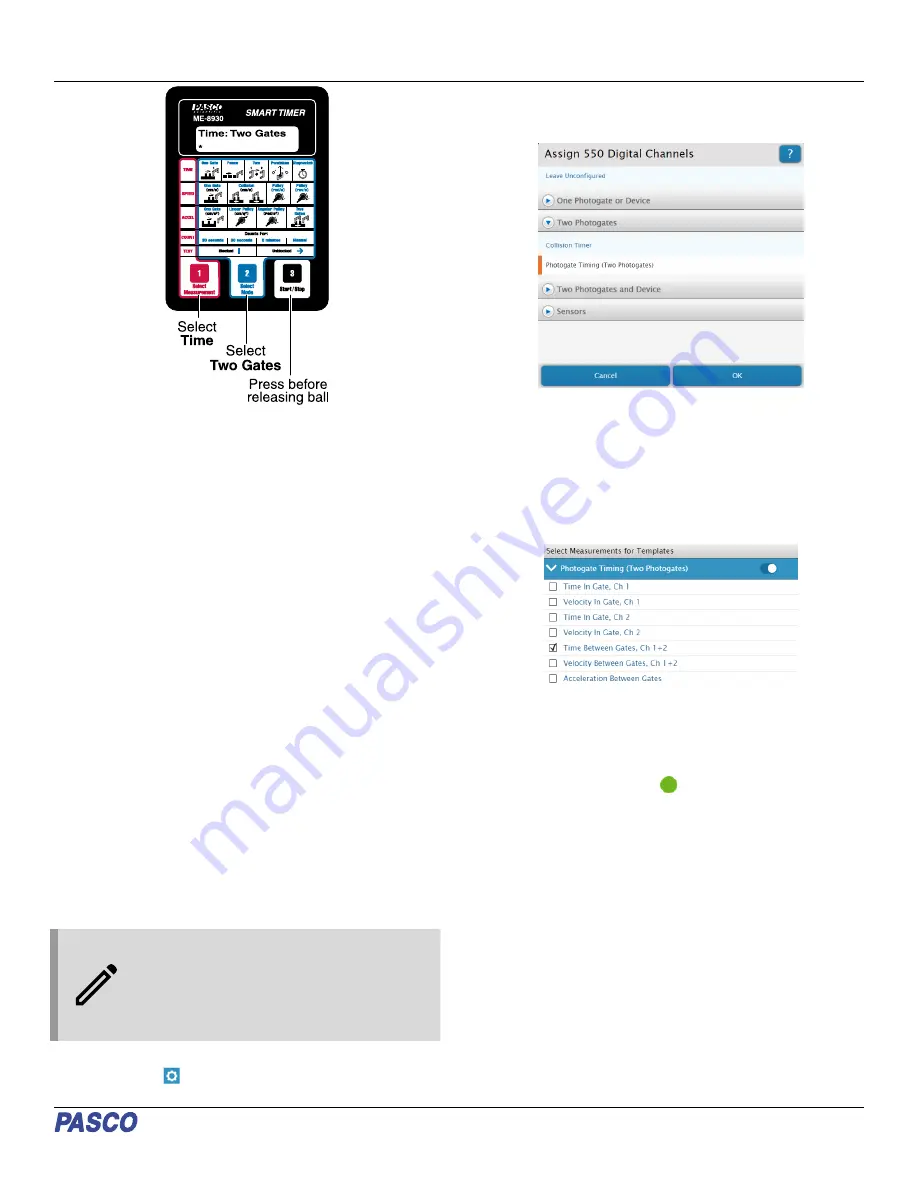
6. From the Assign Digital Channels menu, open the Two
Photogates submenu, select Photogate Timing (Two
Photogates), and click OK. (See Figure 6.)
Figure 6. Configuring the digital channels of a 550 Universal Interface
(UI-5001) for this experiment in SPARKvue.
7. Click OK again to skip assigning Flag Length and
Photogate Spacing, as those values do not apply to this
experiment.
8. Under Photogate Timing in the measurement selection
column, deselect Time In Gate, Ch 1 and select Time
Between Gates, Ch 1+2.
9. In the Templates section, select Digits to enter the
Experiment Screen. The display should automatically be
set to measure Time Between Gates in units of seconds.
Data collection
1. In SPARKvue, click Start
. This will start the experiment
clock, indicating that the program is ready to collect data.
2. Press the Timer Switch button to release the object from
the Drop Box. When the object hits the Time-of-Flight pad,
the display in SPARKvue will record the fall time.
To time another object, hang the object from the Drop Box, wait
until the LED on the Drop Box stops blinking, and repeat the
previous two steps.
Timing option 3: PASCO Capstone
with computer interface
1. Start PASCO Capstone on your computer, then click
Hardware Setup in the Tools palette.
2. Connect the interface to your computer or tablet. Capstone
may automatically recognize the interface; if it does not,
connect the interface to Capstone. (For precise instructions,
see the manual for the individual interface or the Capstone
online help.)
Product Guide | 012-09864D
3


