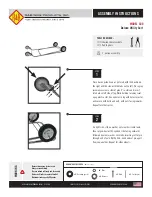
Connecting bumper and hook
attachments
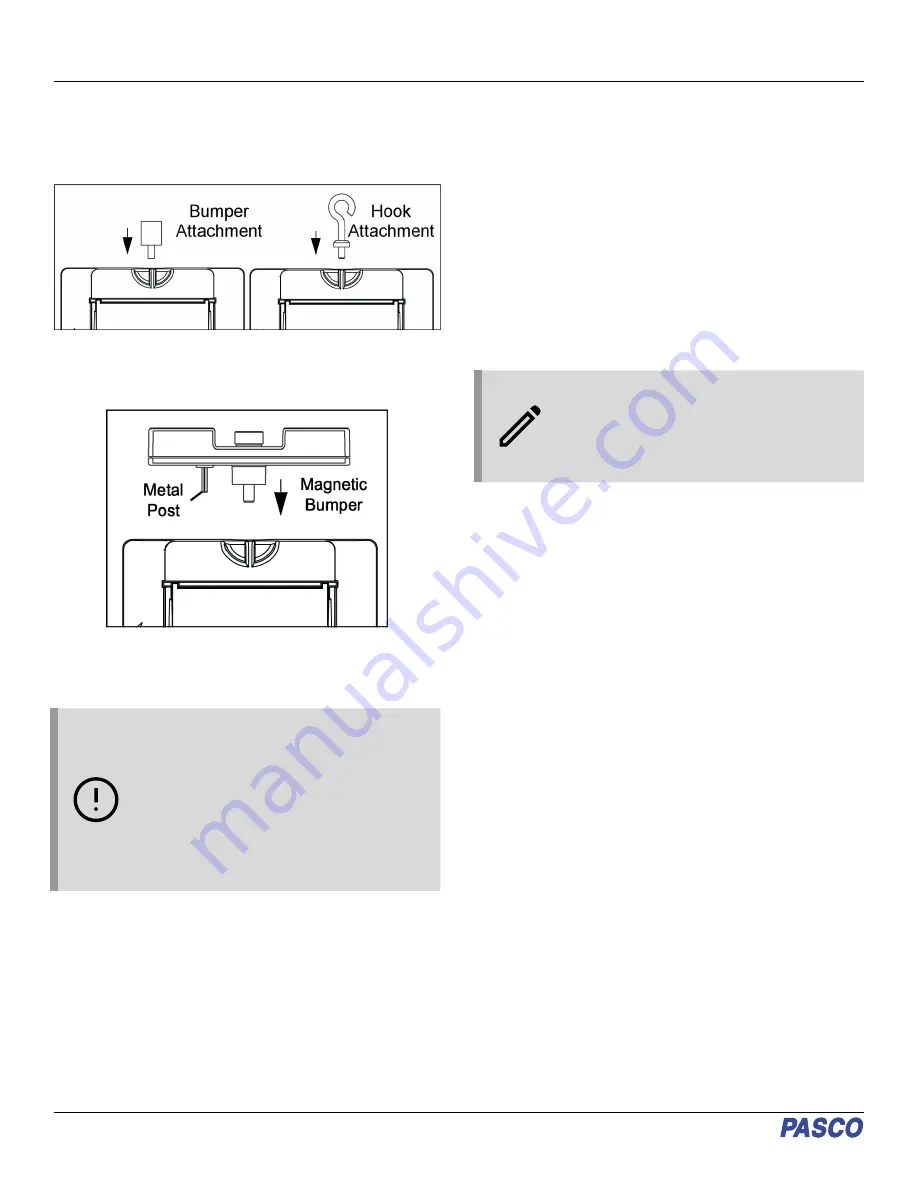
Screw the bumper or hook attachment into the threaded hole on
the front end of the Smart Cart, as shown below.
The magnetic bumper has a metal post that fits in the small hole
to the side of the threaded hole on the front end of the Smart
Cart, as shown below. The post ensures that the magnetic
bumper is mounted in the correct orientation.
Screwing any of these attachments into the threaded hole on the
front end of the Smart Cart connects them to the Smart Cart’s
built-in Force Sensor, allowing measurements of the force on the
cart to be collected.
IMPORTANT: If using the Smart Cart for
collisions, do NOT use the rubber bumper, as
the force of impact on the bumper may damage
the internal force sensor. Instead, any of the
following components can be used as a bumper
for collision experiments:
• Light Spring Bumper (ME-9275)
• Bumper Accessory Set (ME-9884)
• Magnetic Bumper Set (ME-9885A)
Direction of acceleration
The acceleration sensing unit inside the Smart Cart is oriented
so that the acceleration axes are aligned with the x-y-z arrows
indicating the direction of positive acceleration.
In this orientation, the x-axis direction is 'along' the long axis of
the Smart Cart; the y-axis direction is 'perpendicular' relative to
the top of the Smart Cart; and the z-axis direction is
'perpendicular' to the long axis of the Smart Cart and parallel
relative to the top of the cart.
Zero (tare) the sensors
At the beginning of an experiment, the measurement from the
built-in force and acceleration sensors may not be zero when the
force or acceleration is actually zero. This is a normal behavior
that is corrected when you zero (or tare) the sensor using
PASCO Capstone or SPARKvue. For information on zeroing a
sensor in these programs, see the Capstone or SPARKvue
online help and search for "Zero sensor".
Calibration
The Smart Cart is factory calibrated, so calibration is not
necessary, especially if you are measuring a change in a
measurement rather than absolute values. However, it is
possible to calibrate the sensors if desired. For information on
calibrating a Smart Cart, see the PASCO Capstone or
SPARKvue online help.
NOTE: Zeroing of the acceleration sensor
should only be performed if you are measuring
acceleration on only a single axis, as zeroing the
sensor will cause the measurements of
acceleration on the other two axes to no longer
report accurate values.
Accessories
A number of accessories are available for the Wireless Smart
Cart. Links to these products can be found on the product page.
In particular, certain accessories are designed specifically to be
used with the Wireless Smart Cart, including:
• Smart Fan Accessory (ME-1242)
• Smart Ballistic Cart Accessory (ME-1245)
• Smart Cart Vector Display (ME-1246)
• Smart Cart Motor (ME-1247)
For instructions on mounting these accessories to the Smart
Cart, see the manual for the product in question.
Troubleshooting
• If the Wireless Smart Cart loses Bluetooth connection and
will not reconnect, try cycling the ON button. Press and
briefly hold the button until the status LEDs blink in
sequence, then release the button. Start the Smart Cart in
the usual way.
• If the Smart Cart stops communicating with the computer
software or tablet application, try restarting the software or
application. If the problem remains, press and hold the ON
button for 10 seconds, then release. Start the Smart Cart in
the usual way.
• If the above problems do not solve the connection issue,
turn Bluetooth off and back on for your computer, then retry.
Wireless Smart Cart | ME-1240 (Red) / ME-1241 (Blue)
4