background image

APPLICATION AND OPERATION: People

50

ENGLISH

People

Use 

People

 to view and manage the contact list.

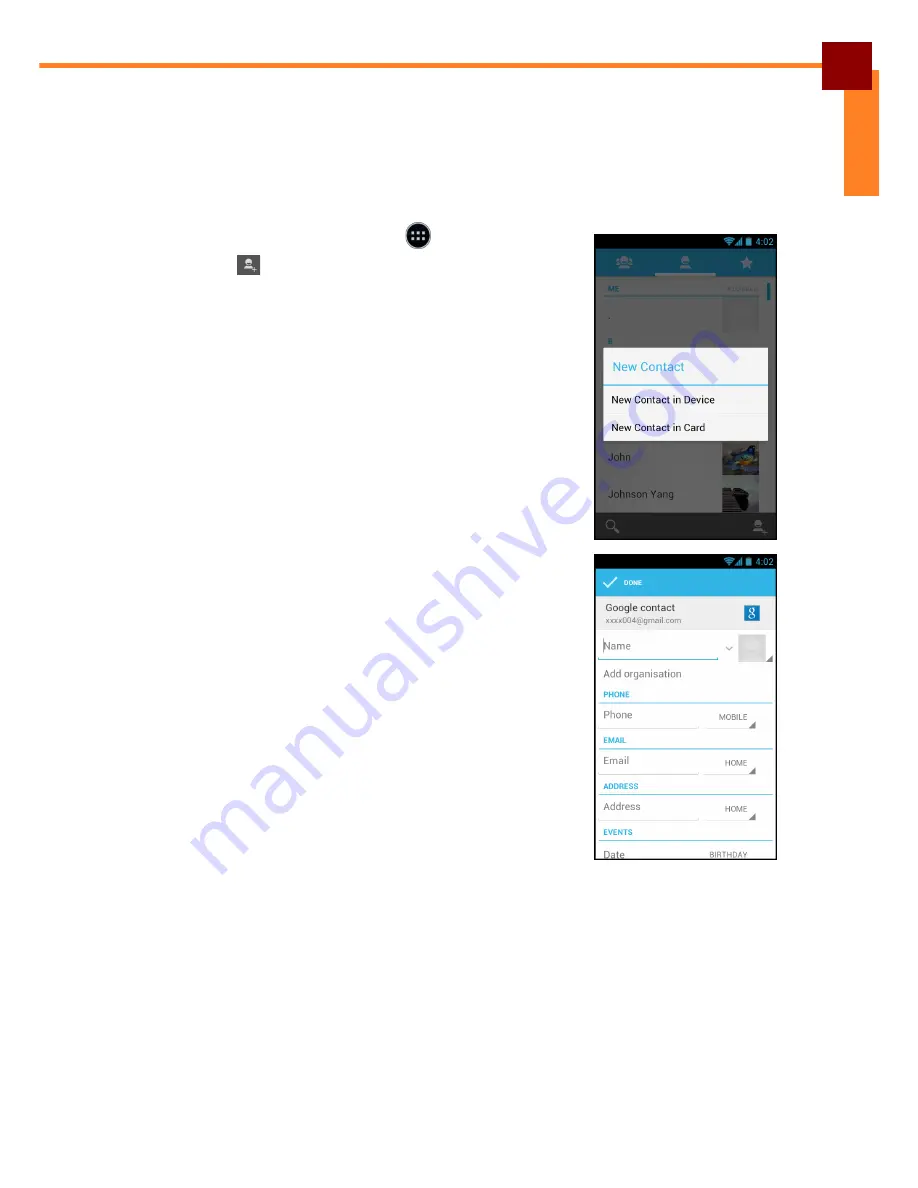
Adding New Contact

1. On the 

Home

 Screen, touch 

 > 

People

.

2. Touch . 
3. Touch one of the following:

New Contact in Device

: To save the new 

contact to the phone memory.

New Contact in Card

: To save the new contact 

to the memory card.

4. Enter the contact information such as name, phone 

number, email address, home address, and other 
related data.

5. Touch 

DONE

 to save the contact.

Summary of Contents for OT-300

Page 1: ...OT 300 Android Handheld Computer User s Manual ...

Page 2: ...een Overview 14 Status and Notifications 15 Using the Touch Screen 16 Managing the Home Screen 17 Opening Applications 18 Changing Basic Settings 19 Setting the Date and Time 19 Configuring Display Settings 20 Configuring Sound Settings 21 Managing Wireless and Network Settings 22 Connecting to Wireless Networks 22 Connecting to Bluetooth Devices 22 Configuring Language and Keyboard Settings 23 Ch...

Page 3: ...ng an Email 39 Deleting Emails 40 Adding Other Email Accounts 41 Customizing Email Settings 41 File Manager 42 Browsing Files 42 Managing Files and Folders 42 Gallery 43 Viewing Photos 43 Playing Videos 44 Playing Slideshow 44 Messaging 45 Creating and Sending a Text Message 45 Adding an Attachment to Message 45 Configuring Messaging Settings 46 Music 47 Playing a Song 47 Creating Playlist 48 Assi...

Page 4: ...ing Call Log 56 Barcode Scanner Module 57 Configuring Barcode Reader Settings 57 Reading a Barcode 58 MSR Module 59 Configuring MSR Settings 59 Testing the MSR Module 60 Appendix 61 Specifications 61 Troubleshooting 63 ...

Page 5: ...in are trademarks or registered trademarks of their respective owners Safety Information Read the following safety information before using the device Use only the power adaptor provided by the manufacturer Use of unauthorized accessories may void the warranty Avoid using the device near electromagnetic sources such as TVs radios and microwave ovens Unplug the power adaptor from the wall outlet du...

Page 6: ...The device could be used with a separation distance of 0 cm to the human body Federal Communications Commission Statement This device complies with Part 15 of the FCC Rules Operation is subject to the following two conditions 1 This device may not cause harmful interference and 2 this device must accept any interference received including interference that may cause undesired operation This device...

Page 7: ...f www fcc gov oet ea fccid after searching on FCC ID NDPOT 300 This device is compliance with SAR for general population uncontrolled exposure limits in ANSI IEEE C95 1 1999 and had been tested in accordance with the measurement methods and procedures specified in OET Bulletin 65 Supplement C WEEE Notice The WEEE logo on the product or on its box indicates that this product must not be disposed of...

Page 8: ...adio or television reception which can be determined by turning the equipment off and on the user is encouraged to try to correct the interference by one or more of the following measures Reorient or relocate the receiving antenna Increase the separation between the equipment and receiver Connect the equipment into an outlet on a circuit different from that to which the receiver is connected Consu...

Page 9: ...stics public sector and hospitality related application settings Features Standard features Dual core 1 2GHz CPU Android 4 0 4 OS WLAN 802 11b g n WWAN GPRS Edge UMTS HSPA Built in GPS accelerometer e compass gyroscope ambient light vibrator 5 0 Megapixels camera AF with LED flash Replaceable battery Support sunlight readable Gorilla class II touch screen 1 5m drop resistance and IP54 Optional fea...

Page 10: ...ay the screen output Touch and drag items on the screen to provide user input 5 Search Touch to search device applications and contacts or search the Internet 6 Menu Touch to open the menu of the current application 7 Home Touch to return to the Home screen 8 Back Touch to return to the previous screen or menu 9 Microphone Record voice input 10 Flash Provide additional lighting when taking picture...

Page 11: ...a USB cable for data transfer or battery charging purposes 3 Earphone jack Connect to an earphone 4 Volume keys Press to adjust the volume No Item Description 1 Barcode scan window Point this scan window to scan barcodes 2 Power button Turn on off the device Press once to put the device into Sleep mode 3 Cradle connector Connect to the cradle unit 1 2 3 4 1 1 3 2 ...

Page 12: ...No Item Description 1 Module indicator Lit Green when any of these modules is active 1D 2D barcode scanner NFC MSR IC Card 2 Wireless indicator Lit Green when wireless connection 3G Wi Fi or Bluetooth is activated 3 Power indicator Lit Red when the battery is charging Lit Green when the battery is full 3 2 1 ...

Page 13: ...g Started Installing the Battery 1 Press and slide down to open the battery cover Lift up to remove the battery cover 2 Align the battery connectors on the battery with the pins in the battery compartment Then insert the battery 3 Replace the battery cover ...

Page 14: ... adaptor to the wall outlet to start charging NOTE Use only the supplied power adaptor and DC to USB cable to charge the battery Using other power adaptor and cord not authorized by the manufacturer may damage the device and void the warranty When the battery is charging The status LED lights red When the device is turned on the icon is displayed on the top right corner of the screen 1 2 2 3 ...

Page 15: ...mory card slot upward 3 Insert a micro SD card into the memory card slot 4 Gently place down the memory card slot 5 Replace the battery compartment cover Installing the SIM Card 1 Remove the battery compartment cover 2 Insert the SIM card into the SIM card slot as shown in the illustration 3 Replace the battery compartment cover SIM ...

Page 16: ...utton for at least 3 seconds 2 Touch Power off 3 A confirmation message appears on the screen Touch OK to turn the device off Sleep Mode To save power put the device to Sleep mode when not in use In Sleep mode the device is in Power On mode but the screen backlight is turned off To put the device to Sleep mode press the Power button once The screen backlight turns off To turn the backlight on pres...

Page 17: ... after turning the device on or after a period of inactivity The screen lock time can be set in Settings menu see Configuring Display Settings on page 20 To unlock the screen drag towards Or drag towards to directly enter the Camera application NOTE When the icon is touched it automatically changes to ...

Page 18: ...ion 2 Home screen Main screen display Touch items on the screen to select an application Swipe the finger left or right to change panels 3 Search Bar Touch to do a search on the internet application and contacts 4 Shortcut application icon Phone People Messaging Browser Touch to open the Phone People Messaging Browser application 5 Application icon Touch to display all applications installed on th...

Page 19: ...or the device the icons displayed on the status bar may vary No Item Description 1 Bluetooth icon Indicate Bluetooth is enabled To enable this function see Connecting to Bluetooth Devices on page 22 2 Wi Fi icon Indicate the Wi Fi signal strength To enable this function see Connecting to Wireless Networks on page 22 3 Network icon Indicate the network signal strength 4 Battery icon Indicate the ba...

Page 20: ...A pop out menu may appear depending on the function in use by touching and holding on the screen Scrolling Scroll up down slide the finger up down on the screen Scroll right left slide the finger right left on the screen Dragging Touch and hold an icon to move its position Pinching Zoom in move the two fingers apart from each other at the specific area on the screen to zoom in Zoom out move the tw...

Page 21: ...Live Wallpapers To use pre installed interactive wallpapers that came with the device Wallpapers To use preset wallpapers that came with the device To add shortcut icons or widgets 1 On the Home Screen touch APPS or WIDGETS tab to display the applications widgets 2 To add an item touch and hold the application icon then drag it to the specific Home screen To move items Move items from one screen p...

Page 22: ... remove 2 Drag and drop the item to the Remove icon until the item turns red The application icon is removed from the Home screen Opening Applications Touch APPS tab to access the pre installed applications and device settings Touch an icon to open the application Swipe the finger left or right to view more applications ...

Page 23: ...ccording to the network To manually adjust date and time perform the following 1 On the Home Screen touch Settings 2 In SYSTEM touch Date time 3 Uncheck Automatic date time checkbox 4 Touch Set date to set the date Touch or on the related field item to adjust the value Touch Set to apply the values To change the date time format touch Select date format and select the date format from the list 5 T...

Page 24: ...s 2 In DEVICE touch Display Brightness 3 Drag the slider to adjust the brightness setting 4 Touch OK to confirm NOTE To enable the device to automatically adjust the brightness of the screen depending on the surrounding light touch Automatic brightness checkbox Touch OK to confirm To specify the idle time before the device automatically enters Sleep mode perform the following 1 On the Home Screen ...

Page 25: ... SOUND touch Volumes 3 Drag the respective volume slide to adjust the volume 4 Touch OK to confirm the settings To customize the device ringtones and notifications perform the following 1 On the Home Screen touch Settings 2 In SOUND touch Phone ringtone or Default notification 3 Select the desired setting from the available ringtone options 4 Touch OK to confirm the settings NOTE To enable the dev...

Page 26: ...onnect NOTE Password entry is required only for first time connection Once the device is connected to a network and Wi Fi is enabled on the device the device will automatically connect to that network Connecting to Bluetooth Devices To connect to a Bluetooth enabled device perform the following 1 On the Home Screen touch Settings 2 In WIRELESS NETWORK touch Bluetooth and set it to ON to enable the...

Page 27: ...nput 3 Touch Language 4 Touch the desired language 5 Touch to return to the Home screen Changing the Input Settings By default the device uses the Android keyboard To manage the keyboard settings perform the following 1 On the Home Screen touch Settings Language input 2 In KEYBOARD INPUT METHODS touch Default Configure input methods 3 To configure the input method touch on the desired keyboard opt...

Page 28: ... 3 to 5 to add more words 7 Touch to return to the Home screen To modify a word in the dictionary perform the following 1 On the Home Screen touch Settings Language input 2 Touch Personal dictionary 3 Touch the word to edit 4 Modify the word then touch OK 5 Repeat steps 3 to 4 to modify more words 6 Touch to return to the Home screen To delete a word from the dictionary perform the following 1 On ...

Page 29: ...cation Location Google search Check the box to let Google use the location to improve search results and other services 3 Touch to return to the Home screen Configuring Security Settings Use the Security settings menu to configure the device security options 1 On the Home Screen touch Settings Security 2 Touch one of the following options Screen lock Use slide or set up a pattern PIN or password t...

Page 30: ...ates Install from storage Install encrypted certificates from memory card Clear credentials Clear credential storage of all contents and reset its password 3 Touch to return to the Home screen Managing Accounts Synchronize the data email calendar and other information of an account with the device To add an Exchange account perform the following 1 On the Home Screen touch Settings Accounts sync 2 ...

Page 31: ...in or Username Password Server for Exchange account etc NOTE Obtain these information from the network administrator or service provider 7 Touch Next to continue and complete the wizard 8 Touch to return to the Home screen To add a Google account perform the following 1 On the Home Screen touch Settings Accounts sync 2 Touch ADD ACCOUNT 3 Touch Google 4 Touch Existing to use the existing Google ac...

Page 32: ... 3 Check the boxes of the desired data to sync such as Contacts Calendar 4 Touch Sync now 5 Touch to return to the Home screen To remove an account perform the following 1 On the Home Screen touch Settings Accounts sync 2 Touch the desired account to remove 3 Touch Remove account 4 A confirmation message appears Touch Remove account to confirm 5 Touch to return to the Home screen ...

Page 33: ...torage SD CARD The micro SD card To view the total and available storage space touch from the Home Screen then touch Settings Storage To unmount the memory card for safe removal perform the following 1 On the Home Screen touch Settings Storage 2 Touch Unmount SD card 3 A confirmation message appears on the status bar Touch OK to confirm 4 Touch to return to the Home screen 5 Turn off the device an...

Page 34: ...e URL on the address bar 4 Touch Go on the on screen keyboard NOTE Be sure that the device is properly connected to Internet either via Wi Fi connection or mobile data network Viewing the Current Web Page To zoom in on the current page move the two fingers apart from each other at the location of the screen to zoom in In zoom mode swipe the finger up down and left right to scroll on the page To zo...

Page 35: ...o save favorite web page as bookmark Share page Select to share current page via Bluetooth Email or Messaging Find on page Select to find test on the current web page Request desktop site Select to open the current web page in desktop display mode Save for offline reading Select to save the current web page to be available even when the internet service is not available Settings Select to configur...

Page 36: ... subject NOTE Drag the icon to zoom in out on the subject 3 Touch to capture the shot Reviewing Photos Touch the thumbnail frame to preview the latest captured photo Touch to view other recorded photos or videos in Gallery Touch a sharing application i e Bluetooth Messaging Email to share the current photo Flash mode Touch to view the latest record file Zoom icon Touch to enter Camera menu ...

Page 37: ...g Auto 60 Hz 50 Hz Off Restore defaults Cancel OK Touch to change the auto exposure settings Available options Frame Average Center Weighted Sport Metering Touch to specify the image quality settings Available options Super fine Fine Normal Touch to change the color effect settings Available options None Mono Sepia Negative Solarize Touch to change the white balance settings Available options Auto...

Page 38: ...e video NOTE Drag the icon to zoom in out on the subject 5 Touch to stop recording Reviewing Videos Touch the thumbnail frame to preview the latest recorded video Touch to play the video Touch to view other recorded photos or videos in Gallery Touch a sharing application i e Bluetooth Messaging Email to share the current video Touch to view the latest record file Zoom icon Touch to enter Video men...

Page 39: ...tes 30 seconds Color effect None Mono Sepia Negative Solarize Power Mode Normal_Power Low_Power Restore defaults Cancel OK Touch to specify the video quality settings Available options 720P D1 WVGA VGA CIF QVGA QCIF Touch to select the time lapse interval Available options Off 1s 1 5s 2s 2 5s 3s 5s 10s Touch to change the white balance settings Available options Auto Incandescent Daylight Fluoresc...

Page 40: ...ouch Camera 2 Touch and select to switch to Panorama mode 3 Aim the device at the subject 4 Touch to start capturing the shot 5 Pan the device horizontally and follow the shooting guideline as shown on the screen 6 Touch to stop shooting Touch to view the latest record file Shooting guideline ...

Page 41: ...t 1 On the Home Screen touch Email 2 Enter the email address and password 3 Touch Next NOTE Touch Manual setup to manually configure the email NOTE To setup an Exchange email account refer to Managing Accounts on page 26 4 Set the Inbox checking frequency setting and touch other options box to enable the necessary settings 5 Touch Next to continue ...

Page 42: ...he emails Viewing Emails By default emails are automatically saved in the Inbox folder Touch to manually receive emails Touch to view other folders Touch to search email that contains specific text in the current folder Touch to compose a new email Indicates this email contains attachment Unread emails Read emails Indicates this email has been added to the Starred folder ...

Page 43: ...n select the file to attach 6 Touch to send the email Reading and Replying an Email 1 On the Home Screen touch Email 2 Touch an email to open it 3 Perform any of the following To reply the email touch or touch Reply all To forward the email touch Forward Then enter the recipient email in the To field To view the attachment touch the Attachments tab To save the file into the device touch SAVE NOTE ...

Page 44: ... On the Home Screen touch Email 2 Touch an email to open it 3 Touch to delete the current email To delete selected emails in the same folder perform the following 1 On the Home Screen touch Email 2 Touch and hold the desired email to delete Select other email s if necessary 3 Touch to delete the selected email s ...

Page 45: ...NT 4 Repeat Steps 2 6 in Setting up an Email Account on page 37 NOTE Check the Send email from this account by default box to set this new account as the default email account Customizing Email Settings 1 On the Home Screen touch Email 2 Touch Settings 3 Touch General or an email account 4 Touch an option and change the necessary settings ...

Page 46: ...the folder name and touch OK To rename the folder or file touch and hold the item and touch Rename Enter the new name and touch OK To sort item by size touch Sorting by Size To switch to memory card while browsing the content of the memory device touch SD card To copy file or folder touch and hold the item to copy and touch Copy To paste the file or folder select the destination path and touch Pas...

Page 47: ...e Viewing Photos 1 On the Home Screen touch Gallery 2 Touch the desired album folder The recorded files are displayed in thumbnails 3 Touch the desired image to view it in full screen 4 Perform the following To view other files swipe the finger to the left or right To share this photo touch and select the desired sharing application To delete or edit this photo play the slideshow or show more opti...

Page 48: ...f the following To play the video touch To view other files swipe the finger to the left or right To share this video touch and select the desired sharing application To delete this video or show more options touch Playing Slideshow 1 On the Home Screen touch Gallery 2 Touch the desired album folder The recorded files are displayed in thumbnails 3 Touch to start the slideshow 4 To stop the slidesh...

Page 49: ...tically saved as a draft Adding an Attachment to Message 1 On the Home Screen touch Messaging 2 Touch 3 Enter the recipient s phone number in the To field 4 Compose the message 5 Touch to add an attachment and select one of the following options Pictures Select to attach a photo from Gallery Capture picture Select to take a picture to attach Videos Select to attach a video clip Capture video Selec...

Page 50: ...ivery reports Select to request a delivery report for each sent text message Manage RUIM card messages Select to manage messages stored on the SIM card Delivery reports MMS Select to request a delivery report for each sent multimedia message Read reports Select to request a read report for each sent multimedia message Auto retrieve Select to automatically retrieve new messages Roaming auto retriev...

Page 51: ...ouch the Song tab All songs are displayed on the screen 3 Touch a song to play NOTE Touch to view more options Touch to skip to the next song Touch to pause the playback Touch again to play Touch to skip to the previous song Slide to go forward backward Touch to toggle the repeat mode Touch to enable disable the shuffle mode Touch to enter Now Playing screen ...

Page 52: ...and hold the desired song to add 3 Touch Add to playlist 4 Select a playlist To create a new playlist touch New Enter the new playlist name and touch Save Assigning Song as Ringtone 1 On the Home Screen touch Music 2 Touch and hold the desired song to be the device ringtone 3 Touch Use as phone ringtone ...

Page 53: ... 2 Touch and hold the desired song to delete 3 Touch Delete 4 Touch OK to delete the selected song Configuring the Sound Effect 1 On the Home Screen touch Music 2 Touch a song to play 3 Touch Sound effects 4 Touch Equaliser and set it to ON 5 Touch an option and change the necessary settings ...

Page 54: ...me Screen touch People 2 Touch 3 Touch one of the following New Contact in Device To save the new contact to the phone memory New Contact in Card To save the new contact to the memory card 4 Enter the contact information such as name phone number email address home address and other related data 5 Touch DONE to save the contact ...

Page 55: ...ng 1 On the Home Screen touch People 2 Touch Import export Import from SIM card 3 Touch the desired contact to import To import contacts from the memory card perform the following 1 On the Home Screen touch People 2 Touch Import export Import from storage 3 Select the vCard file s to import 4 Touch OK to import contacts ...

Page 56: ...e following 1 On the Home Screen touch People 2 Touch Import export Export to SIM RUIM card 3 Touch the desired contact to export To copy contacts to the memory card perform the following 1 On the Home Screen touch People 2 Touch Import export Export to storage 3 Touch OK to copy contacts to the memory card ...

Page 57: ...he Home Screen touch People 2 Touch the desired contact to share 3 Touch Share 4 Select the desired sharing application to send the contact information To assign a contact ringtone perform the following 1 On the Home Screen touch People 2 Touch the desired contact to assign a ringtone to 3 Touch Set ringtone 4 Select the desired ringtone and touch OK to confirm To delete a contact perform the foll...

Page 58: ...he following 1 On the Home Screen touch People 2 Touch the desired contact to add to the Favorite list 3 Touch and it turns indicating the current contact has been added to the Favorite list 4 Touch Favorite tab to view the favorite contact s To remove a specific contact from Favorite list perform the following 1 On the Home Screen touch People 2 Touch the desired contact to remove from the Favori...

Page 59: ... the phone number using the on screen keypad To delete a wrong number touch To delete the entire number touch and hold 3 Touch to make a call after the user finishes entering the phone number 4 To end the call after dialing touch NOTE As an alternative calls can be made directly from the contact lists Touch People tab and touch the desired contact s phone number ...

Page 60: ...l Log The Call Log screen displays the recent outgoing received or missed calls To view the Call Log screen touch the Call Log tab To remove an entry from the list select the desired entry and touch Remove from call log To edit the phone number before making a call touch Edit number before call Edit the phone number and touch to make a call To clear all call log touch Clear call log Touch OK to co...

Page 61: ...ix settings Configure the prefix and suffix characters Code readable settings Configure the code readable settings Code options Configure the code options Read options Configure the read options including read mode read time margin redundancy positive and negative and scan angle settings Output mode Select the output mode Trigger Key Specify which button s to be used as trigger key s Restore facto...

Page 62: ...orm the following 1 Press and release the barcode scan trigger key 2 Aim the scanning beam at the barcode 3 The scanned data appears on the screen To read a 2D barcode perform the following 1 Press and hold the barcode scan trigger key 2 Aim the scanning beam at the barcode 3 The scanned data appears on the screen 4 Release the trigger key ...

Page 63: ... order start sentinels and end sentinels settings By default the start sentinel of a magnetic stripe card is already set based on the ISO standard Track 1 Track 2 Track 3 Prefix and suffix setting Configure the prefix and suffix characters for package track settings Output setting Configure the output mode reader and buzzer settings Restore factory default settings Return all MSR settings to the f...

Page 64: ...MSR Module 1 On the Home Screen touch Settings MSR Settings 2 Touch MSR Demo to open the swipe test screen 3 Swipe a magnetic stripe card through the MSR module Make sure the magnetic stripe is facing upward 4 Data appears on the screen if the test is successful ...

Page 65: ...r Button 1 x Power button 2 x Volume button 2 x Barcode scan trigger key function key Battery Li Polymer 2960 mAh Battery hot swap 3 min on operation Li ion Polymer 3 7V 80mAh Sensor Accelerometer Ambient light sensor Gyroscope sensor Vibrator GPS AGPS Proximity sensor E compass sensor Camera 5MP with LED flash RFID NFC 13 56MHz ISO14443 A B FeliCa R W Sealing IP54 Drop 1 5m drop resistance LED 1 ...

Page 66: ...ications are subject to change without prior notice Optional Accessories Battery pack Cradle Storage Temperature 20 60º C Operating Temperature 5 50º C Packing Adaptor Power cord Quick start guide USB cable DC to USB cable Earphone OT 300 Specifications ...

Page 67: ...ther the micro SD card capacity is full Try to delete or move some files to free space 4 Cannot connect to the Internet Check whether the device is connected to a wireless network If no wireless network is available try to use the SIM card s data network connection The battery may be too low Network connectivity uses more power Be sure to charge the battery 5 Captured photos are too dark Check whe...

Page 68: ......

Reviews: