background image

91

Summary of Contents for PTK 2000 B2

Page 1: ...N 273460 TABLE SAW Translation of the original instructions TISCHKREISS GE Originalbetriebsanleitung STO OWA PI A TARCZOWA T umaczenie oryginalnej instrukcji obs ugi 273460_par_Tischkreissaege_cover_P...

Page 2: ...illustrations and familiarise yourself with all functions of the device Przed przeczytaniem prosz roz o y stron z ilustracjami a nast pnie prosz zapozna si z wszystkimi funkcjami urz dzenia Klappen S...

Page 3: ...1 2 4 3 1 2 2 3 4 5 17 24 21 22 18 23 19 20 16 3 4 5 6 14 11 12 13 9 8 7 15 10 r a b c d e s t 11 12 9 f g 3...

Page 4: ...9 11 7 5 10 12 8 6 18 18 26 25 f a c 18 24 23 19 20 21 22 38 38 38 f f r r r r r 7 7 7 d a b c e d a b c e d a b c e 7 15 15 f a c g 4...

Page 5: ...m a x 3 8 m m 17 19 15 13 18 20 16 14 37 36 35 28 4 27 2 6 29 29 34 f a c g f r f 16 f a c g r 30 25 25 26 25 25 26 5...

Page 6: ...r 23 Operation 23 Performing Longitudinal Cuts 24 Cutting narrow Workpieces 24 Cutting very narrow Workpieces 24 Performing Bevel Cuts 25 Performing Transverse Cuts 25 Cutting Chipboard 25 Transport 2...

Page 7: ...p these in a safe place so that the information is available to you at all times Should you give the device to anyone else please give them these operating instructions safety instructions as well We...

Page 8: ...b nut c 20 pieces each Bag C for table length width extension Hexagonal bolt with mounted washer spring washer f 12 pieces Hexagonal bolt g lock washer b 2x washer a nut c 6 pieces Tools Jaw spanner...

Page 9: ...aser class 2 Laser wavelength 650 nm Laser power 1 mW Laser module power supply 2 x 1 5 V Micro AAA Sound pressure level LpA 92 dB A KpA 3 dB Sound power level LWA measured 105 dB A KWA 3 dB guarantee...

Page 10: ...ies 2 Consider work area environment Do not expose tools to rain Do not use tools in damp or wet locations Keep work area well lit Do not use tools in the presendce of flammable liquids or gases 3 Gua...

Page 11: ...one or both hands could touch the saw blade as the result of a sudden slip 14 Maintain tools with care Keep cutting tools sharp and clean for better and safer performance Follow instruction for lubric...

Page 12: ...afety Precautions Warning Do not use damaged cracked or deformed saw blades Replace a worn table insert Regrinding is not allowed Only use saw blades recommen ded by the manufacturer which conform to...

Page 13: ...end in the workpiece When transporting the power tool use only the transport devices supplied Never use the guards for handling or transporting the tool During transport make sure that the top part of...

Page 14: ...of the tools ensure that all protective devices are correctly attached 9 Before use ensure that all of the tools used by you fulfil the technical requi rements of this power tool and are properly atta...

Page 15: ...is may cause the battery to short circuit resulting in damage burns or even the danger of fire 16 Remove batteries from the device if this is not going to be used for a prolon ged period unless it is...

Page 16: ...d As the user you must ensure in consultation with your electricity sup ply company if necessary that the continuous current carrying capacity of the network at the connection point to the public main...

Page 17: ...assembly it is not possible for final assembly to be carried out Additional tool required Phillips screwdriver Mounting of the Frame Abb 4 10 1 Turn the table circular saw over and place it on the fl...

Page 18: ...has a rubber seal make sure that this is mounted 3 The adapter is secured by means of a bayonet lock Insert the vacuum cleaner adapter 16 as shown in Figure 15 and lock this in place with a quarter tu...

Page 19: ...2 Connect a suitable woodchip extrac tion system to the suction adapter 16 Figure 21 6 Dismantling is carried out in reverse order Caution Before you start sa wing the saw blade guard 2 has to be lowe...

Page 20: ...itching on and off Figure 23 The saw can be switched on by pressing the green pushbutton I Before you start sawing wait until the saw blade has reached its maximum speed Attaching changing the Saw Bla...

Page 21: ...and side of the saw blade 5 Insert the parallel stop into the side of the guide rail 13 Figure 28 In order to switch the saw off again the red pushbutton 0 has to be pressed Adjusting the Cutting Dept...

Page 22: ...he guard Adjust the saw blade 5 to the maxi mum cutting depth Adjust the parallel stop 14 such that the stop rail 39 touches the saw blade adjustment for thick material If the parallel stop 14 is not...

Page 23: ...e has reached its maximum speed before you carry out the cut Secure long workpieces against tilting at the end of the cutting process e g unwin ding stand etc Adjusting the Scale of the Transverse Sto...

Page 24: ...s push the workpiece through to the end of the riving knife 4 The cutting waste remains on the saw table 1 until the saw blade 5 is back in its resting position Secure long workpieces against tilting...

Page 25: ...f the saw blade in order to perform the cut Caution Always hold the guided workpiece firmly and never the free workpiece which is cut off Always push the transverse stop 8 so far forwards until the wo...

Page 26: ...se Clean the device regularly with a damp cloth and some soft soap Do not use any detergents or solvents these might attack the plastic parts of the device Make sure that no water can get into the int...

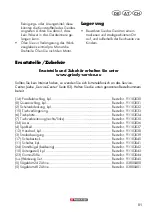
Page 27: ...le length extender Order number 91103533 6 Table insert Order number 91103534 7 Table width extender right left Order number 91103535 34 Laser Order number 91103536 4 Riving knife Order number 9110353...

Page 28: ...are chargeable Guarantee Cover The equipment has been carefully pro duced in accordance with strict quality guidelines and conscientiously checked prior to delivery The guarantee applies for all mater...

Page 29: ...al freight Please send the equipment inc all accessories supplied at the time of purchase and ensure ad equate safe transport packaging Repair Service For a charge repairs not covered by the guarantee...

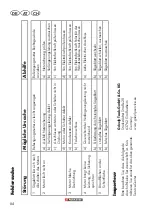
Page 30: ...Repair by electrical specialist 3 Motor wrong direction of rotation a Capacitor faulty a Repair by electrical specialist b Wrong connection b Exchange polarity of outlet by an qualified electrician 4...

Page 31: ...Tel 1890 930 034 0 08 EUR Min peak 0 06 EUR Min off peak E Mail grizzly lidl ie IAN 273460 Importer Please note that the following address is not a service address Please initially con tact the servic...

Page 32: ...poprzecznego 50 U ywanie lasera 51 Regulacja lasera 51 Praca 51 Wykonywanie ci wzd u nych 52 Ci cie w szych element w 52 Ci cie bardzo w skich element w 52 Wykonywanie ci sko nych 53 Wykonanie ci pop...

Page 33: ...chrony zdro wia i bezpiecze stwa Uwaga Podczas u ywania urz dze koniecz ne jest stosowanie niekt rych rodk w bezpiecze stwa w celu unikni cia obra e cia a i szk d materialnych Dlatego prosz starannie...

Page 34: ...to u Popychacz Nogi 4x Poprzeczki 2x Rozp rki pod u ne 2x Rozp rki rodkowe kr tkie 2x Rozp rki rodkowe d ugie 2x Stopki gumowe 4x Wsporniki n g 2x Podpory sto u kr tkie 4x Podpory sto u d ugie 2x Inst...

Page 35: ...wa gniazda baterii 38 Punkty mocowania 39 Listwa oporowa Opis dzia ania Tarcz wka stolarska s u y do wzd u nego i poprzecznego ci cia tylko z ogranicz nikiem poprzecznym wszelkiego rodzaju drewna o wy...

Page 36: ...piecze stwa Przy u ywaniu maszyny nale y przestrzega tych zasad bezpiecze stwa Symbole i piktogramy Symbole na urz dzeniu Przeczytaj instrukcj obs ugi No okulary ochronne Nosi ochronniki s uchu No och...

Page 37: ...przechowuj w bezpiecz nym miejscu Przechowuj nieu ywane narz dzia elektryczne w suchym wysoko po o onym lub zamkni tym i niedost pnym dla dzieci miejscu 6 Nie przeci aj narz dzia elekt rycznego Pracuj...

Page 38: ...yste aby m c lepiej i bezpieczniej pracowa Przestrzegaj wskaz wek dotycz cych smarowania urz dzenia i wymiany narz dzi Regularnie sprawdzaj kabel zasilaj cy narz dzia elektryczn ego w razie uszkodzeni...

Page 39: ...dzi elektry cznych kt rych w cznika wy cznika nie mo na w cza i wy cza 21 Uwaga U ywanie innych ni podane narz dzi i innych akcesori w mo e grozi zranieniem 22 Urz dzenie elektryczne mo e by naprawian...

Page 40: ...i w razie potrzeby naprawi elektronarz dzie i nasady narz dziowe Wady elektronarz dzia ele ment w ochronnych lub nasa dy narz dziowej zg asza niezw ocznie po ich wykryciu osobie odpowiedzialnej za be...

Page 41: ...dycznych Aby zmniejszy niebezpiecze stwo powa nych lub miertelnych obra e cia a przed przyst pieniem do obs ugi elektronarz dzia przez osoby z implanta mi medycznymi zalecamy im skonsultowa nie si z l...

Page 42: ...si z bateriami 1 Zawsze pami ta o wk adaniu baterii z prawid ow polaryzacj i podan na baterii 2 Baterii nie zwiera 3 Nie adowa baterii jednorazowych 4 Nie roz adowywa nadmiernie bate rii 5 Nie miesza...

Page 43: ...maszyny podczas obr bki i zmniejszenia dok adno ci ci cia Unika przypadkowego uruchamiania maszyny podczas wk adania wtyku do gniazda wtykowego nie wolno naciska przycisku zasilania Stosowa narz dzie...

Page 44: ...przepisom elektrycznym i normom DIN Stosowa tylko przewody zasilaj ce z oznaczeniem H05VV F Przepisy wymagaj umieszczenia na kablu zasilaj cym nadruku z oznaczeniem typu Silnik pr du przemiennego Nap...

Page 45: ...bezpieczy rozp rki rodkowe rubami imbusowy mi w spos b przedstawiony na ilustr 8 6 Teraz na o y na nogi stopki gumowe 23 ilustr 9 7 Do otwor w w tylnych nogach przykr ci wsporniki n g 24 Materia y do...

Page 46: ...nie dokr ca zbyt mocno Os ona tarczy pi y musi zachowa swobod ruchu Monta adaptera systemu odci gu wi r w Ilustr 15 1 W o y adapter systemu odci gu 16 do przewidzianego w tym celu otworu na tylnej st...

Page 47: ...o ci Uwaga Przestrzega kierunku obrotu skos tn cy z b w musi by skierowany w kierunku obrotu pi y tzn do przodu pa trz strza ka na os onie tarczy pi y 2 5 Za o y w ssawny 3 na adap ter systemu odci gu...

Page 48: ...bezpiecznikiem min 16A Urz dzenie pod cza w miar mo liwo ci tylko do gniazda sieciowego z wy cznikiem r nicowopr dowym o warto ci pr du wyzwalaj cego nieprzekraczaj cej 30 mA Obs uga Za czanie i wy c...

Page 49: ...9 mo na przesuwa w kierunku wzd u nym elazna zasada Tylny koniec listwy oporowej przylega do wyimaginowa nej linii Ta zaczyna si mniej wi cej obok rodka tarczy pi y i przebiega pod k tem 45 do ty u Wc...

Page 50: ...ta Karb na dr ku prowadz cym wskazuje ustawiony k t Ponownie dokr ci rub rade kowan 33 W przypadku docinania ogranicznik poprzeczny 8 z listw oporow 39 musi zosta przed u ony prowadnic r wnoleg 14 il...

Page 51: ...ika linii ci cia otrzymamy czyste ci cia Wy czanie lasera Prze cznik Laser Za Wy 35 ustawi na 0 Pomie laserowy ga nie W celu oszcz dzenia baterii laser wy cza zawsze je li nie jest potrzebny Promie la...

Page 52: ...ie obrabiane elementy zabezpieczy przed mo liwym prze chyleniem na ko cu operacji ci cia np przy u yciu stojaka z rolk etc Ci cie w szych element w Ilustr 36 Ci cie wzd u ne element w o szeroko ci mni...

Page 53: ...ie Uwaga Zawsze mocno trzyma prowadzony element nigdy wolny element kt ry jest odcinany Ogranicznik poprzeczny 8 zawsze przesuwa na tyle aby zapewni ca kowite przeci cie obrabianego elementu Ponownie...

Page 54: ...zyszczenie urz dzenia bezpo rednio po ka dym u yciu Urz dzenie czy ci regularnie wilgotn ciereczk z niewielkim dodatkiem szarego myd a Nie stosowa adnych rodk w myj cych ani rozpuszczal nik w mog yby...

Page 55: ...ik wy cznik Numer zam wienia 91103541 24 Wsporniki n g Numer zam wienia 91103542 10 Cz dolna korpusu Numer zam wienia 91103543 23 Stopki gumowe Numer zam wienia 91103544 r s Narz dzie Numer zam wienia...

Page 56: ...Nale y bezwzgl dnie unika zastosowa i dzia a kt rych odradza si lub przed kt rymi ostrzega si w instrukcji obs ugi Produkt jest przeznaczony do u ytku prywatnego a nie komercyjnego W przy padku niew a...

Page 57: ...rz dzenia przes ane dla nas odp atnie jako przesy ka ponadwymiarowa ekspre sowa lub na innych warunkach specjal nych nie zostan odebrane Utylizacj przes anych do nas uszkodzonych urz dze przeprowadzam...

Page 58: ...sprawdzenie przez elektryka 3 Nieprawid owy kierunek obrotu silnika a Kondensator uszkodzony a Zleci sprawdzenie przez elektryka b Nieprawid owe pod czenie b Zleci elektrykowi zmian polary zacji gnia...

Page 59: ...tzung des Lasers 77 Justieren des Lasers 78 Betrieb 78 Ausf hren von L ngsschnitten 78 Schneiden schmaler Werkst cke 79 Schneiden sehr schmaler Werkst cke 79 Ausf hren von Schr gschnitten 79 Ausf hrun...

Page 60: ...rungen eingehalten werden um Verletzungen und Sch den zu verhindern Lesen Sie diese Original betriebsanleitung Sicherheitshinweise deshalb sorgf ltig durch Bewahren Sie diese gut auf damit Ihnen die I...

Page 61: ...Scheibe Federring f 8 St ck Sechskantschraube g Feder ring b 2x U Scheibe a Mut ter c 4 St ck Rundkopfschraube M6 x 12 e U Scheibe a Federring b Mutter c je 8 St ck Beutel B f r Standb gel und obere...

Page 62: ...BxLxH 10x50x1 mm Tischgr e 630 x 445 mm Tischverbreiterung Li Re 620 x 250 mm Tischverl ngerung hinten 435 x 320 mm Schnitth he max 90 73 mm Schnitth he max 45 63 mm H henverstellung 0 73 mm S geblatt...

Page 63: ...zur Verh tung von Per sonen oder Sachsch den Gebotszeichen anstelle des Aus rufungszeichens ist das Gebot er l utert mit Angaben zur Verh tung von Sch den Hinweiszeichen mit Informationen zum besseren...

Page 64: ...rzeugen den Arbeiten eine Atemmaske 10 Schlie en Sie die Staubabsaug Einrichtung an Falls Anschl sse zur Staubab saugung und Auffangeinrichtung vorhanden sind berzeugen Sie sich dass diese angeschloss...

Page 65: ...ltrommel nur im abgerollten Zustand 19 Seien Sie stets aufmerksam Achten Sie darauf was Sie tun Gehen Sie mit Vernunft an die Arbeit Benutzen Sie das Elektrowerkzeug nicht wenn Sie unkonzentriert sind...

Page 66: ...eeignete pers nli che Schutzausr stung Dies schlie t ein Geh rschutz zur Verminderung des Risikos schwerh rig zu werden Atemschutz zur Verminderung des Risikos gef hrlichen Staub einzuatmen Tragen Sie...

Page 67: ...Nut verwendet werden Verwenden Sie beim Transportie ren des Elektrowerkzeuges nur die Transportvorrichtungen Verwen den Sie niemals die Schutzvor richtungen f r Handhabung oder Transport Achten Sie da...

Page 68: ...erheit zu verbessern und das Verletzungsrisiko weiter zu mindern 8 Stellen Sie vor der Benutzung von Einsatzwerkzeugen sicher dass alle Schutzvorrichtungen ordnungsgem befestigt sind 9 Vergewissern Si...

Page 69: ...hei em Wetter in Fahrzeugen 15 Unbenutzte Batterien in der Original verpackung aufbewahren und von Metallgegenst nden fern halten Aus gepackte Batterien nicht mischen oder durcheinander werfen Dies k...

Page 70: ...Anforderungen der EN 61000 3 11 und unterliegt Sonderanschlu bedingungen Das hei t dass eine Verwendung an beliebigen frei w hlbaren Anschluss punkten nicht zul ssig ist Das Ger t kann bei ung nstigen...

Page 71: ...ziehen Legen Sie alle mitgelieferten Teile auf eine flache Oberfl che Gruppieren Sie gleiche Teile Hinweis Wenn Verbindungen mit einer Schraube Rundkopf oder Sechskant Sechskantmuttern und Unterlegsc...

Page 72: ...ung 15 am S getisch mittels der Sechskantschrauben e locker befesti gen Abb 12 2 Tischst tzen 25 26 am Geh use der Tischkreiss ge mittels Sechskantschrau ben e locker festschrauben Ebenfalls m ssen di...

Page 73: ...nsten besteht erh hte Verletzungs gefahr 1 Einsetzen der Batterien Abb 16 Stellen Sie den Schalter 35 Laser Ein Aus auf die Position 0 Laser aus Entfernen Sie die Batteriefachab deckung 37 indem Sie d...

Page 74: ...ergestell o festschrauben Verwenden Sie dazu die Bohrungen die sich im Ge stell der Maschine befinden F r die sichere Verwendung auf einer Werk bank sind die vier montierten Gummi f e vorgesehen Abb 5...

Page 75: ...Abb 23 Durch Drehen des Handrades 12 f r H henverstellung kann das S geblatt auf die gew nschte Schnitttiefe stufenlos eingestellt werden Wichtig das Handrad 12 muss f r die Einstellung der Schnittti...

Page 76: ...14 parallel zum S geblatt 5 ausrichten l sst Abb 30 Schrauben m wieder festziehen Werkst ckdicke Abb 24 anwenden F r dickes Material ber 25 mm Werkst ckdicke Abb 26 anwenden Anschlagschiene drehen Ab...

Page 77: ...schla ges 8 lockern Queranschlag 8 so positionieren dass die Anschlagschiene in einem 90 Winkel zum S geblatt 5 steht Nun Queranschlag mit Hilfe des 90 Winkels exakt zum S geblatt aus richten und die...

Page 78: ...bevor Sie den Schnitt durchf hren Lange Werkst cke gegen Abkippen am Ende des Schneidvorganges sichern z B Abrollst nder etc Achtung beim Einschneiden Betreiben Sie das Ger t nur mit Absau gung berpr...

Page 79: ...einer Breite von 30 mm und weniger ist unbedingt ein Schiebeholz zu verwenden Schiebeholz nicht im Lieferum fang enthalten Erh ltlich im einschl gigen Fachhandel Verschlissenes Schiebeholz rechtzeitig...

Page 80: ...Sie das Elektrowerkzeug vor Schl gen St en und starken Vibrationen z B beim Transport in Fahrzeugen 4 Sichern Sie das Elektrowerkzeug gegen Kippen und Verrutschen 5 Verwenden Sie Schutzvorrichtungen...

Page 81: ...er siehe Service Center Seite 83 Halten Sie die unten genannten Bestellnummern bereit 14 Parallelanschlag kpl Bestellnr 91103530 8 Queranschlag kpl Bestellnr 91103531 2 Schutzabdeckung kpl Bestellnr 9...

Page 82: ...zt voraus dass innerhalb der Drei Jahres Frist das defekte Ger t und der Kauf beleg Kassenbon vorgelegt und schriftlich kurz beschrieben wird worin der Mangel besteht und wann er aufgetreten ist Wenn...

Page 83: ...Ihnen mitgeteilte Service Anschrift bersenden Um An nahmeprobleme und Zusatzkosten zu vermeiden benutzen Sie unbedingt nur die Adresse die Ihnen mitgeteilt wird Stellen Sie sicher dass der Versand ni...

Page 84: ...ssen b Falschanschluss b Von Elektrofachkraft Polarit t der Wandsteckdose tauschen lassen 4 Motor bringt keine Leistung die Sicherung spricht an a Querschnitt der Verl ngerungsleitung nicht ausreichen...

Page 85: ...1 9 9 7 A2 2 0 0 8 EN 6 1 0 0 0 3 2 2 0 1 4 EN 6 1 0 0 0 3 1 1 2 0 0 0 EN I S O 1 2 1 0 0 2 0 1 0 EN 6 1 0 1 0 1 2 0 1 0 EN 6 0 8 2 5 1 2 0 0 7 EN 6 1 0 0 0 6 1 2 0 0 7 EN 6 1 0 0 0 6 3 2 0 0 7 EN 8...

Page 86: ...2 1 2 0 1 2 EN 5 5 0 1 4 1 2 0 0 6 A2 2 0 1 1 EN 5 5 0 1 4 2 1 9 9 7 A2 2 0 0 8 EN 6 1 0 0 0 3 2 2 0 1 4 EN 6 1 0 0 0 3 1 1 2 0 0 0 EN I S O 1 2 1 0 0 2 0 1 0 EN 6 1 0 1 0 1 2 0 1 0 EN 6 0 8 2 5 1 2 0...

Page 87: ...0 6 A2 2 0 1 1 EN 5 5 0 1 4 2 1 9 9 7 A2 2 0 0 8 EN 6 1 0 0 0 3 2 2 0 1 4 EN 6 1 0 0 0 3 1 1 2 0 0 0 EN I S O 1 2 1 0 0 2 0 1 0 EN 6 1 0 1 0 1 2 0 1 0 EN 6 0 8 2 5 1 2 0 0 7 EN 6 1 0 0 0 6 1 2 0 0 7 E...

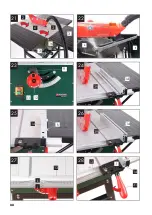
Page 88: ...25 27 23 22 26 28 24 21 s t 3 3 14 14 l h 2 6 3 31 14 13 39 39 14 13 k j 11 12 9 16 88...

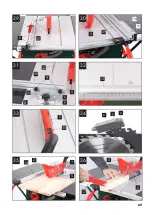
Page 89: ...33 31 29 32 30 14 14 m h q o p 39 39 32 39 33 13 35 2 8 5 5 45 34 z y z 35 5 1 2 14 36 5 2 17 89...

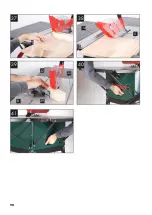
Page 90: ...40 41 37 38 5 14 39 8 39 32 32 90...

Page 91: ...91...

Page 92: ...CO KG Stockst dter Stra e 20 D 63762 Gro ostheim Last Information Update Stan informacji Stand der Informationen 01 2016 Ident No 72037501012016 PL IAN 273460 273460_par_Tischkreissaege_cover_PL indd...

Reviews: