


24
GB
MT
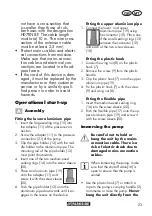
bent pipe or water hose.
• You can adjust the height of the plastic
hook after loosening the wing nut (8).
This way you can hang the pump in
a rain barrel without it touching the
ground and sucking in possible sedi-
ment.
• When the water level is low, you can
also place the pump in the rain barrel.
The shut-off valve must protrude over
the edge of the container.
Beware of dirt and sand accumu-
lating at the bottom of the barrel
over time, which could damage the
pump.
We recommend placing the pump
on a brick.
Mains connection
The pump you have purchased is already
equipped with a safety plug. The pump
is intended for connection to an earthed
socket with residual current circuit breaker
(RCCB) with 230 V ~ 50 Hz.
Operation
The minimum water level on initial
start-up must be 60 mm.
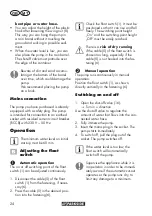
Adjusting the fl oat
switch
Automatic operation
The on or off switching point of the fl oat
switch (
1) can be adjusted continuously.
1. Disconnect the cable (
5
) of the fl oat
switch (
1) from the fastening, if neces-
sary (
6).
2. Press the cable (
5) in the desired posi-
tion into the fastening (
6).
Check the fl oat switch (
1). It must be
positioned so that it can rise and fall
freely. The switching point height
„On“ and the switching point height
„Off“ must be easily reached.
There is a
risk of dry running
if the cable (
5) of the
fl oat switch
is
chosen too long, especially if the
cable (
5) is not hooked into the fas-
tening (
6) .
Manual operation
The pump runs
continuously in manual
operation.
Position the fl oat switch (1), as shown,
directly vertically in the fastening (6).
Switching on and off
1. Open the shut-off valve (
16).
→
Turn in + direction
Use the shut-off valve to regulate the
amount of water that fl ows into the con-
nected water hose.
2. Fully immerse the pump.
3. Insert the mains plug in the socket. The
pump starts immediately.
4. To switch off, pull the plug out of the
socket. The pump switches off.
If the water level is too low, the
fl oat switch will automatically
switch off the pump.
Supervise the appliance while it is
in operation in order to be immedi-
ately aware if the automatic cut-out
operates or the pump runs dry, to
limit any damage to a minimum.
Summary of Contents for PRP 400 B1
Page 3: ...1 3 5 6 7 8 10 11 13 14 15 12 9 17 19 20 18 16 4 2...
Page 4: ...15 21 11 14 10 19 19 19 20 19 20 18 13 13 18 12 7 14 17 8 17 9 7...
Page 148: ...148 SI...
Page 175: ...175 BG 2x 5x 3 4 5 8 1 2 3 4 5 6 7 8 9 10 11 12 13 14 15 16 17 18 19 20 21 22 23...
Page 177: ...177 BG 35 C 2000 m...
Page 178: ...178 BG FI 30 mA 6...
Page 180: ...180 BG 16 7 2 8 230 V 50 Hz 60 mm 1 1 5 1 6 2 5 6 1 5 5 6 1 6 1 16 2...
Page 181: ...181 BG 3 4 16 3 1 4 1 2 22 3 22 4 23 5 23 22 23 35 C...
Page 182: ...182 BG 1 17 19 2 17 19 12 13 14 www grizzlytools shop 185 7 91105969 10 11 13 15 5x 17 19 2x...
Page 183: ...183 BG 1 22 23 16 1 22 23 35 C...
Page 184: ...184 BG 3 II 3...
Page 185: ...185 BG IAN 420315_2207 BG 00800 111 4920 grizzly lidl bg IAN 420315_2207...
Page 186: ...186 BG 20 63762 33 3 II III...
Page 190: ...190 GR 2000 m 35 C...
Page 191: ...191 GR RCD 30 mA 6 H07RN8 F 10 m...
Page 193: ...193 GR 8 RCD 230 V 50 Hz 60 mm 1 1 5 1 6 2 5 6 1 On Off 5 5 6 1 6 1 16 2 3 4...
Page 194: ...194 GR 16 3 1 4 1 2 22 3 22 4 23 5 23 22 23 35 C...
Page 196: ...196 GR 1 22 23 16 1 22 23 35 C...
Page 197: ...197 GR 3...
Page 199: ...199...
Page 217: ...217...
Page 218: ...1 22 23 1 6 5 17 19 12 6...
Page 219: ......


