16 GB
Assembly
m
WARNING!
Always switch the product off, remove
the battery pack
[
]
and let the
product cool down before performing
inspection, maintenance and cleaning
work!
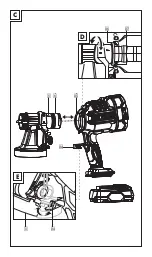
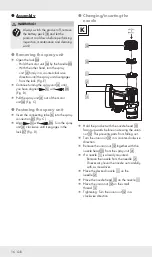
Removing the spray unit
Open the lock
[
]
:
–
Hold the motor unit
[
]
by the handle
[
]
.
–
With the other hand, turn the spray
unit
[
4]
firmly in a counter-clockwise
direction until the spray unit disengages
from the lock (Fig. E).
Continue turning the spray unit
[
4]
until
you have aligned
[
5]
with
[
]
(Fig. D).
Pull the spray unit
[
4]
out of the motor
unit
[
]
(Fig. C).
Fastening the spray unit
Insert the connecting tube
[
6]
into the spray
connection
[
]
(Fig. C).
Align
[
5]
with
[
]
. Turn the spray
unit
[
4]
clockwise until it engages in the
lock
[
]
(Fig. D).
Changing/inserting the
nozzle
K
[
]
[
]
[
1]
[
3]
[
2]
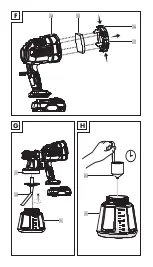
Hold the product with the nozzle head
[
]
facing upwards before unscrewing the union
nut
[
]
. This prevents parts from falling out.
Turn the union nut
[
]
in a counter-clockwise
direction.
Remove the union nut
[
]
together with the
nozzle head
[
]
from the spray unit
[
4]
.
If a nozzle
[
1]
is already mounted:
–
Remove the nozzle from the needle
[
2]
.
–
If necessary, lever the nozzle out carefully
with a screwdriver.
Place the desired nozzle
[
1]
on the
needle
[
2]
.
Place the nozzle head
[
]
on the nozzle
[
1]
.
Place the union nut
[
]
on the small
thread
[
3]
.
Tightening: Turn the union nut
[
]
in a
clockwise direction.
Summary of Contents for PFSA 20-Li B2
Page 3: ...A x4 1 5 mm 1 8 mm 2 2 mm 2 6 mm 2 9 8 1 4 3 5 6 7...
Page 4: ...B...
Page 5: ...C E D 6 5...
Page 6: ...F G H 9 9...
Page 7: ...28 18 29 30 I 18 33 32 34 31 J...
Page 24: ...21 GB EC declaration of conformity...
Page 41: ...38 FI EU vaatimustenmukaisuusvakuutus...
Page 58: ...55 SE EG f rs kran om verensst mmelse...
Page 75: ...72 PL Deklaracja zgodno ci WE...
Page 92: ...89 LT ES atitikties deklaracija...
Page 109: ...106 EE ELi vastavusdeklaratsioon...
Page 126: ...123 LV ES atbilst bas deklar cija...

