background image

PDWS 125 A1

NL

BE

 45


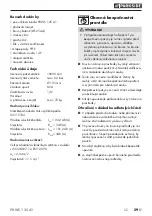
Inhoud van het pakket

1 perslucht-haakse slijper PDWS 125 A1
1 hulphandgreep
1 slijpschijf (Ø 125mm)
1 pensleutel
1 steeksleutel
1 inbussleutel
1 m PTFE-tape
1 steeknippel (1/4")
1 olieflesje
1 gebruiksaanwijzing

Technische gegevens

Nominaal toerental:   10000 min

-1

Nominale luchtdruk:   max. 6,3 bar
Schijfmaat: 

 Ø 125 mm

Schroefdraad:  

M14

Steeknippel:  

1/4"

Gewicht (met hulphandgreep): ca. 1,72 kg

Geluidsemissiewaarden:

Gemeten waarde voor geluid vastgesteld conform 
ISO 15744:
Geluidsdrukniveau:  

L

pA

 = 90,2 dB (A)

Onzekerheid: K

pA

 = 3 dB (A)

Geluidsvermogensniveau:  L

WA

 = 101,2 dB (A)

Onzekerheid:  

K

WA

 = 3 dB (A)

Trillingsemissiewaarde:

Totale trillingswaarde vastgesteld conform  
ISO 28927-1 en EN 12096:
a

h

 = 2,44 m/s

2

Onzekerheid K = 1,5 m/s

2

WARNING!

 Algemene  veiligheids-
regels


WAARSCHUWING!


Voor meerdere gevaren: de veiligheidsvoor-
schriften dienen voorafgaand aan het opzet-
ten, het werking, de reparatie, het onderhoud 
en de verwisselen van accessoires op de slijp-
machine voor slijpschijven en voor het werken 
in de buurt van het apparaat te worden 
gelezen en begrepen. Indien u dit nalaat, kan 
dit leiden tot zwaar lichamelijk letsel.


De slijpmachine voor slijpschijven mag uitslui-
tend door ter zake gekwalificeerde en opge-
leide personen worden opgesteld, ingesteld of 
gebruikt.


Deze machine mag niet worden gemodificeerd. 
Wijzigingen kunnen de werkzaamheid van de 
veiligheidsmaatregelen verminderen en de ri-
sico's verhogen voor wie het apparaat bedient.


De veiligheidsvoorschriften mogen niet verloren 
gaan — geef ze aan degene die het apparaat 
bedient.


Gebruik nooit beschadigde slijpmachines voor 
slijpschijven.

Risico's door weggeslingerde delen


Bij een breuk van het werkstuk of van accessoires 
of zelfs van het apparaat zelf kunnen delen met 
hoge snelheid weggeslingerd worden.


Bij het werken met de slijpmachine voor slijp-
schijven moet altijd slagbestendige oogbescher-
ming worden gedragen. De beschermingsgraad 
moet voor elk afzonderlijk gebruik beoordeeld 
worden.


Zorg ervoor dat het werkstuk goed vastgeklemd 
wordt.


Zorg ervoor dat de slijpschijf veilig op de slijp-
machine voor slijpschijven is geklemd.

Summary of Contents for PDWS 125 A1

Page 1: ...LSCHLEIFER Originalbetriebsanleitung AIR ANGLE GRINDER Translation of the original instructions AMOLADORA ANGULAR NEUMÁTICA Traducción del manual de instrucciones original ESMERILADORA ANGULAR A AR COMPRIMIDO Tradução do manual de instruções original PERSLUCHT HAAKSE SLIJPER Vertaling van de originele gebruiksaanwijzing PNEU ÚHLOVÁ BRUSKA Překlad originálního provozního návodu ...

Page 2: ...e yourself with all functions of the device Avant de lire le mode d emploi ouvrez la page contenant les illustrations et familiarisez vous ensuite avec toutes les fonctions de l appareil Vouw vóór het lezen de pagina met de afbeeldingen open en maak u vertrouwd met alle functies van het apparaat Před čtením si otevřete stranu s obrázky a potom se seznamte se všemi funkcemi přístroje Antes de empez...

Page 3: ......

Page 4: ...b und Dämpfe 6 Gefährdungen durch Lärm 6 Gefährdungen durch Schwingungen 7 Zusätzliche Sicherheitsanweisungen für pneumatische Maschinen 7 Besondere Sicherheitshinweise zum Schleifen und Trennschleifen 7 Weitere besondere Sicherheitshinweise zum Trennschleifen 8 Rückschlag und entsprechende Sicherheitshinweise 8 Inbetriebnahme 9 Zusatzgriff anbringen 9 Schutzhaube anbringen 9 Schleifscheibe anbring...

Page 5: ...er Veränderung der Maschine gilt als nicht bestimmungsgemäß und birgt erhebliche Unfallgefahren Nicht zum gewerblichen Gebrauch Erklärung der Symbole WARNING Vor der Inbetriebnahme die Bedienungsanleitung lesen Schutzbrille tragen Drehrichtung Täglich ölen P04 2017 Herstellungsdatum V04 2020 Ablaufdatum Lesen Sie die Original Betriebsan leitung und die Sicherheitshinwei se vor der Inbetriebnahme G...

Page 6: ...Maschine zu lesen und müssen verstanden werden Ist dies nicht der Fall so kann dies zu schweren körperlichen Verletzungen führen Die Schleifmaschine für Schleifmittel sollte aus schließlich von entsprechend qualifizierten und geschulten Bedienungspersonen eingerichtet eingestellt oder verwendet werden Diese Maschine darf nicht verändert werden Veränderungen können die Wirksamkeit der Sicherheitsmaß...

Page 7: ...ein die Größe die Masse und die Leistung der Maschine zu handhaben Halten Sie die Maschine richtig Seien Sie bereit den üblichen oder plötzlichen Bewegungen entgegenzuwirken Halten Sie beide Hände bereit Achten Sie darauf dass Ihr Körper im Gleichge wicht ist und dass Sie sicheren Halt haben Geben Sie Befehlseinrichtung zum Ingang oder Stillsetzen im Falle einer Unterbrechung der Energieversorgung...

Page 8: ...dem Gewindetyp und größe des Spindelgewindes entspricht Unterziehen Sie das Schleifmittel vor der Ver wendung einer Inspektion Verwenden Sie keine Schleifmittel die möglicherweise fallen gelassen wurden oder die Absplitterungen Risse oder andere Fehler aufweisen Es ist sicherzustellen dass das Schleifmittel vor der Benutzung ordnungsgemäß befestigt und fest genug angezogen ist die Schleifmaschine ...

Page 9: ...Absaugen oder zur Unterdrückung von Flugstaub oder Dämpfen vorgesehenen Einbau oder Zubehörteile der Maschine sollten den Anweisungen des Her stellers entsprechend eingesetzt und gewartet werden Die Verbrauchsmaterialien Maschinenwerk zeuge sind den Empfehlungen dieser Anleitung entsprechend auszuwählen zu warten und zu ersetzen um eine unnötige Intensivierung der Staub oder Dampfentwicklung zu ve...

Page 10: ...esehen sind Zusätzliche Sicherheitsanweisungen für pneumatische Maschinen Druckluft kann ernsthafte Verletzungen verursachen Sorgen Sie im Falle dass die Maschine nicht gebraucht wird sowie vor dem Austausch von Zubehörteilen oder vor der Ausführung von Reparaturarbeiten dafür dass die Luft zufuhr geschlossen ist der Luftschlauch nicht unter Druck steht und dass die Maschine von der Luftzufuhr get...

Page 11: ...s Druckluft werkzeug mit der sich drehenden Scheibe direkt auf Sie zugeschleudert werden Falls die Trennscheibe verklemmt oder Sie die Arbeit unterbrechen schalten Sie das Gerät aus und halten Sie es ruhig bis die Scheibe zum Stillstand gekommen ist Versuchen Sie nie die noch laufende Trennscheibe aus dem Schnitt zu ziehen sonst kann ein Rückschlag erfolgen Ermitteln und beheben Sie die Ursa che f...

Page 12: ...Kanten usw Verhindern Sie dass Einsatzwerkzeuge vom Werkstück zurückprallen und verklem men Das rotierende Einsatzwerkzeug neigt bei Ecken scharfen Kanten oder wenn es abprallt dazu sich zu verklemmen Dies verursacht einen Kontrollverlust oder Rückschlag e Verwenden Sie kein Ketten oder gezähntes Sägeblatt Solche Einsatzwerk zeuge verursachen häufig einen Rückschlag oder den Verlust der Kontrolle ü...

Page 13: ...gen lösen Die 2 Seiten des Vorderflansch sind unterschied lich Den Vorderflansch wie folgt auf die Spindel aufschrauben Bei dünnen Schleifscheiben siehe Abbildung 1 Der Bund des Vorderflansches zeigt nach oben damit die dünne Schleifscheibe sicher gespannt werden kann 12 3 2 mm Abb 1 Bei dicken Schleifscheiben siehe Abbildung 2 3 2 mm Abb 2 Der Bund des Vorderflansches zeigt nach unten damit der Vorde...

Page 14: ...das Werkstück bringen Maschine nach dem Ausschalten erst dann ablegen wenn der Motor zum Stillstand gekommen ist 1 Passendes Einsatzwerkzeug anbringen 2 Arbeitsdruck einstellen gemessen am Lufteintritt bei eingeschaltetem Druckluft werkzeug Maximal zulässiger Arbeitsdruck siehe Kapitel Technische Daten 3 Druckluftwerkzeug an die Druckluftversor gung anschließen 4 Einschalten Einschaltsperre nach v...

Page 15: ...den örtlichen Recyclebehältern entsorgt werden Werfen Sie das Gerät nicht in den Hausmüll Möglichkeiten zur Entsorgung des ausgedienten Gerätes erfahren Sie bei Ihrer Gemeinde oder Stadtverwaltung Garantie der Kompernaß Handels GmbH Sehr geehrte Kundin sehr geehrter Kunde Sie erhalten auf dieses Gerät 3 Jahre Garantie ab Kaufdatum Im Falle von Mängeln dieses Produkts stehen Ihnen gegen den Verkäuf...

Page 16: ...hres Anliegens zu gewährleisten folgen Sie bitte den folgenden Hinweisen Bitte halten Sie für alle Anfragen den Kassenbon und die Artikelnummer z B IAN 12345 als Nachweis für den Kauf bereit Die Artikelnummer entnehmen Sie bitte dem Typenschild einer Gravur auf dem Titelblatt ihrer Anleitung unten links oder als Aufkleber auf der Rück oder Unterseite Sollten Funktionsfehler oder sonstige Mängel au...

Page 17: ...odukt mit den folgenden Normen normativen Dokumenten und EG Richtlinien übereinstimmt Maschinenrichtlinie 2006 42 EG Angewandte harmonisierte Normen EN ISO 11148 7 2012 Typbezeichnung der Maschine Druckluft Winkelschleifer PDWS 125 A1 Herstellungsjahr 01 2017 Seriennummer IAN 285213 Bochum 20 01 2017 Semi Uguzlu Qualitätsmanager Technische Änderungen im Sinne der Weiterentwicklung sind vorbehalten...

Page 18: ...s due to vibrations 21 Additional safety instructions for pneumatic machines 21 Special safety instructions for grinding and abrasive cutting 22 Additional special safety instructions for abrasive cutting 22 Kickback and corresponding safety instructions 22 Operation 23 Attaching the auxiliary handle 23 Attaching the protective cover 23 Attaching the grinding disc 24 Fitting the connector nipple 2...

Page 19: ...f or modi fication to the machine is deemed to be improper and carries the risk of serious personal injury Not for commercial use Explanation of the symbols WARNING Read the instruction manual before use Wear safety goggles Rotation direction Oil daily P04 2017 Production date V04 2020 Expiry date Read the original operating instructions and safety instructions before initial operation Wear ear pro...

Page 20: ...ation emission value determined in accordance with ISO 28927 1 and EN 12096 ah 2 44 m s2 Uncertainty K 1 5 m s2 WARNING General safety rules WARNING For multiple hazards Please ensure that you have read and understood the safety instruc tions before adjusting operating repairing maintaining or replacing accessories on the angle grinder as well as before working in the vicinity of the machine Failu...

Page 21: ...y before replacing the abrasive media or servicing it Hazards caused by entanglement Suffocation scalping and or cut wounds can occur if loose clothing jewellery necklaces hair or gloves are not kept away from the machine and its accessories Hazards during operation Avoid contact with the rotating spindle and the fitted grinding disc in order to avoid cuts to the hands and other body parts When usin...

Page 22: ...recommended by the manufacturer of the grinding machine for abrasive media Never use any other types or sizes of accessory parts and consumables Ensure that the dimensions of the abrasive me dia are compatible with those of the grinding machine for abrasive media and that the abra sive media fits onto the spindle Ensure that the thread type and size of the abrasive media exactly matches the thread ...

Page 23: ... created the main priority must be to control these at the site of their re lease All inserts or accessories of the machine in tended for collecting extracting or suppressing airborne dust or vapours or should be used and serviced in accordance with the manufacturer s instructions Consumables machine tools should be se lected maintained and replaced in accordance with the recommendations in this g...

Page 24: ...tand a clamp or a compensation device to support the weight of the machine Hold the machine securely but not too firmly while maintaining the necessary hand reaction force as the vibration risk generally increases the harder the machine is held Use intermediate layers if these are intended for the bonded abrasive media Additional safety instructions for pneumatic machines Compressed air can cause s...

Page 25: ...of smaller compressed air tools and can break Additional special safety instructions for abrasive cutting Avoid cutting disc jams or excessive contact pressure Do not make any excessively deep cuts Overloading the cutting disc increases the stress and likelihood of tilting or jamming and thus the possibility of kickback or breakage of the grinding tool Avoid the area in front of and behind the rot...

Page 26: ...kback will force the compressed air tool in the opposite direction to the direction of rotation of the grinding disc at the block age d Take special care when working around corners sharp edges etc Avoid allowing the accessory tool to bounce back from the workpiece or jam The rotating ac cessory tool is more likely to jam in corners or sharp edges or if it bounces This can cause a loss of control ...

Page 27: ...ning the front flange The 2 sides of the front flange are different Screw the front flange onto the spindle as follows For thin grinding discs see figure 1 The collar on the front flange faces upwards so that the thin grinding disc can be safely clamped 12 3 2 mm fig 1 For thick grinding discs see figure 2 3 2 mm fig 2 The collar on the front flange faces downwards so that the front flange can be safely atta...

Page 28: ...to the workpiece After switching off only put the machine down once the motor has come to a standstill 1 Attach a suitable accessory tool 2 Adjust the operating pressure measured at the air intake when the compressed air tool has been switched on Please refer to the section entitled Technical data for the maximum permissible operating pressure 3 Connect the compressed air tool to the com pressed ai...

Page 29: ... recycling containers Do not dispose of the appliance in the normal domestic waste Your local community or municipal authorities can provide information on how to dispose of the worn out appliance Kompernass Handels GmbH warranty Dear Customer This appliance has a 3 year warranty valid from the date of purchase If this product has any faults you the buyer have certain statutory rights Your statuto...

Page 30: ...nsure quick processing of your case please observe the following instructions Please have the till receipt and the item number e g IAN 12345 available as proof of purchase You will find the item number on the type plate an engraving on the front page of the instructions bottom left or as a sticker on the rear or bot tom of the appliance If functional or other defects occur please contact the servic...

Page 31: ...complies with the following stand ards normative documents and EC directives Machinery Directive 2006 42 EC Applied harmonised standards EN ISO 11148 7 2012 Type designation of machine Air angle grinder PDWS 125 A1 Year of manufacture 01 2017 Serial number IAN 285213 Bochum 20 01 2017 Semi Uguzlu Quality Manager The right to effect technical changes in the context of further development is reserved...

Page 32: ...és par les oscillations 34 Instructions de sécurité supplémentaires pour les machines pneumatiques 35 Avertissements de sécurité spéciaux pour le meulage et le tronçonnage à la meule 35 Autres avertissements de sécurité particuliers concernant le tronçonnage au disque 36 Recul brutal et consignes de sécurité correspondantes 36 Mise en service 37 Fixer la poignée supplémentaire 37 Fixer le capot pr...

Page 33: ...non conforme et s accom pagne de risques d accident non négligeables Ne convient pas à un usage commercial Explication des symboles WARNING Avant la mise en service veuillez lire le mode d emploi Porter des lunettes de protection Sens de rotation Huiler quotidiennement P04 2017 Date de production V04 2020 Date d expiration Lisez les instructions d utilisation d origine et les consignes de sécurité...

Page 34: ...imité de la machine En cas contraire de graves blessures corporelles peuvent s ensuivre Cette meuleuse pour meule disque doit être exclusivement installée réglée et utilisée par du personnel qualifié et formé en conséquence Cette machine ne doit pas être modifiée Les modifications risquent de restreindre l efficacité des mesures de sécurité et d augmenter les risques pour l opérateur Les consignes de s...

Page 35: ... immobilisation en cas d interruption de l ali mentation énergétique Utiliser uniquement les lubrifiants recommandés Il faut porter des lunettes de protection le port de gants de protection et d une tenue de protec tion est recommandé Pendant des travaux au dessus de la tête portez toujours un casque de protection Après avoir éteint la machine ne la déposer qu après que la meule s est immobilisée P...

Page 36: ...il faut éteindre la machine immédiatement si des vibrations considérables ou d autres dégâts apparaissent il faut déterminer la cause de ces pannes Vérifier les dimensions de la broche et d autres caractéristiques importantes de la broche pour éviter que son extrémité ne touche le fond de l orifice de meules boisseaux meules coniques ou meules tiges présentant des inserts taraudés destinés à les fixe...

Page 37: ...de poussière et de vapeurs génératrices à leur tour d un environne ment à risque d explosion Risques dus au bruit La présence d un haut niveau de bruit peut si la protection anti bruit n est pas suffisante pro voquer des lésions auditives permanentes une perte d acuité auditive et d autres problèmes dont par exemple un acouphène tintements bourdonnements divers sifflements Des mesures comme par ex l u...

Page 38: ... avec la machine et des flexibles entre eux Veillez à ce que la pression maximale indiquée sur la machine ne soit pas dépassée Ne portez jamais les machines pneumatiques en tenant le flexible Avertissements de sécurité spéciaux pour le meulage et le tronçonnage à la meule Utilisez exclusivement les meules disques homo logués pour aller avec votre outil pneumatique ainsi que le capot protecteur prévu...

Page 39: ...tayée des deux côtés de la meule autant au niveau de la meule à tronçonner que du bord Soyez particulièrement prudent lors des coupes plongeantes dans les murs existants ou dans d autres zones n offrant pas une visibilité complète Le disque de tronçonnage plongeant peut provoquer un recul en tranchant des conduites d eau ou de gaz des lignes élec triques ou d autres objets Recul brutal et consignes...

Page 40: ...ilisation vissez le nipple Fixer la poignée supplémentaire ATTENTION Ne travailler qu avec une poignée supplé mentaire fixée Vissez la poignée supplémentaire à fond sur le côté gauche ou droit de la machine Fixer le capot protecteur ATTENTION Pour des raisons de sécurité utilisez toujours le capot protecteur Le capot de protection est monté sur la livraison avec 2 vis sur l appareil Pour la rotatio...

Page 41: ...sserrer le flasque avant Les 2 côtés du flasque avant ne sont pas iden tiques Vissez le flasque avant comme suit sur la broche Meules disques minces voir la figure 1 Le collet du flasque avant regarde vers le haut afin que la meule le disque mince puisse être serré de manière sûre 12 3 2 mm Fig 1 Meules épaisses voir la figure 2 3 2 mm Fig 2 Le collet du flasque avant regarde vers le bas afin que le flasque...

Page 42: ...on de la pièce Après avoir éteint la machine ne la déposer sur une surface qu après que le moteur se soit immobilisé 1 Monter un outil d intervention adapté 2 Régler la pression de travail mesurée à l orifice d admission d air lorsque l outil pneumatique est allumé Pression de tra vail maximale admissible voir le chapitre Caractéristiques techniques 3 Raccorder l outil pneumatique à l alimenta tion...

Page 43: ...ice après vente ou un spécialiste et uniquement avec des pièces de rechange d origine Cela assure le maintien de la sécurité de l appareil Mise au rebut L emballage se compose de matières recyclables Il peut être éliminé dans les conteneurs de recyclage locaux Ne pas jeter l appareil avec les ordures ménagères Se renseigner auprès de votre mairie ou des ser vices de votre commune pour connaître le...

Page 44: ...nel La garantie est annulée en cas d entretien incorrect et inapproprié d usage de la force et en cas d intervention non réalisée par notre centre de service après vente agréé Procédure en cas de garantie Afin de garantir un traitement rapide de votre demande veuillez suivre les indications suivantes Veuillez avoir à portée de main pour toutes questions le ticket de caisse et la référence article p...

Page 45: ...produit est en conformité avec les normes documents normatifs et directives CE suivants Directive Machines 2006 42 CE Normes harmonisées appliquées EN ISO 11148 7 2012 Désignation du modèle de la machine Meuleuse d angle pneumatique PDWS 125 A1 Année de construction 01 2017 Numéro de série IAN 285213 Bochum le 20 01 2017 Semi Uguzlu Responsable qualité Sous réserve de modifications techniques à des...

Page 46: ...door lawaai 48 Risico s door trillingen 49 Bijkomende veiligheidsvoorschriften voor pneumatische machines 49 Bijzondere veiligheidsvoorschriften voor slijpen en doorslijpen 49 Verdere bijzondere veiligheidsvoorschriften voor doorslijpen 50 Terugslag en passende veiligheidsmaatregelen 50 Ingebruikname 51 Hulphandgreep aanbrengen 51 Beschermkap aanbrengen 51 Slijpschijf aanbrengen 52 Montage van de ...

Page 47: ...modificatie van het apparaat geldt als niet in overeenstemming met de bestemming en brengt aanzienlijke risico s op ongelukken met zich mee Niet voor commercieel gebruik Uitleg van de symbolen WARNING Lees vóór de ingebruikname de gebruiksaanwijzing Draag een veiligheidsbril Draairichting Dagelijks smeren P04 2017 Productiedatum V04 2020 Vervaldatum Lees de originele gebruiksaan wijzing en de veili...

Page 48: ...ijp machine voor slijpschijven en voor het werken in de buurt van het apparaat te worden gelezen en begrepen Indien u dit nalaat kan dit leiden tot zwaar lichamelijk letsel De slijpmachine voor slijpschijven mag uitslui tend door ter zake gekwalificeerde en opge leide personen worden opgesteld ingesteld of gebruikt Deze machine mag niet worden gemodificeerd Wijzigingen kunnen de werkzaamheid van de ...

Page 49: ...staat zijn om de grootte het gewicht en de prestaties van het apparaat te hanteren Houd het apparaat juist vast wees voorbereid op de gebruikelijke of plotselinge bewegingen Houd beide handen klaar Let erop dat uw lichaam in balans is en dat u stevig staat Schakel het apparaat uit in het geval van een stroomonderbreking Gebruik uitsluitend aanbevolen smeermiddelen Draag een beschermbril het dragen...

Page 50: ... de slijpschijf voor gebruik Gebruik geen slijpschijven die mogelijk zijn gevallen of die splinters scheuren of andere gebreken vertonen Vergewis u er voor het gebruik van dat de slijpschijf volgens de voorschriften is bevestigd en vast genoeg is aangedraaid het apparaat moet minstens 1 min in vastgezette positie bij onbelast toerental draaien het apparaat moet onmiddellijk worden uitgeschakeld wa...

Page 51: ...or het opvangen afzuigen of onderdruk ken van zwevend stof en dampen bedoelde installaties of accessoires van het apparaat moeten volgens de instructies van de fabrikant worden gebruikt en onderhouden De accessoires schijven moeten volgens de aanbevelingen van deze gebruiksaanwijzing worden verwisseld onderhouden en vervan gen om onnodige toename van stof en damp ontwikkeling te vermijden Gebruik ...

Page 52: ...hijven zijn voorzien Bijkomende veiligheidsvoorschriften voor pneumatische machines Perslucht kan ernstig letsel veroorzaken Controleer als het apparaat niet in gebruik is vóór het verwisselen van accessoires en vóór de uitvoering van reparatiewerkzaam heden of de luchttoevoer is afgesloten of de luchtslang niet onder druk staat en of het apparaat is losgekoppeld van de lucht toevoer Richt de luch...

Page 53: ...chijf Als u de doorslijpschijf in het werkstuk van u weg beweegt kan in geval van een terugslag het persluchtgereedschap met de roterende schijf direct in uw richting geslingerd worden Als de doorslijpschijf vastloopt of als u het werk onderbreekt schakelt u het apparaat uit en houdt u het rustig in het materiaal tot de schijf tot stilstand is gekomen Probeer nooit de nog draaiende doorslijpschijf...

Page 54: ...ijpschijf op het blokkeerpunt d Werk bijzonder voorzichtig in de buurt van hoeken scherpe randen enz Voorkom dat de schijf uit het werkstuk terugslaat en vastloopt De roterende schijf heeft de neiging vast te lopen bij hoeken scherpe randen of wanneer hij afketst Dit veroorzaakt verlies aan controle of een terugslag e Gebruik geen kettingzaagblad of getand zaagblad Dergelijke opzetgereedschappen v...

Page 55: ...zijden van de voorflens zijn verschillend Schroef de voorflens als volgt op de spil Bij dunne slijpschijven zie afbeelding 1 De zitting van de voorflens wijst omhoog zodat de dunne slijpschijf veilig kan worden gespannen 12 3 2 mm Afb 1 Bij dikke slijpschijven zie afbeelding 2 3 2 mm Afb 2 De zitting van de voorflens wijst omlaag zodat de voorflens veilig op de spil kan worden aangebracht Vergrendel de...

Page 56: ...el het apparaat eerst in en breng pas dan de schijf naar het werkstuk Leg het apparaat na uitschakeling pas neer wanneer de motor tot stilstand is gekomen 1 Bevestig een passende schijf 2 Stel de werkdruk in gemeten op de luchtin laat bij ingeschakeld persluchtgereedschap Zie voor de maximaal toegestane werkdruk het hoofdstuk Technische gegevens 3 Sluit het persluchtgereedschap aan op de perslucht...

Page 57: ...vriende lijke materialen De verpakking kan in de plaatselijke kringloopcontainers worden gedeponeerd Deponeer het apparaat niet bij het normale huisvuil Informatie over mogelijkheden voor het afvoeren van het afgedankte apparaat krijgt u bij uw ge meentereinigingsdienst Garantie van Kompernaß Handels GmbH Geachte klant U hebt op dit apparaat 3 jaar garantie vanaf de aankoopdatum In geval van gebre...

Page 58: ...ons erkend servicefiliaal zijn uitgevoerd vervalt de garantie Afhandeling bij een garantiekwestie Voor een snelle afhandeling van uw aanvraag neemt u de volgende aanwijzingen in acht Houd voor alle aanvragen de kassabon en het artikelnummer bijv IAN 12345 als aankoop bewijs bij de hand Het artikelnummer vindt u op het typeplaatje in het product gegraveerd op de titelpagina van de gebruiksaanwijzing...

Page 59: ...en hierbij dat dit product voldoet aan de volgende normen normatieve documenten en EU richtlijnen Machinerichtlijn 2006 42 EC Toegepaste geharmoniseerde normen EN ISO 11148 7 2012 Typeaanduiding van het apparaat Perslucht haakse slijper PDWS 125 A1 Productiejaar 01 2017 Serienummer IAN 285213 Bochum 20 01 2017 Semi Uguzlu Kwaliteitsmanager Technische wijzigingen vanwege verdere ontwikkeling voorbe...

Page 60: ...ní hlukem 62 Ohrožení v důsledku vibrací 63 Dodatečné bezpečnostní pokyny pro pneumatické stroje 63 Speciální bezpečnostní pokyny k broušení a rozbrušování 63 Další speciální bezpečnostní pokyny k rozbrušování 64 Zpětný ráz a příslušné bezpečnostní pokyny 64 Uvedení do provozu 65 Namontování přídavné rukojeti 65 Namontování ochranného krytu 65 Namontování brusného kotouče 66 Montáž zástrčkové vsuv...

Page 61: ...ím a mohou způsobovat značná nebezpečí úrazu Není určeno pro komerční použití Vysvětlení symbolů WARNING Před uvedením do provozu si přečtěte návod k obsluze Noste ochranné brýle Směr otáčení Denně naolejovat P04 2017 Datum výroby V04 2020 Datum vypršení lhůty Před uvedením do provozu si pře čtěte původní návod k obsluze a bezpečnostní pokyny Používejte ochranu sluchu Noste bezpečnostní obuv Noste...

Page 62: ...i přečíst před seřízením provozem opravou údržbou a výměnou příslušenství na brusce na brusné kolíčky a před prací v blízkosti stroje a musíte jim rozumět Pokud tomu tak není může to vést k vážnému tělesnému zranění Brusku na brusné prostředky by měly seřizovat nastavovat nebo používat výhradně kvalifikova né a zaškolené obsluhující osoby Tento stroj se nesmí modifikovat Změny by mohly snížit účinno...

Page 63: ...sí být fyzicky schopna zvládnout velikost hmotnost a výkon stroje Držte stroj správně Buďte připraveni na půso bení obvyklých nebo náhlých pohybů Mějte připravené obě ruce Dbejte na to aby bylo vaše tělo v rovnováze a abyste měli bezpečnou stabilitu Při přerušení dodávky energie pro uvedení do chodu nebo zastavení uvolněte hlavní vypínač Používejte pouze doporučené brusné prostředky Musí se použív...

Page 64: ...m zkontrolujte brusný prostředek Nepoužívejte brusné prostředky které snad spadly nebo se odlupují mají praskliny nebo jiné vady Musí se zajistit že je brusný prostředek před použitím správně upevněn a dostatečně utažen bruska na brusné prostředky se minimálně 1 mi nutu musí nechat běžet v bezpečné poloze při volnoběžných otáčkách stroj se musí okamžitě vypnout pokud se zjistí značné vibrace nebo ...

Page 65: ...hu nebo výparů se musí používat a udržovat podle pokynů výrobce Spotřební materiál nástroje se musí zvolit udr žovat a vyměňovat v souladu s doporučeními uvedenými v tomto návodu aby se zabránilo zbytečnému zintenzivnění tvorby prachu nebo výparů Používejte dýchací přístroje podle pokynů svého zaměstnavatele nebo jak to vyžadují zdravotní a bezpečnostní předpisy při práci Zpracování určitých mater...

Page 66: ...ěnou příslušenství nebo před provedením opravy dbejte na to aby byl uzavřen přívod vzduchu vzduchová hadice nebyla pod tlakem a aby byl stroj odpojen od přívodu vzduchu Proudem vzduchu nikdy nemiřte proti sobě ani jiným osobám Šlehající hadice mohou způsobit vážná zranění Proto vždy zkontrolujte zda jsou hadice a upevňovací prostředky nepoškozené nebo se neuvolnily Pokud se použijí univerzální oto...

Page 67: ...šejte vytáhnout z místa řezu dělicí ko touč který se ještě pohybuje protože může dojít ke zpětnému rázu Zjistěte a odstraňte příčinu vzpříčení Nezapínejte pneumatické nářadí znovu dokud se nachází v obrobku Než budete opatrně pokračovat v řezu nechte dělicí kotouč nejprve rozběhnout na jeho nejvyšší otáčky Jinak se kotouč může vzpříčit vyskočit z obrobku nebo vést ke zpětnému rázu Desky nebo velké...

Page 68: ...v oblasti rohů a ost rých hran a při odrazu od obrobku To vede ke ztrátě kontroly nebo ke zpětnému rázu e Nepoužívejte pilový list určený pro řetězovou pilu ani ozubený pilový list Takové vložené nástroje způsobují často zpětný ráz nebo ztrátu kontroly nad pneumatickým nástrojem Uvedení do provozu UPOZORNĚNÍ Před prvním provozem našroubujte zástrčko vou vsuvku Namontování přídavné rukojeti POZOR S...

Page 69: ... uvolnění přední příruby 2 strany přední příruby se liší Přední přírubu našroubujte na vřeteno takto V případě tenkých brusných kotoučů viz obrázek 1 Nákružek přední příruby ukazuje směrem nahoru aby se tenký brusný kotouč mohl bezpečně upnout 12 3 2 mm Obr 1 V případě tlustých brusných kotoučů viz obrázek 2 3 2 mm Obr 2 Nákružek přední příruby ukazuje směrem dolů aby se přední příruba mohla bezpe...

Page 70: ...y oběma rukama Nejprve ho zapněte pak na obrobek přiložte vložený nástroj Po vypnutí stroj odložte až tehdy až když se zastavil motor 1 Namontujte vhodný vložený nástroj 2 Nastavte pracovní tlak měřen na vstupu vzduchu při zapnutém pneumatickém nástro ji Maximálně přípustný pracovní tlak viz kapitola Technické údaje 3 Zapojte pneumatický nástroj do napájení stlačeným vzduchem 4 Zapnutí Pojistku pr...

Page 71: ...al je z ekologických materiálů Lze ho zlikvidovat v místních recyklačních kontej nerech Přístroj nevyhazujte do domovního odpadu Informace o možnostech likvidace vysloužilého přístroje vám podá obecní nebo městský úřad Záruka společnosti Kompernass Handels GmbH Vážená zákaznice vážený zákazníku na tento přístroj získáváte záruku v trvání 3 let od data zakoupení V případě závad tohoto výrobku máte ...

Page 72: ...autorizovanými servisními provozovnami záruční nároky zanikají Vyřízení v případě záruky Pro zajištění rychlého Vaší žádosti postupujte podle následujících pokynů Pro všechny dotazy mějte připraven pokladní lístek a číslo výrobku např IAN 12345 jako doklad o koupi Číslo výrobku naleznete na typovém štítku rytině na titulní straně svého návodu vlevo dole nebo jako nálepku na zadní nebo spodní stran...

Page 73: ...eme že tento výrobek je ve shodě s následujícími normami normativními dokumenty a směrnicemi ES Směrnice o strojních zařízeních 2006 42 EC Použité harmonizované normy EN ISO 11148 7 2012 Typové označení stroje Pneu úhlová bruska PDWS 125 A1 Rok výroby 01 2017 Sériové číslo IAN 285213 Bochum 20 01 2017 Semi Uguzlu manažer kvality Technické změny ve smyslu dalšího vývoje jsou vyhrazeny ...

Page 74: ...or las vibraciones 77 Indicaciones de seguridad adicionales para las máquinas neumáticas 77 Indicaciones de seguridad especiales para la amoladura y el corte 77 Otras indicaciones de seguridad especiales para los discos de corte 78 Retroceso e indicaciones de seguridad 78 Puesta en funcionamiento 79 Montaje del mango adicional 79 Montaje de la cubierta de protección 79 Montaje del disco abrasivo 8...

Page 75: ...ato no es apto para su uso comercial o industrial Explicación de los símbolos WARNING Lea las instrucciones de uso antes de la puesta en funciona miento Utilice gafas de protección Sentido de giro Lubrique el aparato a diario P04 2017 Fecha de fabricación V04 2020 Fecha de caducidad Lea las instrucciones de uso originales y las indicaciones de seguridad antes de poner el aparato en funcionamiento ...

Page 76: ...lo contrario pueden producirse lesiones personales graves Solo el personal con la debida formación o cualificación puede instalar ajustar o utilizar la amoladora Esta máquina no admite modificaciones Las modificaciones pueden reducir la efectividad de las medidas de seguridad y aumentar los riesgos para el usuario Las indicaciones de seguridad no deben perderse entrégueselas al usuario No use nunca a...

Page 77: ...las dos manos preparadas Asegúrese de mantener el equilibrio y trabaje con una postura corporal segura Desbloquee el dispositivo de control de inicio y de parada si se produce una interrupción de la corriente eléctrica Utilice exclusivamente los lubricantes recomen dados Es obligatorio utilizar gafas de protección además se recomienda el uso de guantes y de ropa de protección Para la realización d...

Page 78: ...s de utilizarla No utilice ninguna herra mienta intercambiable que haya podido caerse o que presente desperfectos fisuras o cualquier otro daño Antes de su uso debe garantizarse que la herramienta intercambiable esté bien fijada y apretada debe ponerse en funcionamiento la amoladora durante un mínimo de 1 minuto en una posición segura y al ralentí debe apagar se inmediatamente la máquina si se aprec...

Page 79: ... prin cipal deberá ser controlarlos en el lugar desde el que se liberen Todos los componentes o accesorios de la máquina previstos para recolectar aspirar o mitigar el polvo o los vapores deben instalarse y mantenerse según lo dispuesto en las indica ciones del fabricante Deben seleccionarse mantenerse y sustituirse los consumibles herramientas intercambiables según las recomendaciones de estas in...

Page 80: ...seguridad adiciona les para las máquinas neumáticas El aire comprimido puede causar lesiones graves Si no pretende utilizar la máquina y antes de cambiar accesorios o de realizar tareas de reparación asegúrese de que el suminis tro de aire esté cerrado de que el tubo de aire no esté sometido a presión y de que la máquina no esté conectada a la alimenta ción de aire No dirija nunca la corriente de ...

Page 81: ... que quede ladeado o bloqueado y con ello de que se produzca un retroceso o rotura Evite colocarse en la zona inmediatamente anterior y posterior al disco de corte en ro tación Si el disco de corte se aleja de usted al introducirse en la pieza de trabajo en caso de retroceso es posible que la máquina de aire comprimido con el disco en rotación salgan despedidos en su dirección Si el disco de corte...

Page 82: ...arse en la zona hacia la que pueda dirigirse la máquina de aire comprimido en caso de retroceso El retroceso desplaza la máquina de aire comprimido en la dirección contraria a la dirección de giro del disco abra sivo en el punto de bloqueo d Trabaje de forma especialmente cuidadosa en las zonas con esquinas aristas afiladas etc para evitar que las herramientas intercambiables reboten desde la pieza...

Page 83: ...ensora trasera El disco abrasivo debe quedar uniformemente colocado sobre la brida tensora trasera Fijación aflojamiento de la brida delantera Los 2 lados de la brida delantera son distintos Enrosque la brida delantera en el husillo de la manera siguiente Para los discos abrasivos finos consulte la figura 1 El collar de la brida delantera debe apuntar hacia arriba para que el disco abrasivo fino pueda...

Page 84: ...Primero active la máquina y después aplique la herramienta intercambiable sobre la pieza de trabajo Tras apagar la máquina espere a que el motor se haya detenido totalmente antes de posarla 1 Monte la herramienta intercambiable más adecuada 2 Ajuste la presión de trabajo medida en la entrada de aire con la máquina de aire comprimido encendida Consulte la máxi ma presión de trabajo autorizada en el...

Page 85: ...ración del aparato al servicio de asistencia técni ca o a un técnico especializado y solo con los recambios originales De esta forma se garantizará que la seguridad del aparato no se vea afectada Desecho El embalaje está compuesto por material ecológico que puede desecharse en los contenedores de reciclaje locales No deseche el aparato con la basura doméstica Puede informarse acerca de las posibil...

Page 86: ...e la fuerza y apertura del aparato por personas ajenas a nuestros centros de asistencia técnica autorizados la garantía perderá su validez Proceso de reclamación conforme a la garantía Para garantizar una tramitación rápida de su re clamación le rogamos que observe las siguientes indicaciones Mantenga siempre a mano el comprobante de caja y el número de artículo p ej IAN 12345 como justificante de ...

Page 87: ...le con lo dispuesto por las siguientes normas documentos normativos y directivas CE Directiva relativa a las máquinas 2006 42 EC Normas armonizadas aplicadas EN ISO 11148 7 2012 Denominación de la máquina Amoladora angular neumática PDWS 125 A1 Año de fabricación 01 2017 Número de serie IAN 285213 Bochum 20 01 2017 Semi Uguzlu Responsable de calidad Reservado el derecho de realizar modificaciones t...

Page 88: ... ruído 90 Perigos devido a vibrações 91 Instruções de segurança adicionais para máquinas pneumáticas 91 Instruções de segurança específicas para lixar e cortar 91 Outras instruções de segurança específicas para cortar 92 Contragolpe e respetivas instruções de segurança 92 Colocação em funcionamento 93 Colocar punho adicional 93 Colocar cobertura de proteção 93 Colocar disco abrasivo 94 Montagem do b...

Page 89: ...ente graves Este aparelho não foi concebido para o uso comercial Explicação dos símbolos WARNING Leia o manual de instruções antes da colocação em funcio namento Usar óculos de proteção Sentido de rotação Lubrificar diariamente P04 2017 Data de fabrico V04 2020 Data de validade Antes da colocação em fun cionamento leia o manual de instruções original e as instruções de segurança Usar protetores aur...

Page 90: ...talação utiliza ção reparação manutenção e substituição de acessórios na lixadeira para pontas abrasivas bem como antes do trabalho na proximidade da máquina Caso contrário podem ocorrer lesões corporais graves A lixadeira para materiais abrasivos terá de ser exclusivamente instalada ajustada ou utilizada exclusivamente por operadores devidamente qualificados e instruídos Esta máquina não pode ser ...

Page 91: ... potência da máquina Segure a máquina de forma correta Esteja preparado para contrariar os movimentos nor mais ou repentinos Mantenha as duas mãos prontas Certifique se de que mantem o seu corpo equili brado e numa posição estável Liberte o dispositivo de comando para arrancar e parar no caso de uma interrupção da alimenta ção de energia Utilize apenas lubrificantes recomendados A utilização dos ócu...

Page 92: ...eio Antes da utilização inspecione o material abrasivo Não utilize materiais abrasivos que tenham eventualmente caído ou que apresen tem estilhaços rachas ou outras falhas Antes da utilização é necessário garantir que o material abrasivo está devidamente colocado e suficientemente apertado a lixadeira tem de ser operada num local seguro no mínimo du rante 1 minuto em velocidade de marcha lenta a má...

Page 93: ...sos devem ser utilizados e mantidos de acordo com as instruções do fabricante Os materiais consumíveis as ferramentas da máquina devem ser escolhidos mantidos e substituídos de acordo com as recomendações deste manual a fim de evitar uma intensifica ção desnecessária da formação de poeiras ou vapores Utilize os equipamentos de proteção respi ratória de acordo com as instruções do seu empregador ou c...

Page 94: ...nais para máquinas pneumáticas O ar comprimido pode levar à ocorrência de lesões graves Se a máquina não for utilizada antes da substituição de acessórios ou da execução de trabalhos de reparação certifique se de que a alimentação de ar está fechada a mangueira de ar comprimido não está sob pressão e a máquina está desligada da alimentação de ar Nunca oriente o fluxo de ar para si mesmo ou para outr...

Page 95: ...te em rotação Se o disco de corte for deslocado para a frente na peça a trabalhar afastando se do corpo é possível que no caso de um contragolpe a ferramenta pneumática com o disco em rotação seja arremessada diretamente para si Se o disco de corte emperrar ou o trabalho for interrompido desligue o aparelho e man tenha o imóvel até que o disco pare comple tamente Nunca tente puxar o disco de corte...

Page 96: ...o ao do movimento do disco abrasivo no ponto de bloqueio d Trabalhe com especial cuidado junto a cantos arestas afiadas etc Evite que as fer ramentas de aplicação sejam ricocheteadas e travadas pela peça a trabalhar A ferramenta de aplicação em rotação tende a emperrar em cantos e arestas afiadas ou caso ricocheteie Isto leva a uma perda de controlo ou um con tragolpe e Não utilize lâminas de serra ...

Page 97: ...raseiro Apertar desapertar flange dianteiro Os 2 lados do flange dianteiro são diferentes Aparafuse o flange dianteiro sobre o veio da seguinte forma Em discos abrasivos finos ver figura 1 O colar do flange dianteiro aponta para cima para que o disco abrasivo fino possa ser apertado de forma segura 12 3 2 mm Fig 1 Em discos abrasivos grossos ver figura 2 3 2 mm Fig 2 O colar do flange dianteiro aponta para...

Page 98: ... pouco tempo Conduza a máquina sempre com as duas mãos Ligue primeiro e só depois aproxime a ferra menta de aplicação à peça a trabalhar Depois de desligar só pouse a máquina quando o motor estiver parado 1 Colocar a ferramenta de aplicação 2 Ajustar a pressão de trabalho medida na entrada de ar com a ferramenta pneumática ligada Pressão de funcionamento máxima autorizada ver capítulo Dados técnic...

Page 99: ...nação A embalagem é composta por materiais ecológicos Esta pode ser depositada nos ecopontos locais Não deite o aparelho no lixo doméstico Relativamente às possibilidades de eliminação do aparelho em fim de vida informe se na junta de freguesia ou câmara municipal da sua área de residência Garantia da Kompernass Handels GmbH Estimada Cliente Estimado Cliente Este aparelho tem uma garantia de 3 anos...

Page 100: ...ento em caso de acionamento da garantia Para garantir um processamento rápido do seu pedido siga por favor as seguintes instruções Para todos os pedidos de esclarecimento tenha à mão o talão de compra e o número do artigo p ex IAN 12345 como comprovativo da compra O número do artigo consta na placa de carac terísticas numa impressão na capa do seu manual de instruções em baixo à esquerda ou como a...

Page 101: ...o cumpre os seguintes documentos normativos normas e diretivas comunitárias Diretiva Máquinas 2006 42 EC Normas harmonizadas aplicadas EN ISO 11148 7 2012 Designação de tipo da máquina Esmeriladora angular a ar comprimido PDWS 125 A1 Ano de fabrico 01 2017 Número de série IAN 285213 Bochum 20 01 2017 Semi Uguzlu Gestor de qualidade Reservado o direito a alterações técnicas no âmbito do desenvolvim...

Page 102: ...SE 21 DE 44867 BOCHUM GERMANY www kompernass com Stand der Informationen Last Information Update Version des informations Stand van de informatie Stav informací Estado de las informaciones Estado das informações 01 2017 Ident No PDWS125A1 012017 1 ...

Reviews: