background image

PWS 230 D4

■ 

54 

GB

MT

Use

Mounting/adjusting the blade guard


WARNING! RISK OF INJURY!


Always remove the plug from the power 
socket before working on the appliance.

 RISK OF INJURY!


Always use the angle grinder with the blade 
guard  . The blade guard should be fitted 
securely. Set it so that the highest possible 
degree of safety is achieved, i.e. the smallest 
possible part of the grinding disc is open to 
the operator. The blade guard   is designed 
to protect the operator from fragments and 
accidental contact with the grinding tool.

 RISK OF INJURY!


Make sure that the blade guard   is fitted at 
least at the same angle as the additional 
handle


 (see fig. B). Otherwise, you could 

cut injure yourself on the roughing disc or 
cutting disc.


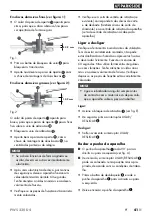
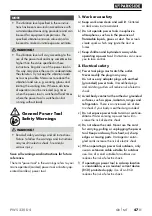
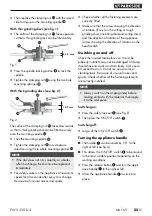
Put the protective cover in the position shown 
(see Fig. F). 
The protective cover can only be put on or 
removed in this position. 
Turn the protective cover until it clicks into place 
for the first time.


Now pull the lever   and turn the protective 
cover   into the required position (working 
position) until it clicks into place.


Check the secure seat of the protective  
cover. The lever   must be engaged and the  
guard   must not twist.

Fitting the additional handle


CAUTION!


For safety reasons, this appliance may only 
be used with the additional handle  . 
Failure to do this can lead to serious injury. 
The additional handle   can be screwed 
onto the left or the right depending on the job 
at hand.

Fitting/changing the roughing/ 
cutting disc


Always wear protective gloves when changing 
cutting/rough grinding discs. 

Roughing and 

cutting discs become very hot. Allow them to cool 
down completely before touching them.
Pay attention to the dimensions of the roughing/
cutting disc. The diameter of the hole must fit the 
mounting flange without any play. Do not use a 
reducer or adapter.


Check the roughing/cutting disc. It should not 
be damaged or damp, and it should have no 
cracks. 

Otherwise, it could break during use 

and cause injuries.

NOTE


Use only discs which are free of dirt.


Use only grinding discs whose permissible 
speed rating is at least as high as that on the 
type plate on the power tool.


RISK OF INJURY!

 Press the spindle locking 

button   only when the mounting spindle   is 
at a complete standstill.


Press the spindle locking button   to lock the 
spindle.


Undo the clamping nut   using the two-hole 
mounting spanner   (see fig D).


Place the rough grinding or cutting disc with the 
label side towards the appliance on the mount-
ing flange  .

Summary of Contents for 331943 1907

Page 1: ...CHLEIFER Originalbetriebsanleitung AMOLADORA ANGULAR Traducción del manual de instrucciones original ANGLE GRINDER Translation of the original instructions REBARBADORA Tradução do manual de instruções original SMERIGLIATRICE ANGOLARE Traduzione delle istruzioni d uso originali ...

Page 2: ...en seguida familiarícese con todas las funciones del dispositivo Prima di leggere aprire la pagina con le immagini e prendere confidenza con le diverse funzioni dell apparecchio Antes de começar a ler abra na página com as imagens e de seguida familiarize se com todas as funções do aparelho Before reading unfold the page containing the illustrations and familiarise yourself with all functions of th...

Page 3: ...B A ...

Page 4: ...D C E I 0 F ...

Page 5: ...ondientes 6 Indicaciones de seguridad especiales para el amolado y el tronzado 7 Otras indicaciones de seguridad especiales para las muelas de tronzar 7 Accesorios autorizados 8 Almacenamiento y manipulación de las herramientas intercambiables recomendadas 8 Indicaciones de trabajo 9 Manejo 10 Montaje ajuste de la cubierta de protección 10 Montaje del mango adicional 11 Montaje cambio de la muela ...

Page 6: ...del aparato giratorio Interruptor de encendido apagado Bloqueo de encendido Botón de desbloqueo Cubierta de las escobillas de carbón Mango adicional Cubierta de protección Botón de bloqueo del husillo Rosca 3 x para el mango adicional Palanca Tuerca de fijación consulte la fig C Husillo de montaje consulte la fig C Brida de montaje consulte la fig C Llave de montaje con dos orificios consulte la fig D V...

Page 7: ... las herra mientas eléctricas de accionamiento eléctrico con cable de red y a las de accionamiento por batería sin cable de red 1 Seguridad en el lugar de trabajo a Mantenga limpia y bien iluminada la zona de trabajo El desorden y la falta de iluminación en el lugar de trabajo pueden provocar accidentes b No trabaje con la herramienta eléctrica en un entorno potencialmente explosivo en el que haya...

Page 8: ...jor la herramienta eléctrica espe cialmente en situaciones inesperadas f Utilice ropa adecuada No lleve ropa ancha ni joyas Mantenga el pelo la ropa y los guantes lejos de las piezas móviles La ropa holgada las joyas o el pelo suelto pueden quedar atrapados en las piezas móviles g Si se admite el montaje de dispositivos de aspiración y de acumulación de polvo ase gúrese de que estén conectados y c...

Page 9: ... destrozarse y salir despedidos e El diámetro exterior y el grosor de la herra mienta intercambiable deben coincidir con las dimensiones especificadas para la herramien ta eléctrica Las herramientas intercambiables con unas dimensiones incorrectas no pueden protegerse ni controlarse de forma suficiente f Las herramientas intercambiables con inserto de rosca deben poder ajustarse a la perfección al h...

Page 10: ...a la carcasa y si se acumula mucho polvo metálico puede provocar un peligro eléctrico o No utilice la herramienta eléctrica en las proximidades de materiales inflamables Las chispas pueden incendiar dichos materiales p No utilice ninguna herramienta intercambia ble que precise líquidos refrigerantes El uso de agua o de otros líquidos refrigerantes puede provocar una descarga eléctrica Retroceso e i...

Page 11: ...asiva y frente a las chispas que pudieran inflamar la ropa d Las muelas abrasivas solo deben utilizarse para las aplicaciones recomendadas Por ejemplo no realice ningún amolado con la superficie lateral de una muela de tronzar Las muelas de tronzar están previstas para arrancar el material con el filo de la muela Si se ejerce una fuerza lateral sobre estas muelas abrasivas pueden romperse e Utilice s...

Page 12: ... muela de tronzar como en el borde de la pieza f Proceda con especial cautela al realizar cor tes de tipo nicho en las paredes existentes o en otras zonas ocultas La muela de tronzar podría cortar tuberías de gas o agua cables eléctricos u otros objetos y causar un retroceso Accesorios autorizados Máx diámetro Ø mm Máx grosor mm Dimensiones de la rosca mm Velocidad r p m Velocidad periférica m s H...

Page 13: ...do Con esto se evita una reactivación accidental descontrolada Utilice el aparato exclusivamente para cortar o realizar amoladuras en seco Debe montarse el mango adicional para realizar cualquier tarea con el aparato No deben procesarse los materiales que con tengan asbesto El asbesto es cancerígeno Consejo Así actúa correctamente PELIGRO GUÍE SIEMPRE EL APARATO DE FORMA LONGITUDINAL POR LA PIEZA ...

Page 14: ... el enchufe de la red eléctrica PELIGRO DE LESIONES Utilice siempre la amoladora angular con la cubierta de protección La cubierta de protección debe montarse de forma segura en la amoladora angular Ajústela de forma que se alcance el máximo nivel de seguri dad esto es que solo una mínima parte de la muela abrasiva quede expuesta hacia el usuario La cubierta de protección debe proteger al usuario ...

Page 15: ...a velocidad de ralentí del aparato PELIGRO DE LESIONES Accione exclusiva mente el botón de bloqueo del husillo con el husillo de montaje detenido Pulse el botón de bloqueo del husillo para bloquear el mecanismo Afloje la tuerca de fijación por medio de la llave de montaje con dos orificios consulte la fig D Coloque la muela de desbaste o de tronzar en la brida de montaje con la parte escrita orientada...

Page 16: ...erruptor de encendido apagado Giro del mango del aparato El mango del aparato puede girarse 90 hacia la derecha o hacia la izquierda consulte la fig A De esta manera el interruptor de encendido apagado puede quedar en una posición más cómoda para las condiciones de trabajo Pulse el botón de desencastre y gire el man go del aparato hacia la derecha o hacia la izquierda Deje que el mango del aparato ...

Page 17: ...itados por la garantía descrita a con tinuación Condiciones de la garantía El plazo de la garantía comienza con la fecha de compra Guarde bien el comprobante de caja ya que lo necesitará como justificante de compra Si dentro de un periodo de tres años a partir de la fecha de compra de este producto se detecta un defecto en su material o un error de fabricación asumiremos la reparación o sustitución...

Page 18: ...n la placa de características del producto grabado en el producto en la portada de las instrucciones de uso parte inferior izquierda o en el adhesivo de la parte trasera o inferior del producto Si se producen errores de funcionamiento u otros defectos póngase primero en contacto con el departamento de asistencia técnica especificado a continuación por teléfono o por correo electrónico Podrá enviar ...

Page 19: ...usiva de la expedición de esta declaración de conformidad recaerá sobre el fabricante El objeto descrito en la declaración cumple con las disposiciones de la Directiva 2011 65 EU del Parlamento Europeo y del Consejo del 8 de junio de 2011 sobre las restricciones a la utilización de determinadas sustancias peligrosas en aparatos eléctricos y electrónicos Normas armonizadas aplicadas EN 60745 1 2009...

Page 20: ...PWS 230 D4 16 ES ...

Page 21: ...olari indicazioni relative alla sicurezza operazioni di levigatura e di troncatura 23 Altre indicazioni relative alla sicurezza per lavori di troncatura 23 Accessori consentiti 24 Conservazione e movimentazione degli utensili consigliati 24 Istruzioni operative 24 Utilizzo 26 Montaggio regolazione della calotta di protezione 26 Montare l impugnatura supplementare 26 Montaggio sostituzione della mo...

Page 22: ...abile Interruttore ON OFF Blocco di accensione Tasto di sblocco Copertura spazzole di carbone Impugnatura supplementare Calotta di protezione Tasto di blocco mandrino Filettatura 3 x per l impugnatura supplementare Leva Dado tenditore vedi Fig C Mandrino portamola vedi Fig C Flangia portamola vedi Fig C Chiave di montaggio a due fori vedi Fig D Volume della fornitura 1 smerigliatrice angolare PWS ...

Page 23: ...outensili a batteria senza cavo di rete 1 Sicurezza sul posto di lavoro a Mantenere l area di lavoro pulita e ben illu minata Il disordine e la scarsa illuminazione dell area di lavoro potrebbero dare luogo a infortuni b Non lavorare con elettroutensili in ambienti a rischio di esplosione in cui sono presenti liqui di gas o polveri infiammabili Gli elettrouten sili generano scintille che possono in...

Page 24: ...aspi ratrucioli accertarsi che siano collegati e che vengano utilizzati correttamente L uso di un aspiratore per polvere può ridurre i pericoli associati alla polvere 4 Uso e manipolazione dell elettro utensile a Non sovraccaricare l apparecchio Utilizzare l elettroutensile idoneo al proprio lavoro Con l elettroutensile adatto si lavora meglio e con maggiore sicurezza nell intervallo di potenza in...

Page 25: ...ile deve essere adatto al diametro di accoglimento della flangia Utensili che non si adattano perfettamente al mandrino porta mola dell elettroutensile non ruotano in modo uniforme vibrano molto forte e potrebbero provocare la perdita del controllo g Non utilizzare mai utensili danneggiati Prima di ogni utilizzo controllare gli utensili ed ac certarsi che sulle mole abrasive non vi siano scheggiatu...

Page 26: ...tensile nella direzione opposta a quella della rotazione dell utensile nel punto di blocco Se ad es una mola abrasiva resta agganciata o bloccata nel pezzo da lavorare il bordo della mola abrasiva che si abbassa nel pezzo da lavorare potrebbe rimanere impigliato provocando in questo modo una rottura oppure un contraccolpo della mola abrasiva La mola abrasiva si avvicina o si al lontana dall operat...

Page 27: ...li più grandi non sono concepite per le maggiori velocità di elettroutensili più piccoli e possono rompersi Altre indicazioni relative alla sicurezza per lavori di troncatura a Evitare di far bloccare la mola abrasiva da taglio oppure di esercitare una pressione troppo alta Non eseguire tagli eccessivamen te profondi Sottoponendo la mola a carico eccessivo se ne aumenta la sollecitazione e la si r...

Page 28: ...rosso con un angolo piatto sopra il pezzo da lavorare in caso di materiale duro con un angolo un po più ripido Lavori di troncatura Non utilizzare mai mole da sgrosso per lavori di troncatura Utilizzare solo mole da taglio o sgrosso rinforzate con fibra e omologate che sono idonee per una velocità perimetrale non inferio re a 80 m s ATTENZIONE L utensile abrasivo continua a girare dopo lo spegnimen...

Page 29: ...arsi completamente disattivare immediatamente la corrente Troncatura lavorare con un avanzamento moderato e non ribaltare la mola da taglio Le mole da taglio e sgrosso diventano molto calde durante la lavorazione lasciarle raf freddare completamente prima di toccarle Non utilizzare mai l apparecchio per scopi diversi dalla sua destinazione d uso Assicurarsi sempre che l apparecchio sia spento prim...

Page 30: ...protezione non deve ruotare Montare l impugnatura supplementare ATTENZIONE Per motivi di sicurezza questo apparecchio può essere usato solo con l impugnatura supplementare Altrimenti si potrebbero riportare lesioni L impugnatura supplementa re a seconda della modalità di lavoro può venire avvitata a sinistra a destra o sopra la testa dell apparecchio Montaggio sostituzione della mola da taglio da ...

Page 31: ...ia della direzione di rotazione se presente sulle mole da taglio o sgrosso anche mole di diamante e la direzio ne di rotazione dell apparecchio freccia della direzione di rotazione sulla testa dell apparec chio coincidano Accensione e spegnimento Verificare l utensile inserito prima dell uso Deve essere montato correttamente non deve essere danneggiato né umido né presentare cricche e deve ruotare ...

Page 32: ...comunale o municipale Smaltire l imballaggio conformemente alle norme di tutela ambientale Tenere conto dei codici presenti sui vari mate riali di imballaggio ed eventualmente separare i materiali effettuando una raccolta diffe renziata I materiali di imballaggio presentano codici costituiti da abbreviazioni a e numeri b con il seguente significato 1 7 materie plastiche 20 22 carta e cartone 80 98 ma...

Page 33: ...evasione della Sua richie sta La preghiamo di seguire le seguenti istruzioni Tenga a portata di mano per qualsiasi richiesta lo scontrino di cassa e il codice dell articolo per es IAN 12345 come prova di acquisto Il codice dell articolo è riportato sulla targhetta identificativa o su un incisione presenti sul pro dotto sul frontespizio del manuale di istruzioni in basso a sinistra o su un adesivo a...

Page 34: ...i conformità L oggetto della dichiara zione sopra descritto soddisfa le prescrizioni della Direttiva 2011 65 EU del Parlamento Europeo e del Consiglio Europeo dell 8 giugno 2011 sulla restrizione dell uso di determinate sostanze pericolose nelle apparecchiature elet triche ed elettroniche Norme armonizzate utilizzate EN 60745 1 2009 A11 2010 EN 60745 2 3 2011 A13 2015 EN 55014 1 2017 EN 55014 2 20...

Page 35: ...etivas instruções de segurança 36 Instruções de segurança específicas para lixar e cortar 37 Outras instruções de segurança específicas para cortar 37 Acessórios autorizados 38 Armazenamento e manuseamento das ferramentas de aplicação recomendadas 38 Indicações de trabalho 38 Operação 40 Montar ajustar a cobertura de proteção 40 Montar o punho adicional 40 Montar substituir discos de corte desbaste ...

Page 36: ...arelho rotativo Interruptor LIGAR DESLIGAR Bloqueio de ativação Botão de desbloqueio Cobertura das escovas de carvão Punho adicional Cobertura de proteção Botão de bloqueio do veio Rosca 3 para punho adicional Alavanca Porca de aperto ver fig C Veio de admissão ver fig C Flange de admissão ver fig C Chave de montagem de duas bocas ver fig D Conteúdo da embalagem 1 Rebarbadora PWS 230 D4 1 Punho adicio...

Page 37: ... e bem iluminado Desarrumação e áreas de trabalho pouco iluminadas podem causar acidentes b Não trabalhe com a ferramenta elétrica em atmosferas potencialmente explosivas onde se encontram líquidos gases ou poeiras in flamáveis As ferramentas elétricas originam faíscas que podem inflamar poeiras e vapores c Durante a utilização da ferramenta elétrica mantenha crianças e outras pessoas afas tadas Em ...

Page 38: ...que se de que são ligados e utilizados corretamente A utilização de um aparelho de aspiração de pó pode reduzir eventuais peri gos devido a pó 4 Utilização e conservação da ferramenta elétrica a Não sobrecarregue o aparelho Utilize a ferramenta elétrica apropriada para o seu trabalho Com a ferramenta elétrica adequa da trabalhará melhor e de forma mais segura na respetiva área de trabalho b Não ut...

Page 39: ...a têm de encaixar exatamente na rosca do veio Nas ferramentas de aplicação montadas por meio de flange o diâmetro do orifício da ferramenta de aplicação tem de corresponder ao diâmetro de admissão da flange As ferramentas de aplicação que não fiquem perfeitamente ajustadas ao veio rodam irregularmente vibram com muita intensidade e podem levar à perda de controlo g Não utilize ferramentas de aplicaçã...

Page 40: ... disco abrasivo um prato de lixar uma escova de arame etc Um encravamento ou bloqueio leva a uma paragem abrupta da ferramenta de aplicação em rotação Deste modo uma ferramenta elétrica descontrola da é acelerada no ponto de bloqueio no sentido oposto ao da rotação da ferramenta de aplicação Se por exemplo um disco abrasivo encravar ou bloquear na peça a trabalhar a aresta que imer ge na peça a tr...

Page 41: ...os para ferramentas elétricas maiores não são adequados para as elevadas rotações de ferra mentas elétricas mais pequenas e podem partir se Outras instruções de segurança específicas para cortar a Evite um bloqueio do disco de corte ou uma pressão de compressão demasiado elevada Não execute cortes demasiado profundos Uma sobrecarga do disco de corte aumenta o respetivo esforço e a predisposição par...

Page 42: ... caso de material macio conduza o disco de desbaste num ângulo reto sobre a peça a trabalhar em caso de material duro num ângulo um pouco inclinado Cortar Nunca utilize discos de desbaste para o corte Utilize apenas discos de corte ou abrasivos com reforço fibroso testado permitidos para uma velocidade circunferencial superior a 80 m s CUIDADO A ferramenta abrasiva continua a funcionar após ter sid...

Page 43: ...er de ser tra vado ou bloqueado repentinamente a corrente elétrica tem de ser imediatamente desligada Cortar trabalhe com uma velocidade cons tante e não emperre o disco de corte Os discos de desbaste e de corte aquecem muito durante os trabalhos antes de lhes tocar deixe os arrefecer completamente Nunca utilize o aparelho para outra finali dade Verifique sempre se o aparelho está desliga do antes d...

Page 44: ... Por motivos de segurança este aparelho só pode ser utilizado com o punho adicional Caso contrário podem ocorrer ferimentos O punho adicional pode ser aparafu sado à esquerda à direita ou em cima na cabeça do aparelho dependendo do tipo de trabalho Montar substituir discos de corte desbaste Durante a substituição de discos de corte des baste use sempre luvas de proteção Os discos de corte desbaste...

Page 45: ... existente corresponde à dos discos de corte e de desbaste também discos de corte de diamante e ao sentido de rotação do aparelho seta do sentido de rotação na cabeça do aparelho Ligar e desligar Verifique a ferramenta inserida antes da utilização Tem de estar corretamente montada não pode estar danificada ou húmida ou apresentar fissuras e deve rodar livremente Execute um ensaio de 60 segundos Não u...

Page 46: ...s de embalagem e separe os convenientemente Os ma teriais de embalagem estão identificados com abreviaturas a e algarismos b com os seguintes significados 1 7 plásticos 20 22 papel e cartão 80 98 compostos Relativamente às possibilidades de elimi nação do produto em fim de vida infor me se na junta de freguesia ou câmara municipal da sua área de residência Garantia da Kompernass Handels GmbH Estimada...

Page 47: ... número do artigo p ex IAN 12345 como comprovativo da compra O número do artigo consta da capa do manual de instruções em baixo à esquerda da placa de características de uma impressão no produto ou do autocolante na traseira ou lado inferior do produto Caso ocorram falhas de funcionamento ou outros defeitos contacte primeiro o Serviço de Assistência Técnico indicado em seguida telefonicamente ou p...

Page 48: ...ão de conformidade O objeto da declaração acima descrito cumpre os regulamentos da Diretiva 2011 65 EU do Parlamento Europeu e do Conselho de 8 de junho de 2011 relativamente à limitação da utilização de determinadas substâncias perigosas em aparelhos elétri cos e eletrónicos Normas harmonizadas aplicadas EN 60745 1 2009 A11 2010 EN 60745 2 3 2011 A13 2015 EN 55014 1 2017 EN 55014 2 2015 EN 61000 ...

Page 49: ... safety instructions for grinding and abrasive cutting 51 Additional special safety instructions for abrasive cutting 51 Permissible accessories 52 Storage and handling of the recommended accessory tools 52 Working procedures 52 Use 54 Mounting adjusting the blade guard 54 Fitting the additional handle 54 Fitting changing the roughing cutting disc 54 Switching on and off 55 Turning the appliance ha...

Page 50: ...usage The appliance is not intended for commercial use Features Appliance handle rotatable ON OFF switch Safety lock out Release button Cover for carbon brushes Additional handle Blade guard Spindle locking button Screw thread 3 x for the additional handle Lever Clamping nut see fig C Attachment spindle see fig C Attachment flange see fig C Two hole mounting spanner see fig D Package contents 1 angle g...

Page 51: ... work area clean and well lit Cluttered or dark areas invite accidents b Do not operate power tools in explosive atmospheres such as in the presence of flammable liquids gases or dust Power tools create sparks which may ignite the dust or fumes c Keep children and bystanders away while operating a power tool Distractions can cause you to lose control 2 Electrical safety a Power tool plugs must matc...

Page 52: ...these are connected and properly used Use of dust collection can reduce dust related hazards 4 Power tool use and care a Do not force the power tool Use the correct power tool for your application The correct power tool will do the job better and safer at the rate for which it was designed b Do not use the power tool if the switch does not turn it on and off Any power tool that can not be controlle...

Page 53: ... ciently shielded or controlled f Attachment tools with a thread insert must match the thread of the grinding spindle ex actly For attachment tools that are mounted using a flange the diameter of the hole on the attachment tool must correspond to the width of the fitment on the flange Accessory tools that do not exactly fit on the grinding spin dle rotate unevenly vibrate severely and can lead to a lo...

Page 54: ... an uncontrolled pow er tool turns rapidly against the direction of rotation of the accessory tool caught in the blockage If for example a grinding disc catches or jams in a workpiece the edge of the grinding disc projecting into the workpiece can get caught and break off the grinding disc or cause a kickback The grinding disc can then fly in the direction of the operator or away from him depending ...

Page 55: ...larger power tools are not designed for the higher rotational speeds of smaller power tools and can break Additional special safety instructions for abrasive cutting a Avoid causing blockages to the cutting disc or high contact pressure Do not make any ex cessively deep cuts Overloading the cutting disc increases the stress and likelihood of tilting or jamming and thus the possibility of kickback ...

Page 56: ...g disc at a shallow angle over the workpiece for hard material at a slightly steeper angle Abrasive cutting Never use rough grinding discs for cutting Use only tested fibre reinforced cutting or grinding discs that are approved for a circum ferential speed of not less than 80 m s CAUTION The grinder continues running after being turned off Do not try to brake it by applying lateral counterpressure S...

Page 57: ...ddenly brakes completely or jams it must be switched off immediately Cutting Work at a moderate feed rate and do not tilt the cutting disc Roughing and cutting discs become very hot let them cool down completely before touching them Never use the appliance for purposes other than the ones for which it was designed Always make sure that the appliance is turned off before plugging it into the wall soc...

Page 58: ...nd the guard must not twist Fitting the additional handle CAUTION For safety reasons this appliance may only be used with the additional handle Failure to do this can lead to serious injury The additional handle can be screwed onto the left or the right depending on the job at hand Fitting changing the roughing cutting disc Always wear protective gloves when changing cutting rough grinding discs R...

Page 59: ...rrectly fitted Make sure that the arrow showing the direction of rotation if any on the cutting or rough grinding discs including diamond cutting discs and the direction of rotation of the appliance arrow showing the direction of rotation on the head match Switching on and off Check the inserted tool before use It must be properly installed may not be damaged or damp should have no cracks and turn f...

Page 60: ...on how to dispose of the appliance Dispose of the packaging in an environmentally friendly manner Note the labelling on the packaging and separate the packaging material components for disposal if necessary The packag ing material is labelled with abbreviations a and numbers b with the following meanings 1 7 Plastics 20 22 Paper and cardboard 80 98 Composites Your local community or municipal auth...

Page 61: ... centres Warranty claim procedure To ensure quick processing of your case please observe the following instructions Please have the till receipt and the item number e g IAN 12345 available as proof of purchase You will find the item number on the type plate on the product an engraving on the product on the front page of the operating instructions below left or on the sticker on the rear or bottom o...

Page 62: ...n The object of the declaration described above complies with the requirements of the Directive 2011 65 EU of the European Parliament and Council of 8 June 2011 on the limitations of use of certain dangerous substances in electrical and electronic appliances Applied harmonised standards EN 60745 1 2009 A11 2010 EN 60745 2 3 2011 A13 2015 EN 55014 1 217 EN 55014 2 2015 EN 61000 3 2 2014 EN 61000 3 ...

Page 63: ...63 Rückschlag und entsprechende Sicherheitshinweise 64 Besondere Sicherheitshinweise zum Schleifen und Trennschleifen 65 Weitere besondere Sicherheitshinweise zum Trennschleifen 65 Zulässiges Zubehör 66 Aufbewahrung und Handhabung der empfohlenen Einsatzwerkzeuge 66 Arbeitshinweise 66 Bedienung 68 Schutzhaube montieren verstellen 68 Zusatz Handgriff montieren 68 Schrupp Trennscheibe montieren wechs...

Page 64: ...r keine Haftung Das Gerät ist nicht für den gewerblichen Einsatz bestimmt Ausstattung Gerätegriff drehbar EIN AUS Schalter Einschaltsperre Entriegelungstaste Abdeckung Kohlebürsten Zusatz Handgriff Schutzhaube Spindel Arretiertaste Gewinde 3 x für Zusatz Handgriff Hebel Spannmutter siehe Abb C Aufnahmespindel siehe Abb C Aufnahmeflansch siehe Abb C Zweiloch Montage Schlüssel siehe Abb D Lieferumfang 1...

Page 65: ...etzkabel 1 Arbeitsplatz Sicherheit a Halten Sie Ihren Arbeitsbereich sauber und gut beleuchtet Unordnung und unbeleuchtete Arbeitsbereiche können zu Unfällen führen b Arbeiten Sie mit dem Elektrowerkzeug nicht in explosionsgefährdeter Umgebung in der sich brennbare Flüssigkeiten Gase oder Stäube befinden Elektrowerkzeuge erzeugen Funken die den Staub oder die Dämpfe entzün den können c Halten Sie K...

Page 66: ... fern von sich bewegenden Teilen Lockere Klei dung Schmuck oder lange Haare können von sich bewegenden Teilen erfasst werden g Wenn Staubabsaug und auffangeinrichtun gen montiert werden können vergewissern Sie sich dass diese angeschlossen sind und richtig verwendet werden Die Verwendung einer Staubabsaugung kann Gefährdungen durch Staub verringern 4 Verwendung und Behandlung des Elektrowerkzeugs a...

Page 67: ...erkzeugs entsprechen Falsch bemes sene Einsatzwerkzeuge können nicht ausrei chend abgeschirmt oder kontrolliert werden f Einsatzwerkzeuge mit Gewindeeinsatz müssen genau auf das Gewinde der Schleif spindel passen Bei Einsatzwerkzeugen die mittels Flansch montiert werden muss der Lochdurchmesser des Einsatzwerkzeuges zum Aufnahmedurchmesser des Flansches passen Einsatzwerkzeuge die nicht genau am E...

Page 68: ...akenden oder blockierten drehenden Einsatzwerk zeuges wie Schleifscheibe Schleifteller Drahtbürs te usw Verhaken oder Blockieren führt zu einem abrupten Stopp des rotierenden Einsatzwerkzeugs Dadurch wird ein unkontrolliertes Elektrowerkzeug gegen die Drehrichtung des Einsatzwerkzeugs an der Blockierstelle beschleunigt Wenn z B eine Schleifscheibe im Werkstück hakt oder blockiert kann sich die Kan...

Page 69: ...iben von größeren Elektrowerkzeugen Schleifscheiben für größere Elektrowerkzeuge sind nicht für die höheren Drehzahlen von klei neren Elektrowerkzeugen ausgelegt und können brechen Weitere besondere Sicherheits hinweise zum Trennschleifen a Vermeiden Sie ein Blockieren der Trennscheibe oder zu hohen Anpressdruck Führen Sie keine übermäßig tiefen Schnitte aus Eine Überlastung der Trennscheibe erhöh...

Page 70: ...be in einem flachen Winkel über das Werkstück bei hartem Material in einem etwas steileren Winkel Trennschleifen Verwenden Sie niemals Schruppscheiben zum Trennen Verwenden Sie nur geprüfte faserstoffver stärkte Trenn oder Schleifscheiben die für eine Umfangsgeschwindigkeit von nicht weniger als 80 m s zugelassen sind VORSICHT Das Schleifwerkzeug läuft nach dem Aus schalten nach Bremsen Sie es nicht...

Page 71: ...ll kommen gebremst oder blockiert sein muss der Netzstrom sofort ausgeschaltet werden Trennen Arbeiten Sie mit mäßigem Vorschub und verkanten Sie die Trennscheibe nicht Schrupp und Trennscheiben werden beim Arbeiten sehr heiß lassen Sie sie vor dem Berühren vollständig abkühlen Verwenden Sie das Gerät niemals zweckent fremdet Achten Sie immer darauf dass das Gerät ausgeschaltet ist bevor Sie den N...

Page 72: ...riff montieren VORSICHT Aus Sicherheitsgründen darf dieses Gerät nur mit dem Zusatz Handgriff verwendet werden Andernfalls können Verletzungen die Folge sein Der Zusatz Handgriff kann je nach Arbeitsweise links rechts oder oben am Gerätekopf eingeschraubt werden Schrupp Trennscheibe montieren wechseln Tragen Sie beim Wechseln von Trenn Schrupp scheiben immer Schutzhandschuhe Schrupp und Trennscheiben...

Page 73: ...ngspfeil falls vorhanden auf den Trenn oder Schrupp scheiben auch Diamant Trennscheiben und die Drehrichtung des Gerätes Drehrichtungspfeil auf dem Gerätekopf übereinstimmen Ein und ausschalten Überprüfen Sie das eingesetzte Werkzeug vor Gebrauch Es muss einwandfrei montiert sein darf weder beschädigt noch feucht sein oder Risse auf weisen und sich frei drehen Führen Sie einen 60 Sekunden dauernde...

Page 74: ...ren Sie bei Ihrer Gemeinde oder Stadtverwaltung Entsorgen Sie die Verpackung umwelt gerecht Beachten Sie die Kennzeich nung auf den verschiedenen Verpack ungsmaterialien und trennen Sie diese gegebenenfalls gesondert Die Verpackungsmaterial ien sind gekennzeichnet mit Abkürzungen a und Ziffern b mit folgender Bedeutung 1 7 Kunststoffe 20 22 Papier und Pappe 80 98 Verbundstoffe Möglichkeiten zur Entso...

Page 75: ...gen Sie bitte den folgenden Hinweisen Bitte halten Sie für alle Anfragen den Kassen bon und die Artikelnummer z B IAN 123456 als Nachweis für den Kauf bereit Die Artikelnummer entnehmen Sie bitte dem Ty penschild am Produkt einer Gravur am Produkt dem Titelblatt der Bedienungsanleitung unten links oder dem Aufkleber auf der Rück oder Unterseite des Produktes Sollten Funktionsfehler oder sonstige M...

Page 76: ...rägt der Hersteller Der oben beschrie bene Gegenstand der Erklärung erfüllt die Vorschriften der Richtlinie 2011 65 EU des Europäischen Parlaments und des Rates vom 8 Juni 2011 zur Beschränkung der Verwendung bestimmter gefährlicher Stoffe in Elektro und Elektronikgeräten Angewandte harmonisierte Normen EN 60745 1 2009 A11 2010 EN 60745 2 3 2011 A13 2015 EN 55014 1 2017 EN 55014 2 2015 EN 61000 3 2...

Page 77: ...ANDELS GMBH BURGSTRASSE 21 44867 BOCHUM GERMANY www kompernass com Estado de las informaciones Versione delle informazioni Estado das informações Last Information Update Stand der Informationen 12 2019 Ident No PWS230C3 112019 1 5 ...

Reviews: