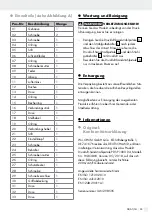
background image

53 

DE/AT/CH

der Druckluft-Sandstrahlpistole 

3

. Die Verrie-

gelung erfolgt automatisch.

  Strahlgutbehälter befüllen


ACHTUNG

 Bevor Sie den 

Schraubverschluss 

2

 des Strahlgut-

behälters 

1

 öffnen oder andere 

Einstellungen vornehmen, muss der Druck stets 
vollständig abgebaut und die Sandstrahlpistole 
von der Druckluftquelle (z. B. Kompressor)  
getrennt werden.


Verwenden Sie bei Ihren Sandstrahlarbeiten 
ausschließlich geeignetes Strahlgut 

14

.


 Hinweis:

 Wir empfehlen Silikose unschädliches 

Strahlmittel (gemahlene Hochofenschlacke) mit 
der  Körnung  0,2 mm–0,8 mm. 


Achten Sie darauf, dass das Strahlgut 

14


absolut trocken und nicht zu grobkörnig ist.


Hinweis:

 Die maximale Korngröße beträgt 

0,8 mm.


Öffnen Sie den Schraubverschluss 

2

 des 

Strahlgutbehälters 

1

, indem Sie ihn gegen 

den Uhrzeigersinn drehen.


Füllen Sie die gewünschte Menge Strahlgut 

14


in den Strahlgutbehälter 

1

 ein.


Achten Sie darauf, dass Sie den maximalen 
Behälterinhalt von 0,9 l nicht überschreiten.


Schließen Sie anschließend wieder den 
Schraubverschluss 

2

 des Strahlgutbehälters 

1

indem Sie ihn im Uhrzeigersinn drehen. Achten Sie 
darauf, daß der Schraubverrschluss 

2

 fest sitzt.

Hinweis zur Körnung des Strahlgutes: 

Je größer / gröber die Körnung des genutzten 
Strahlgutes ist, desto gröberen Schmutz können  
Sie damit entfernen. Das enthaltene Strahlgut ist 
klein und eignet sich sehr gut für die Entfernung von 
z. B. Flugrost oder Verunreinigungen. Die Material- 
oberfläche wird bei kleinem Strahlgut geschont und 
weist nur oberflächlichen Abrieb auf. Für groben 
Rost z. B. eignet sich grobkörnigeres Strahlgut, wel-
ches Sie im Fachhandel erhalten. 

Achtung:

 Maximale Körnung beachten.

   Auffangbeutel  für 

Sandstrahlmaterial montieren


Verwenden Sie die im Lieferumfang enthaltenden 
Schraubschelle 

7

 und einen Schraubendreher, 

um den Auffangbeutel 

6

 am Produkt zu montieren.

   Aufsatz auswählen und 

montieren


Wählen Sie zunächst den für Ihre Arbeit pas-
senden Aufsatz (

10

11

12

13

) aus. 


Stecken Sie den von Ihnen gewählten Aufsatz 
fest auf die Strahldüse 

8

 und achten Sie dar-

auf, dass seitlich keine Luft entweichen kann.

   Druckluft-Sandstrahlpistole 

verwenden


Bereiten Sie das zu bestrahlende Material vor, 
indem Sie es entfetten und säubern.


Hinweis:

 Staub- und Fettablagerungen  

beeinträchtigen das Ergebnis erheblich.


Decken bzw. kleben Sie alles sorgfältig ab, 
was nicht bestrahlt werden soll.


Der Abstand des Aufsatzes zur bearbeitenden 
Fläche ist maßgeblich für das Ergebnis. Halten 
Sie diesen möglichst gering, damit das Strahl-
gut 

14

 vom Auffangbeutel 

6

 aufgenommen 

werden kann.


Je näher Sie mit dem Produkt an Ihr Werkstück 
heran gehen, desto kleiner ist das Strahlmuster 
darauf und umgekehrt.


Nehmen Sie ggf. im Vorfeld einen Probelauf an 
einem nicht mehr benötigten Werkstück vor. 
Dadurch finden Sie den richtigen Abstand /  
Arbeitsdruck heraus und eine übermäßige Abs-
trahlung an Ihrem Werkstück wird verhindert.

Einschalten:


Öffnen Sie den Luftdurchlass, indem Sie den 
Drehregler 

9

 auf „1“ stellen.


Führen Sie die Druckluft-Sandstrahlpistole 

3


an die zu bearbeitende Fläche heran.

Summary of Contents for 298505

Page 1: ...leitung PNEUMATSKI PI TOLJ ZA PJESKARENJE Upute za poslu ivanje i za Va u sigurnost Prijevod originalnih uputa za uporabu AIR SAND BLASTER GUN Operation and Safety Notes Translation of the original in...

Page 2: ...ration and Safety Notes Page 5 HR Upute za poslu ivanje i za Va u sigurnost Stranica 13 RO Instruc iuni de utilizare i de siguran Pagina 21 BG C 29 GR CY 40 DE AT CH Bedienungs und Sicherheitshinweise...

Page 3: ...9 5 1 2 3 4 A 8 7 6 17 16 23 22 20 21 19 18 24 29 30 25 27 28 26 04 03 04 14 12 13 14 15 05 06 01 09 08 07 11 02 10 31 32 33...

Page 4: ...B C 10 11 12 13 14 2x...

Page 5: ...n Page 8 Connecting the compressed air source Page 8 Filling the blasting material holder Page 8 Assembling the collection bag for sandblasting material Page 9 Selecting and assembling an attachment P...

Page 6: ...ll the documentation with it Intended use The product is suitable for removing rust and paint on metal surfaces This product is not intended for any other use Any other use or product modifica tion is...

Page 7: ...off or is running but is not actually in use This can result in a much lower vibration load over the whole of the period of working Note If you wish to make an accurate assessment of the vibration lo...

Page 8: ...experienced in the use of this type of product you should seek training to learn how to handle it safely WARNING NOXIOUS DUST Working on materials which can produce harmful toxic dusts presents a heal...

Page 9: ...attachment First select the attachment 10 11 12 13 which is suitable for your work Place the attachment you have selected onto the jet nozzle 8 and ensure that no air can leak from the sides Using the...

Page 10: ...of the compressor The attachment is not fitted correctly Ensure that the attachment fits tightly on the product and that no air can leak from the sides Blocked sandblasting material lines Check that t...

Page 11: ...asting material holder 1 after you have finished using them To do so blow out the air sand blaster gun 3 and blasting material holder 1 using compressed air Only store the air sand blaster gun 3 in dr...

Page 12: ...oduct is 3 years from the date of purchase Should this product show any fault in materials or manufacture within 3 years from the date of purchase we will repair or replace it at our choice free of ch...

Page 13: ...6 Priklju ivanje izvora komprimiranog zraka Stranica 16 Punjenje spremnika za pjeskarsko sredstvo Stranica 16 Montiranje prihvatne vre ice za pjeskarsko sredstvo Stranica 17 Odabir nastavka i montiran...

Page 14: ...nije pred vi en za nikakve druge proizvode Svaki drugi oblik uporabe ili svaka promjena na proizvodu smatra se nenamjenskom i predstavlja znatnu opasnost od ozljeda Proizvo a ne preuzima nikakvu odgo...

Page 15: ...a precizno ocjenjivanje vibracijskog optere enja tijekom odre enog radnog vremena potrebno je tako er uzeti u obzir vremena kad je proizvod isklju en ili radi ali se zapravo ne koristi To mo e znatno...

Page 16: ...zna ne plo ice Ove su va ne za sigurnost Ako nemate iskustva u rukovanju s proizvodom trebate potra iti poduku o bezopasnom ruko vanju UPOZORENJE OTROVNE PRA INE Obra ivanje tetnih otrovnih pra ina pr...

Page 17: ...adr anu za vrtnu stezaljku 7 i odvija Odabir nastavka i montiranje Izaberite najprije za Va posao odgovaraju i nastavak 10 11 12 13 Nastavak koji ste izabrali vrsto nataknite na mlaznicu 8 i pazite da...

Page 18: ...izlazni tlak kompresora Nastavak ne stoji ispravno Utvrdite da je Va nastavak vrsto nataknut na proizvodu i da zrak ne mo e bo no izlaziti Za epljeni vodovi za pjeskarsko sredstvo Provjerite da grumen...

Page 19: ...stite pneu matski pi tolj za pjeskarenje 3 i spremnik za pjeskarsko sredstvo 1 Pritom ispu ite pneu matski pi tolj za pjeskarenje 3 i spremnik za pjeskarsko sredstvo 1 s komprimiranim zrakom uvajte pn...

Page 20: ...tuma kupnje Jamstveni rok po inje s datumom kupovine Molimo dobro sa uvajte ori ginalan ra un s blagajne To je dokumentacija kao dokaz kupovine koji e se zahtijevati Ako u razdoblju od 3 godine od dat...

Page 21: ...Pagina 24 Racordarea sursei de aer comprimat Pagina 24 Umplerea recipientului pentru produsul de injectare Pagina 25 Monta i punga de colectare pentru nisipul eliberat prin injectare Pagina 25 Alegere...

Page 22: ...uginii i vopselei de pe suprafe ele metalice Produsul nu este destinat pentru alte utiliz ri Orice alt utilizare sau modificare a produsului este considerat necores punz toare scopului i reprezint per...

Page 23: ...re i timpii n care produsul este oprit sau pornit dar nu este folosit Aceasta poate reduce considerabil solicitarea prin oscila ii pentru ntreaga perioad de lucru Indica ie Pentru o evaluare precis a...

Page 24: ...cu aer comprimat de sablat cu nisip Folosi i un produs de injectare adecvat ATEN IE Formare de praf puter nic Lua i m suri pentru aceasta Asigura i v c substan a injectat este colec tat pentru a fi el...

Page 25: ...La un produs de injec tare mic suprafa a materialului este protejat i pre zint numai o frecare de suprafa Pentru rugina grosolan de ex se potrive te produsul de injec tare cu o granula ie grosolan car...

Page 26: ...s face i colierul cu filet 7 cu ajutorul unei uru belni e i s ndep rta i punga de colectare 6 din produs Remedierea defec iunilor Defec iune Cauz posibil Remediere F r flux de material Aerul nu este s...

Page 27: ...3 i recipientul pentru produsul de injec tare 1 dup fiecare lucrare Pentru aceasta sufla i cu aer comprimat pistolul cu aer compri mat de sablat cu nisip 3 i recipientul pentru produsul de injectare 1...

Page 28: ...de la data achizi iei Perioada garan iei ncepe la data achizi iei V rug m s p stra i bonul de cas ori ginal Acesta reprezint dovada achizi iei Dac n decurs de 3 ani de la data achizi iei acestui produ...

Page 29: ...29 BG 30 30 30 30 30 31 31 31 32 32 32 33 33 33 33 34 35 36 36 36 36 36 37 37 37 37 38 38 38 38...

Page 30: ...30 BG PDSP 1000 D4 1 2 3 4 5 6 7 8 9 1 0 10 11 12 13 14 1 PDSP 1000 D4 1 1 1 1 1 1 2kg 1...

Page 31: ...31 BG 6 3bar 320l min 0 9l 6 3bar EN 1265 L 94dB A K 3dB A L 105dB A K 3dB A EN ISO 20643 ah 2 5m s2 EN ISO 20643 a b c...

Page 32: ...32 BG 6 3bar 3...

Page 33: ...33 BG 6 3bar 9 0 3 4 3 2 1 14 0 2mm 0 8mm 14 0 8mm 2 1 14 1 0 9 l 2 1 2 7 6 10 11 12 13 8...

Page 34: ...34 BG 14 6 9 1 3 5 3 5 3 9 0 6 6 7 6...

Page 35: ...35 BG...

Page 36: ...1 02 2 03 1 04 1 05 1 06 1 07 1 08 1 09 1 10 1 11 1 12 1 13 1 14 1 15 1 16 1 17 1 18 1 19 1 20 1 21 1 22 1 23 1 24 1 25 1 26 1 27 1 28 1 29 1 30 1 31 1 32 1 33 1 3 1 3 1 3 1 74167 PDSP 1000 D4 HG0380...

Page 37: ...37 BG 2006 42 E EN ISO 12100 2010 EN ISO 4414 2010 EN 1248 2001 A1 IAN 298505 1 74167 13 2017 www owim com 3 112 115...

Page 38: ...38 BG IAN 298505 00800 111 4920 owim lidl bg IAN 298505 1 74167 112 1...

Page 39: ...39 BG 2 1 2 3 113 1 2 3 2 114 4 5 114 1 113 1 2 2 3 115 4 3 61 2014 25 07 2014 115 1 2 1 3 1 1...

Page 40: ...40 GR CY 41 41 41 41 41 42 42 42 43 43 43 44 44 44 44 45 46 47 47 47 47 47 48...

Page 41: ...41 GR CY PDSP 1000 D4 1 2 3 4 5 6 7 8 9 1 0 10 11 12 13 14 1 PDSP 1000 D4 1 1 1 1 1 1 2 1...

Page 42: ...42 GR CY 6 3bar 320l 0 9l 6 3bar EN 1265 L 94dB A 3dB A L 105dB A 3dB A EN ISO 20643 ah 2 5m s2 EN ISO 20643 a b c...

Page 43: ...43 GR CY 6 3bar 3...

Page 44: ...44 GR CY 6 3bar 9 0 3 4 3 2 1 14 0 2 0 8 14 0 8 2 1 14 1 0 9l 2 1 2 7 6 10 11 12 13 8...

Page 45: ...45 GR CY 14 6 9 1 3 5 3 5 3 9 0 6 6 7 6...

Page 46: ...46 GR CY...

Page 47: ...12 1 13 1 14 1 15 1 16 1 17 1 18 1 19 1 20 1 21 1 22 1 23 1 24 1 25 1 26 1 27 1 28 1 29 1 30 1 31 1 32 1 33 1 3 1 3 1 3 OWIM GmbH Co KG Stiftsbergstra e 1 DE 74167 Neckarsulm PDSP 1000 D4 HG03803 05...

Page 48: ...48 GR CY IAN 298505 Tobias K nig OWIM GmbH Co KG Stiftsbergstra e 1 DE 74167 Neckarsulm 13 2017 www owim com 3 3 O 2251 1994...

Page 49: ...r Druckluft Sandstrahler Seite 52 Bedienung Seite 52 Druckluftquelle anschlie en Seite 52 Strahlgutbeh lter bef llen Seite 53 Auffangbeutel f r Sandstrahlmaterial montieren Seite 53 Aufsatz ausw hlen...

Page 50: ...es Produktes an Dritte mit aus Bestimmungsgem e Verwendung Das Produkt eignet sich zur Entfernung von Rost und Farbe auf Metallfl chen F r alle anderen Anwendungen ist das Produkt nicht vorgesehen Jed...

Page 51: ...gungs belastung w hrend eines bestimmten Arbeitszeit raumes sollten auch die Zeiten ber cksichtigt werden in denen das Produkt abgeschaltet ist oder zwar l uft aber nicht tats chlich im Einsatz ist Di...

Page 52: ...llen mit Strahlgut von der Druckluftquelle HINWEIS Bitte beachten Sie die Sicherheits hinweise der Hersteller des Strahlgutes Verwenden Sie nur f r die Druckluft Sandstrahl pistole geeignete Materiali...

Page 53: ...oberfl che wird bei kleinem Strahlgut geschont und weist nur oberfl chlichen Abrieb auf F r groben Rost z B eignet sich grobk rnigeres Strahlgut wel ches Sie im Fachhandel erhalten Achtung Maximale K...

Page 54: ...Schraubendrehers l sen und den Auffangbeutel 6 vom Produkt entfernen Fehlerbehebung Fehler M gliche Ursache Behebung Kein Materialfluss Die Luft ist nicht trocken genug Installieren Sie einen Wassera...

Page 55: ...trahlpistole 3 und den Strahlgutbeh lter 1 nach jedem Abschluss der Arbeit Blasen Sie hierzu die Druckluft Sandstrahlpistole 3 und den Strahl gutbeh lter 1 mit Druckluft aus Bewahren Sie die Druckluft...

Page 56: ...hre Garantie ab Kaufdatum Die Garantiefrist beginnt mit dem Kaufdatum Bitte bewahren Sie den Original Kas senbon gut auf Diese Unterlage wird als Nachweis f r den Kauf ben tigt Tritt innerhalb von 3 J...

Page 57: ...tsbergstra e 1 DE 74167 Neckarsulm GERMANY Model No HG03803 Version 05 2018 Last Information Update Stanje informacija Versiunea informa iilor Stand der Informationen 02 2018 Ident No HG03803022018 HR...

Reviews: