background image

PHKSA 20-Li A1

GB

 43 

Use

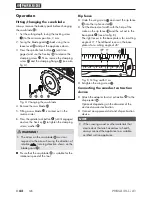
Switching on and off

Switching on:


Push the safety lock-out   to the left or right 
and keep it pressed.


Press the ON/OFF switch  . Once the saw is 
running, you can release the safety lock-out  .

Switching off:


Release the ON/OFF switch  .

Setting the cutting angle

You can select the cutting angle using the cutting 
angle scale  .


Undo the wing screw of the cutting angle pre-
selector  , set the desired cutting angle on the 
cutting angle scale   and then retighten the 
wing screw  .

Setting the cutting depth

NOTE


Select a cutting depth of approx. 3 mm more 
than the thickness of the material. This ensures 
that you achieve a clean cut.


Undo the locking screw  , set the desired cutting 
depth on the cutting depth scale   and then 
retighten the locking screw  .

Working with the circular saw

1.   Switch on the appliance – as described in 

"Switching on and off" – and then place it with 
the front edge of the base plate   on the mate-
rial.

2.   Align the machine using the rip fence   or by 

using a marked line.

3.   Hold the machine in both hands using the han-

dles and saw by exerting an even pressure.

Switching the laser on and off

Switching on:


Press the ON/OFF switch laser   

.

Switching off:


Press the ON/OFF switch laser   

.

Tips and tricks


Avoid damaging the cutting edge of sensitive 
materials, e.g. coated chip boards or doors, by 
sticking masking tape along the cutting line. This 
also makes it easier to mark a line on the tape 
than on a shiny surface. An even more effective 
method of protecting the cutting edges is to 
clamp a thin piece of wood along the cutting 
line (this wood is also sawn).

Maintenance and cleaning


 WARNING! RISK OF INJURY! Always 

switch the appliance off and remove 
the battery before carrying out any 

work on the appliance.

The cordless hand-held circular saw is mainte-
nance-free.


The appliance must always be kept clean, dry 
and free from oil or grease.


Never allow liquids to get into the appliance.


Use a soft, dry cloth to clean the housing. 
Never use petrol, solvents or cleansers which 
can damage plastic.


The blade guard must always move freely and 
close automatically. Therefore, keep the area 
around the blade guard clean at all times. Re-
move dust and chips by blowing them out with 
compressed air or with a brush.


If a lithium-ion battery is to be stored for an 
extended period, the charge level should be 
checked regularly. The optimum charge level is 
between 50% and 80%. The optimum storage 
environment is cool and dry.

Summary of Contents for 281993

Page 1: ...SCIE CIRCULAIRE SANS FIL PHKSA 20 Li A1 SCIE CIRCULAIRE SANS FIL Traduction des instructions d origine AKKU HANDKREISS GE Originalbetriebsanleitung CORDLESS CIRCULAR SAW Translation of the original in...

Page 2: ...emploi ouvrez la page contenant les illustrations et familiarisez vous ensuite avec toutes les fonctions de l appareil Klappen Sie vor dem Lesen die Seite mit den Abbildungen aus und machen Sie sich a...

Page 3: ...A B C...

Page 4: ...ARTEAU PERFORATEUR SANS FIL PABH 20 Li B2 PERCEUSE VISSEUSE SANS FIL PABS 20 Li C3 VISSEUSE CHOCS SANS FIL PDSSA 20 Li A1 SCIE CIRCULAIRE SANS FIL PHKSA 20 Li A1 SCIE SAUTEUSE PENDULAIRE SANS FIL PSTD...

Page 5: ...quipements suppl mentaires d origine 9 Avant la mise en service 9 Charger le pack d accus voir g C 9 Mettre le pack d accus dans l appareil l en retirer 10 Contr ler l tat de l accu 10 V ri er le fonc...

Page 6: ...onvient pas un usage com mercial quipement Figure A Verrouillage de s curit Interrupteur MARCHE ARR T Graduation de profondeur de coupe Touche de d verrouillage pour pack d accus Touche de niveau de l...

Page 7: ...structions ont t mesur es conform ment une m thode de mesure d crites dans une norme et peuvent tre utilis es pour la comparaison d appareils La valeur d mis sion des vibrations et la valeur d mission...

Page 8: ...porter tirer ou d brancher l outil Maintenir le cordon l cart de la cha leur du lubri ant des ar tes ou des parties en mouvement Des cordons endommag s ou emm l s augmentent le risque de choc lec tri...

Page 9: ...ignement ou de blocage des parties mobiles des pi ces cas s es ou toute autre condition pouvant a ecter le fonctionnement de l outil En cas de dom mages faire r parer l outil avant de l utiliser De no...

Page 10: ...isibles ou avec son propre cordon d alimentation Le contact avec une ligne sous tension mettra galement sous tension les parties m talliques expos es de l outil et pourra provoquer un choc lectrique s...

Page 11: ...duit f Avant de scier serrez fond les moyens de r glage de la profondeur et de l angle de coupe Si les r glages d rivent pendant la coupe cela peut provoquer un grippage de la lame et un recul g Soyez...

Page 12: ...c ble le cordon d alimentation ou la che secteur sont endommag s Des cordons d alimentation endommag s signi ent un danger de mort par lectrocution Instructions suppl mentaires Ne pas utiliser de meu...

Page 13: ...eux indiqu s dans le pr sent document sont mis en uvre ceci peut entra ner une exposition dangereuse aux rayons Avant la mise en service Charger le pack d accus voir g C ATTENTION D branchez toujours...

Page 14: ...cteur Tirez le levier de recul du capot protecteur jusqu la but e Le capot protecteur doit se d placer sans se coincer et revenir de lui m me rapidement en posi tion de d part apr s avoir rel ch le le...

Page 15: ...tion Allumer et teindre Mise en marche Appuyez sur la s curit anti d marrage vers la gauche ou vers la droite et maintenez la appuy e Actionnez l interrupteur MARCHE ARR T Apr s que la machine a d mar...

Page 16: ...utomatiquement Gardez de ce fait toujours la zone autour du capot protecteur propre liminez la poussi re et les copeaux par sou age d air comprim ou avec un pinceau Si un accu lithium ions doit rester...

Page 17: ...pas la p riode de garantie Cette disposition s applique galement aux pi ces remplac es ou r par es Les dommages et vices ventuellement d j pr sents l achat doivent tre signal s imm diatement apr s le...

Page 18: ...onsiste le vice et quand il est survenu sans devoir l a ranchir l adresse de service apr s vente communiqu e Sur www lidl service com vous pouvez t l charger ce manuel ainsi que beaucoup d autres des...

Page 19: ...be au fabricant L objet de la d claration d crit ci dessus r pond aux prescriptions de la directive 2011 65 EU du Parlement europ en et du Conseil en date du 8 juin 2011 visant la restriction de l uti...

Page 20: ...r l accu de rechange correspondant votre appareil Apr s avoir mis l accu de rechange dans la corbeille cliquez sur le bouton Caisse et suivez les instructions a ch es l cran pour terminer l op ration...

Page 21: ...shinweise f r Kreiss gebl tter 24 Originalzubeh r zusatzger te 24 Vor der Inbetriebnahme 25 Akku Pack laden siehe Abb C 25 Akku Pack ins Ger t einsetzen entnehmen 25 Akkuzustand pr fen 25 Funktion der...

Page 22: ...tsperre EIN AUS Schalter Schnitttiefenskala Entriegelungstaste f r Akku Pack Taste Akkuzustand Akku Display LED Akku Pack Feststellschraube Spindelarretierung Grundplatte Parallelanschlagaufnahme Abbi...

Page 23: ...onen k nnen entsprechend der Art und Weise in der das Elektrowerkzeug verwendet wird insbesondere welche Art von Werkst ck bearbeitet wird abweichen und k nnen in manchen F llen ber dem in diesen Anwe...

Page 24: ...romschutzschalters ver mindert das Risiko eines elektrischen Schlages 3 Sicherheit von Personen a Seien Sie stets aufmerksam achten Sie darauf was Sie tun und gehen Sie mit Vernunft an die Arbeit mit...

Page 25: ...r zu f hren g Verwenden Sie Elektrowerkzeug Zubeh r Einsatzwerkzeuge usw entsprechend diesen Anweisungen Ber cksichtigen Sie dabei die Arbeitsbedingungen und die auszuf hrende T tigkeit Der Gebrauch v...

Page 26: ...t Unterlegscheiben oder schrauben Die S geblatt Unterlegscheiben und schrauben wurden speziell f r Ihre S ge konstruiert f r optimale Leistung und Betriebssi cherheit Weitere Sicherheitshinweise f r a...

Page 27: ...die untere Schutzhaube niemals in ge neter Position fest Sollte die S ge unbeabsichtigt zu Boden fallen kann die untere Schutzhaube verbo gen werden nen Sie die Schutzhaube mit dem R ckziehhebel und s...

Page 28: ...ein Schmelzen des Kunststo s Tragen Sie beim S gen eine Staubmaske Verwenden Sie nur empfohlene S gebl tter Immer einen Geh rschutz tragen Sicherheitshinweise f r Kreiss gebl tter Schutzhandschuhe tr...

Page 29: ...nken dann ist der Akku Pack berhitzt und kann nicht aufgeladen werden Sollte die rote und gr ne Kontroll LED gemeinsam blinken dann ist der Akku Pack defekt Schieben Sie den Akku Pack in das Ger t ein...

Page 30: ...spfeil Laufrichtung an der Schutzhaube markiert bereinstimmen Stellen Sie sicher dass das S geblatt f r die Drehzahl des Werkzeuges geeignet ist Parallelanschlag L sen Sie die Fl gelschraube und setze...

Page 31: ...ter Laser Ausschalten Dr cken Sie den EIN AUS Schalter Laser Tipps und Tricks Ein Ausrei en der Schnittkante bei emp ndlichen Ober chen z B beschichteten Spanplatten oder T ren vermeiden Sie indem Sie...

Page 32: ...rden durch unsere im Folgenden dargestellte Garantie nicht eingeschr nkt Garantiebedingungen Die Garantiefrist beginnt mit dem Kaufdatum Bitte bewahren Sie den Original Kassenbon gut auf Diese Unterla...

Page 33: ...ikelnummer entnehmen Sie bitte dem Typenschild einer Gravur auf dem Titelblatt ihrer Anleitung unten links oder als Aufkleber auf der R ck oder Unterseite Sollten Funktionsfehler oder sonstige M ngel...

Page 34: ...der Hersteller Der oben beschriebene Gegenstand der Erkl rung erf llt die Vorschriften der Richtlinie 2011 65 EU des Europ ischen Parlaments und des Rates vom 8 Juni 2011 zur Beschr nkung der Verwendu...

Page 35: ...ie auf die Schalt che Kasse und befolgen die auf dem Bildschirm angezeigten Anweisungen um den Bestellvorgang abzuschlie en HINWEIS Die Bestellung von Ersatzteilen kann in einigen L ndern nicht online...

Page 36: ...PHKSA 20 Li A1 32 DE AT CH...

Page 37: ...ipment 40 Before use 41 Charging the battery see g C 41 Attaching disconnecting the battery pack to from the appliance 41 Checking the battery charge level 41 Checking blade guard functionality 41 Ope...

Page 38: ...igure A Safety lock out ON OFF switch Cutting depth scale Release button for battery pack Battery charge level button battery display LED Battery pack Locking screw Spindle lock Base plate Rip fence s...

Page 39: ...he manner in which the power tool is being used and in particular the kind of workpiece that is being worked the vibration and noise emission values can deviate and may sometimes exceed the val ues gi...

Page 40: ...rating a power tool Do not use a power tool while you are tired or under the in uence of drugs alcohol or medication A moment of inattention while operating power tools may result in serious personal...

Page 41: ...ng conditions and the work to be performed Use of the power tool for operations di erent from those intended could result in a hazardous situation 5 Use and handling of the cordless electrical power t...

Page 42: ...rol h Never use damaged or incorrect blade wash ers or bolts The blade washers and bolts were specially designed for your saw for optimum performance and safety of operation Further safety instruction...

Page 43: ...ower blade guard may be bent Raise the blade guard with the release lever and make sure it moves freely and does not touch the blade or any other part at all angles and cut depths b Check the operatio...

Page 44: ...mask when sawing Only use recommended saw blades Always wear hearing protection Safety information for circular saw blades Wear protective gloves Wear a dust mask Wear protective goggles Wear hearing...

Page 45: ...be charged If the red and green control LEDs both ash this means that the battery pack is broken Push the battery pack back into the appliance Never recharge a battery pack again im mediately after r...

Page 46: ...he arrow showing the direction of rotation running direction shown on the blade guard Ensure that the saw blade is suitable for the rotational speed of the tool Rip fence Undo the wing screw and inser...

Page 47: ...Switching on Press the ON OFF switch laser Switching o Press the ON OFF switch laser Tips and tricks Avoid damaging the cutting edge of sensitive materials e g coated chip boards or doors by sticking...

Page 48: ...ur statutory rights are not restricted in any way by the warranty described below Warranty conditions The validity period of the warranty starts from the date of purchase Please keep your original rec...

Page 49: ...proof of purchase You will nd the item number on the type plate an engraving on the front page of the instructions bottom left or as a sticker on the rear or bot tom of the appliance If functional or...

Page 50: ...the declaration described above complies with the requirements of the Directive 2011 65 EU of the Eu ropean Parliament and Council of 8 June 2011 on the limitations of use of certain dangerous substa...

Page 51: ...t battery under the heading Topseller After you have placed the rechargeable battery in the shopping basket click the Checkout button and follow the on screen instructions to complete the ordering pro...

Page 52: ...1993 KOMPERNASS HANDELS GMBH BURGSTRASSE 21 44867 BOCHUM DEUTSCHLAND GERMANY www kompernass com Version des informations Stand der Informationen Last Information Update 09 2016 Ident No PHKSA20 LiA1 0...

Reviews: