8
GB/IE
•
Fit the outer saw blade flange and firmly tighten the
screw.
• Move the saw blade guard back to the correct position.
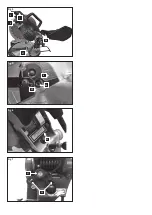
Replacing laser batteries (Fig. 6)
• Remove the laser battery cover (30). Remove the 2
batteries.
• Replace both batteries with the same or an equivalent
type. Make sure that they are inserted with the same
polarity as the used batteries.
• Close the battery cover.
switch ON / switch OFF the laser
To switch on:
Move the ON/OFF switch of the laser
(34) to the “1” position. A laser line is projected onto the
material you wish to process, providing an exact guide
for the cut.
To switch off:
Move the ON/OFF switch of the laser to
the “0” position.
Adjusting the laser (Fig. 7)
If the laser (31) ceases to indicate the correct cutting
line, you can readjust the laser. To do so, open the
screws (32) and set the laser by moving sideways to
that the laser beam strikes the teeth of the saw blade
(5).
m
Electrical connection
The electrical motor installed is connected and
ready for operation. The connection complies with
the applicable VDE and DIN provisions.
The customer‘s mains connection as well as the
extension cable used must also comply with these
regulations.
Important information
In the event of an overloading the motor will switch its-
elf off. After a cool-down period (time varies) the motor
can be switched back on again.
Damaged electrical connection cable
The insulation on electrical connection cables is often
damaged.
This may have the following causes:
•
Passage points, where connection cables are
passed through windows or doors.
•
Kinks where the connection cable has been impro-
perly fastened or routed.
•
Places where the connection cables have been cut
due to being driven over.
•
Insulation damage due to being ripped out of the
wall outlet.
•
Cracks due to the insulation ageing.
Such damaged electrical connection cables must not
be used and are life-threatening due to the insulation
damage.
Check the electrical connection cables for damage re-
gularly. Make sure that the connection cable does not
hang on the power network during the inspection.
Electrical connection cables must comply with the ap-
plicable VDE and DIN provisions. Only use connection
cables with the marking „H 07 RN“.
The printing of the type designation on the connection
cable is mandatory.
AC motor
•
The mains voltage must be 230 V~
•
Extension cables up to 25 m long must have a
cross-section of 1.5 mm2.
Connections and repairs of electrical equipment
may only be carried out by an electrician.
Please provide the following information in the event of
any enquiries:
•
Type of current for the motor
•
Machine data - type plate
•
Machine data - type plate
Accessories
SAW DUST EXTRACTION
The mitre saw is equipped with an extraction port to
which an extraction system can be connected. Alterna-
tively, a dust bag can also be attached.
The hose of the extraction system is fastened on the ex-
traction port with a clamp. We recommend emptying the
bag or container from time to time and cleaning the filter.
The air speed of the suction system must be at least 30
metres per second.
m
Maintenance
If personnel qualified for unusual maintenance tasks
or repairs must be obtained during of after the war-
ranty period, please always contact a service point
recommended by us or contact the manufacturer.
• Only perform repair, maintenance and cleaning work
as well as the correction of malfunctions with the drive
switched off as a basic rule.
• All protective and safety equipment must be reassem-
bled immediately after repair, maintenance is com-
pleted.
NORMAL SERVICE TASKS
Normal service tasks can also be performed by untrai-
ned personnel and are all described in the preceding
sections and in this chapter.
• The mitre saw must not be lubricated, because it al-
ways cuts dry surfaces; all moving machine parts are
self-lubricating.
• In the event of service work, personal protective
equipment must always be work (protective goggles
and gloves).
• Remove saw dust and chips regularly by cleaning the
cutting zone and support surfaces.
We recommend using a suction tool or brush.
ATTENTION:
Do not use compressed air!
Check the saw blade from time to time: If problems ari-
se with the blade, it must be ground by a specialist or
replaced, depending on the condition.
Summary of Contents for 102787
Page 5: ...Fig 4 2 3 27 26 1 Fig 5 28 29 6 Fig 6 30 Fig 7 32 31...
Page 50: ......


