


8
Proper Attachment of Gas Cylinders
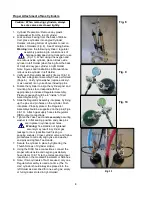
1. Cylinder Preparation: Remove any plastic
wrap/washer from the top of cylinder.
2. Lock casters. Facing from the back of Mobile
Cart, place cylinders into angled Cylinder
Holders, allowing bottom of cylinders to rest on
bottom of Holders (Fig. 8). See Warning below.
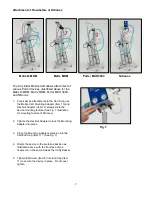
Warning:
Use the following cylinder / regulator
assembly positioning to minimize risk of
hardware damage during transport or use
(Fig. 11). When using one oxygen and
one nitrous oxide cylinder, place nitrous oxide
cylinder in left Holder (when facing from the back
of Cart) and oxygen cylinder in right Holder.
Note: Figures and Illustrations in Manual show
nitrous oxide cylinder in left Holder.
3. Verify each Regulator Assembly (Items 16 & 14)
has had a Regulator Assembly Check performed
(Page 6). Verify nylon washer (replace once/yr.
or as needed) is on yoke above indexing pins.
4. Rotate the cylinder to align the cylinder post and
mounting holes to correspond with the
appropriate pin-indexed Regulator Assembly.
Pressure gauge should be
to “inside” of Cart
Assembly (see Fig. 11).
5. Slide the Regulator Assembly into place by lining
up the pins and pin holes on the cylinder. Push
into place. Properly placed, the Regulator
Assembly should be supported on the pins (Figs.
9 & 10). Attach gas supply hoses to Regulator
DISS output connections.
6. Tighten the Yoke Tee Handle
securely
, assuring
washer is in flat sealing position and yoke pins
are in place in cylinder post holes.
Warning:
Tee Handle not tightened
securely may result in cylinder gas
leakage to room (possible loud hissing or
popping sounds). Close cylinder valve and follow
procedures to correctly align yoke and washer
and pins and tighten Tee Handle.
7. Secure the cylinder in place by tightening the
Thumb Screws of Cylinder Holder.
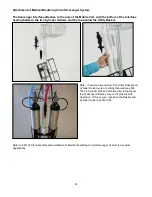
8. Using the DISS hose connections, connect the
proper nitrous oxide and oxygen gas delivery
hose (Items 13 & 15) to the corresponding input
locations on the mounted Flowmeter or Nitronox.
9. Note: If two cylinders of N
2
O are used, only one
Regulator Assembly is used at a time (
The “In-
Use” cylinder should always be placed into the
left Holder as described for one each gas; empty
or full cylinders stored in right Holder).
Fig. 8
Fig. 9
Fig. 10
Fig. 11
Caution: When removing cylinders, always
be sure valves are closed tightly.
Summary of Contents for Porter Nitronox
Page 3: ...3...


