background image

 16

Building the connectors

6     Assembly

Instruction book, Mounting and maintenance

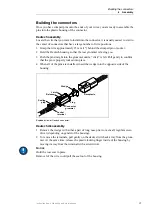
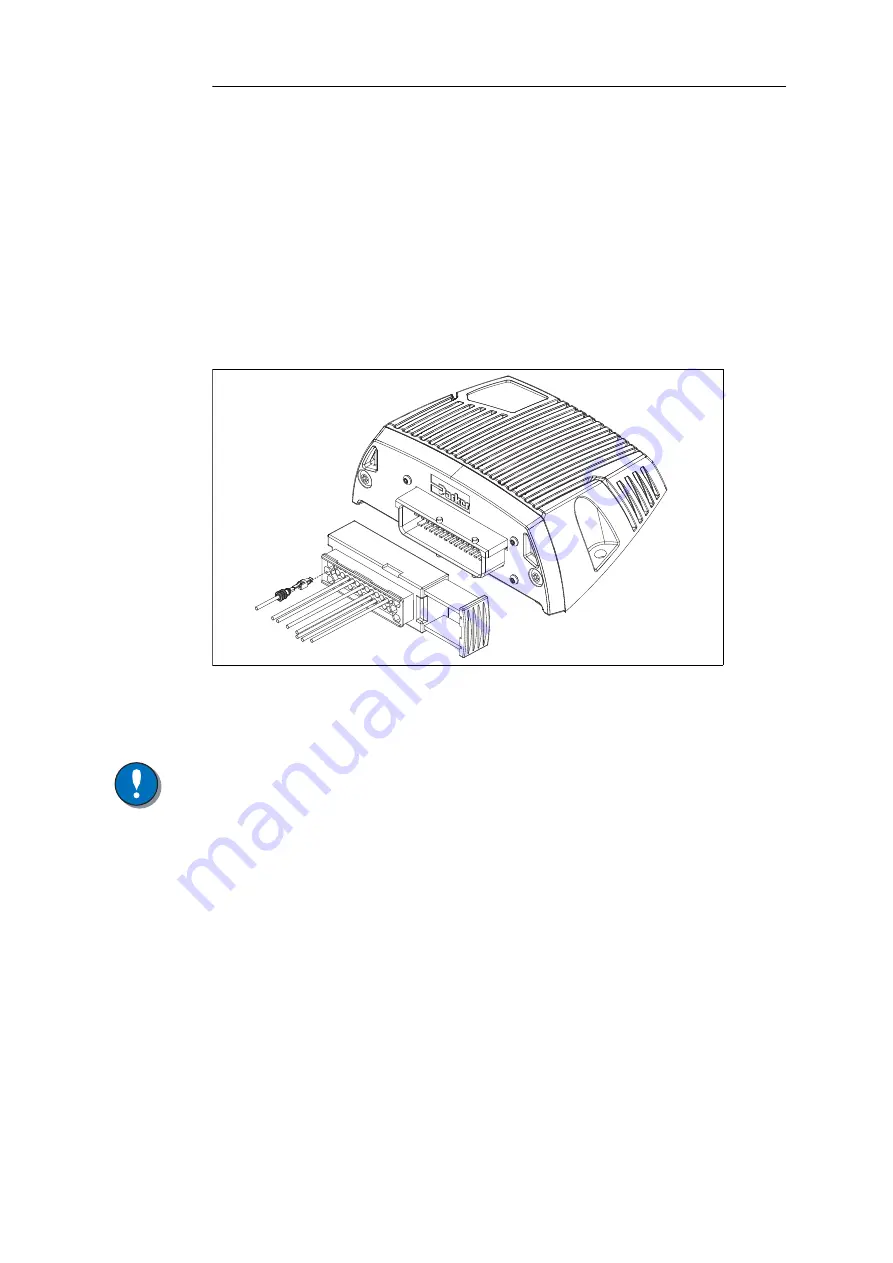
AMP assembly

Locate the wire that you want to install into the connector, it is usually easiest to start in 
the center of connectors that have a large number of wire positions.

1 Grasp the wire just behind the silicone seal (if installed) or the crimped pin.

2 Hold the AMP housing so that the rear face with the round holes is facing you.

3 Push the pin and seal into the correct position on the connector until the locking tabs 

engage.

4 When all wires are in place in the connector housing, visually inspect the pin orien-

tation by looking at the mating face. All pins shold be aligned horizontal to the long 
axis of the housing. If any are tilted, they must be removed and reinstalled.

Assembling a pin into an AMP connector.

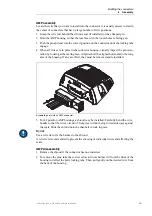
5 For 42 position AMP housings a shroud may be installed. Carefully bend the wire 

bundle so that the wires orient to 90 degrees without being forced sideways against 
the seals. Slide the shroud onto the channels to lock in place.

N

OTICE

Use a wire tie to fix the harness to the shroud.

A wire tie is recommended to prevent the stressing of individual wires and affecting the 
seals.

AMP disassembly

1 Remove the shroud if the connector has one installed.

2 To remove the pins, take the correct extractor tool and insert it from the front of the 

housing to deflect the pin’s locking tabs. Then, pull gently on the desired wire from 
the back of the housing. 

Summary of Contents for HY33-8327-IB/UK

Page 1: ...Mounting and maintenance Instruction book Publ no HY33 8327 IB UK Edition 2013 04 16 ...

Page 2: ...the harness 7 5 Tools 8 Crimping tools 8 Amp Tyco crimping tools 8 Deutsch crimping tool 9 Extraction tools 9 AMP Tyco extraction tools 9 Miscellaneous tools 10 IQAN tools usage 10 6 Assembly 11 Crimping pins on cable 11 Considerations 11 Connector wire sealing 11 Plugging unused connector positions 12 Mounting the connector 12 Inspection for proper crimping 14 Building the connectors 15 Deutsch a...

Page 3: ... is common to the term hazardous situation that a person is exposed to a hazard As a way of pointing out important information for the machine designer that in some way relates to safety This includes the design of the physical machine and also the application program being developed for the control system Not all document sections that contain information about safety are marked with a warning sy...

Page 4: ...tation contains product information in a compact format for details on the information found in those documents consult this manual The IQAN module documentation system Compact Documentation Main Documentation IQANdesign IQANrun User Manuals IQAN module Instruction Book HY33 8nnn IB IQAN module Catalogue Datasheet HY33 8nnn IQAN module Installation Sheet HY33 8nnn IS IQAN module Electrical Schemat...

Page 5: ...sconnected from other equipment The negative cable must always be disconnected from the battery before disconnecting the positive cable The ground wire of the welder shall be positioned as close as possible to the place of the welding The cables on the welding unit shall never be placed near the electrical wires of the control system Start up maintenance and diagnostics For all personnel carrying ...

Page 6: ...tive type TXL It has the following characteristics Conductor Stranded copper wire bare is preferred Insulator DIN ISO 6722 class A PVC Temp range 40 to 105 C NOTICE If there is a risk of prolonged contact with oil Use cabling with sheathing and insulators in oil resistant material e g PUR or PTFE Signal wires For signal transmission I O and communication purposes use wire with a cross sectional ar...

Page 7: ... IQAN systems are of two main types Deutsch transportation connectors AMP Tyco automotive connectors The AMP connectors use two sizes of pins JPT Junior Power Timer and MT Micro Timer pins The following connector descriptions and crimping information will be general in nature for more detailed AMP Tyco connector and crimping information please visit the AMP Tyco website www tycoelectronics com For...

Page 8: ... one face seal if used is installed in the module s connector 4 Put the two connectors together so that the keying passes into the corresponding track Wiggle the connector to ensure that all pins and their mates are aligned 5 Push the latch in while applying force to the connector shell so that the two connec tors are pressed together The more pins the connectors contain the greater the power whic...

Page 9: ...trical connection to the battery s negative terminal Place the harness in beams or channels enclosed by sheet If this is not possible locate the harness in the in most corner of the channel If there are no beams or channels locate the harness towards sheet metal surfaces Protect the harness against mechanical wear Avoid free hanging cables Free hanging cables must be placed so there is no risk tha...

Page 10: ...g tools are used to fix the pins to the conductor and insulator of the individual wires Amp Tyco crimping tools The crimping tools in the IQAN toolkit are designed to work with AMP Tyco connectors used in IQAN modules In some cases the insulator has a single wire seal installed which is attached and held by crimping the pin They are color coded to identify which is used for the crimping of differe...

Page 11: ...d the insulator of the wire DTT 20 02 crimping tool for Deutsch stamped and formed terminals Extraction tools The extraction tool is used to remove the pins from the connector AMP Tyco extraction tools The extraction tools in the IQAN toolkit are for AMP Tyco connector JPT and MT pins The tools are color coded to identify which is used for the removal of different types of pin Using the yellow IQA...

Page 12: ...co connectors Connector kit part no Used with module or part Pin type Wire size Crimping tool Extraction tool 5031007 temp sensor JPT 0 75 1 mm2 18 AWG Red Red 5031022 MDM LF1 JPT 0 75 1 mm2 18 AWG Red Yellow 5031016 XP XS phased out MT 0 75 1 mm2 18 AWG JPT 1 50 2 mm2 14 AWG Blue Yellow Blue Yellow 5031048 LL phased out LM JPT 0 75 1 mm2 18 AWG Yellow Yellow 5031063 MDL2 MC2 XA2 XS2 XT2 XP2 TOC8 ...

Page 13: ...e the cables are exposed to a harsh environment and there is a risk that water might enter the cavities of the connector The silicone seals prevent corrosion and retain their sealing properties even under conditions of heavy vibrations and changes in temperature The seals make the connector less sensitive to moisture and impurities The individual wire seals in combination with the face seal instal...

Page 14: ...sitions will cause the connector to not meet its environmental specification Mounting the connector Mount the connector as follows 1 Select wire pin connector and tool as per the table in the product s instructions 2 Ensure that the correct crimping tool is used see the table in the product s instruc tions 3 Put the seal if one is used on the wire s insulation and slide back far enough so it is ou...

Page 15: ...The ratchet is released when the tool clicks and the tool handles open when you loosen your grip 10 Remove the crimped pin making sure that the following applies the whole of the pin s electrical connection goes around the stripped conductor the mechanical connection of the pin must attach around the cable s insulator or the silicone seal and thereby also around the cable s insulation CAUTION Risk...

Page 16: ...e mechanical connec tion If a seal is installed the seal will be tightly held but not cut or damaged The pin will be aligned with the wire not bent up down or to the side The pin must be aligned The conductor will be visible on both sides of the electrical connection 1 mm max of the insulator will be visible past the mechanical connection Good crimp example with terminology Good Bend up Bend down ...

Page 17: ...ight into the grommet until a click is felt Pull gently to confirm that the pin is properly locked into place 4 When all of the pins are installed insert the wedge into the opposite side of the housing Exploded view of Deutsch connector Deutsch disassembly 1 Remove the wedge with either a pair of long nose pliers or a small regular screw driver depending on gender of the housing 2 To remove the te...

Page 18: ...e mating face All pins shold be aligned horizontal to the long axis of the housing If any are tilted they must be removed and reinstalled Assembling a pin into an AMP connector 5 For 42 position AMP housings a shroud may be installed Carefully bend the wire bundle so that the wires orient to 90 degrees without being forced sideways against the seals Slide the shroud onto the channels to lock in pl...

Page 19: ... gaps or if the lever movements feel uneven WARNING Risk of unexpected and uncontrolled movements Damaged or faulty lever units must be changed Regular inspection Check that the harness conductor splices and connectors have not been damaged The harness should not show signs of abrasion Connectors should be tightly mated Damaged parts must be serviced by technicians Check that the expansion units a...

Page 20: ...na tively the emergency stop may also shut off the diesel engine or a dump valve and with that depressurize the hydraulic system Prepare for system start WARNING Make sure no one is in dangerous proximity to the vehicle to avoid injuries when it starts Prepare for the initial system start as follows The engine for the hydraulic system s pump shall be in off position Make sure that all connectors a...

Page 21: ...ange without notice Parker Hannifin Electronic Controls Division SE 435 35 Mölnlycke Sweden Tel 46 31 750 44 00 Fax 46 31 750 44 21 www parker com ecd Parker Hannifin Electronic Controls Division 1651 N Main Street Morton IL 61550 USA Tel 1 309 263 7788 Fax 1 309 266 6674 Publ no HY33 8327 IB UK Edition 2013 04 16 ...

Reviews: