—
8
—
—
11
—
—
10
—
—
9
—
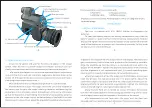
3.Eye piece adjustment
4
.
The objective lens focusing
5.IR power control
6.Laser ranging
7.Menu operation
1>Color
2>Brilliance control
R
eticle
Center
Position
Adjustment
Color
Brightness Of IR
B
rightness
a
utorecording
L
ooprecording
D
ate
Stamp
The dioptric adjustment is designed to ensure a clear visual image
through the unit for people with varying levels of focused vision. Turn the
eyepiece dioptric to bring the menu into sharp focus as you require. The
unit once set up is set to your personal needs and no further adjustment
should be need.
Focus the unit on the intended object and turn the objective lens ring
accordingly until you have the object in clear focus. (Please ensure that
you have adjusted the dioptric eyepiece before focusing the Objective
lens adjustment.)
Press and hold zoom in/red laser switch button to turn on or off the
laser ranging function
Do not look directly at the IR infrared light as this could cause your
eye damage! Switch on the unit. The units display screen will illuminate
into black and white mode. In black & White mode press repeatedly the IR
fill light control button to 8 increase the IR light levels as required. The
unit has 3 power levels 1, 2, 3 and Off. All of which can be adjusted to
increase or decrease the focus of the beam as required. Also within the
top right hand corner of the screen the letters IR will be visible as another
visual warning that the IR is switched on. The IR light also has a zoom head
so this can be pulled out to enable a tighter further reaching beam.
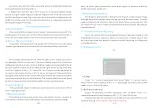
Press Menu button to call up the menu the option. Press +/- button to
select each sub menu. Press OK/photo/ recording to enter the settings :
Press
"
+/-
"
button repeatedly and select
"
Color
"
in roll-up menu.
Press
"
OK
"
to enter setting. Press
"
+/-
"
repeatedly to select color or BW
mode in turn. Press
"
OK
"
to set.
Select
"
IR brilliance control
"
and press
"
OK
"
to enter. Press
"
+/-
"
repeatedly to make switch among
"
off, 1,2,3
"
. Press
"
OK
"
to set.
Please note that the setting you've made will only take effect in your
next starting up.
This is Not for your instant setting.
Instructions for use
1.
Turn On/Off
:
2.
Sleep / Wake-up mode
:
●
Daytime use: Use the rifle scope side wheel or adjustable objective
to bring the target into sharp focus.
●
Night-time use: Set your rifle scope to its lowest magnification,
switch to night mode. Adjust the beam angle of the IR so that the beam
just fills the field of view. Focus the reticule with the barrel adjuster on the
NV007V and then use the rifle scopes side wheel or adjustable objective
to bring the target into sharp.
Press and hold the power button (about 1 second) to turn on/off. The
Sleep/power indicator light will be either illuminated constantly which is
when the unit is powered on or if non illuminated then the unit is off.
To activate the sleep/wake up mode: with the power on ( the sleep
/power light constantly illuminated) press the sleep/wake-up button
once to enter sleep mode then push once again to activate wake-up
mode and power up the unit.


