K887W
Fitting Kit
EN
Fitting Instructions for Basic Carrier
x 4
x 8
x 1
Revision No: Rev1
1
Page 1: ...K887W Fitting Kit EN Fitting Instructions for Basic Carrier x 4 x 8 x 1 x 1 x 4 x 4 x 4 x 4 x 8 x 1 x 4 Revision No Rev1 1 ...
Page 2: ...Fitting Kit K887W MAX kgs lbs W P WHD Chevrolet Silverado LTZ 4dr Truck 15 AU 75 kgs 165 lbs 75 kgs 165 lbs Silverado LTZ 4dr Truck 15 US 75 kgs 165 lbs 75 kgs 165 lbs 2 ...
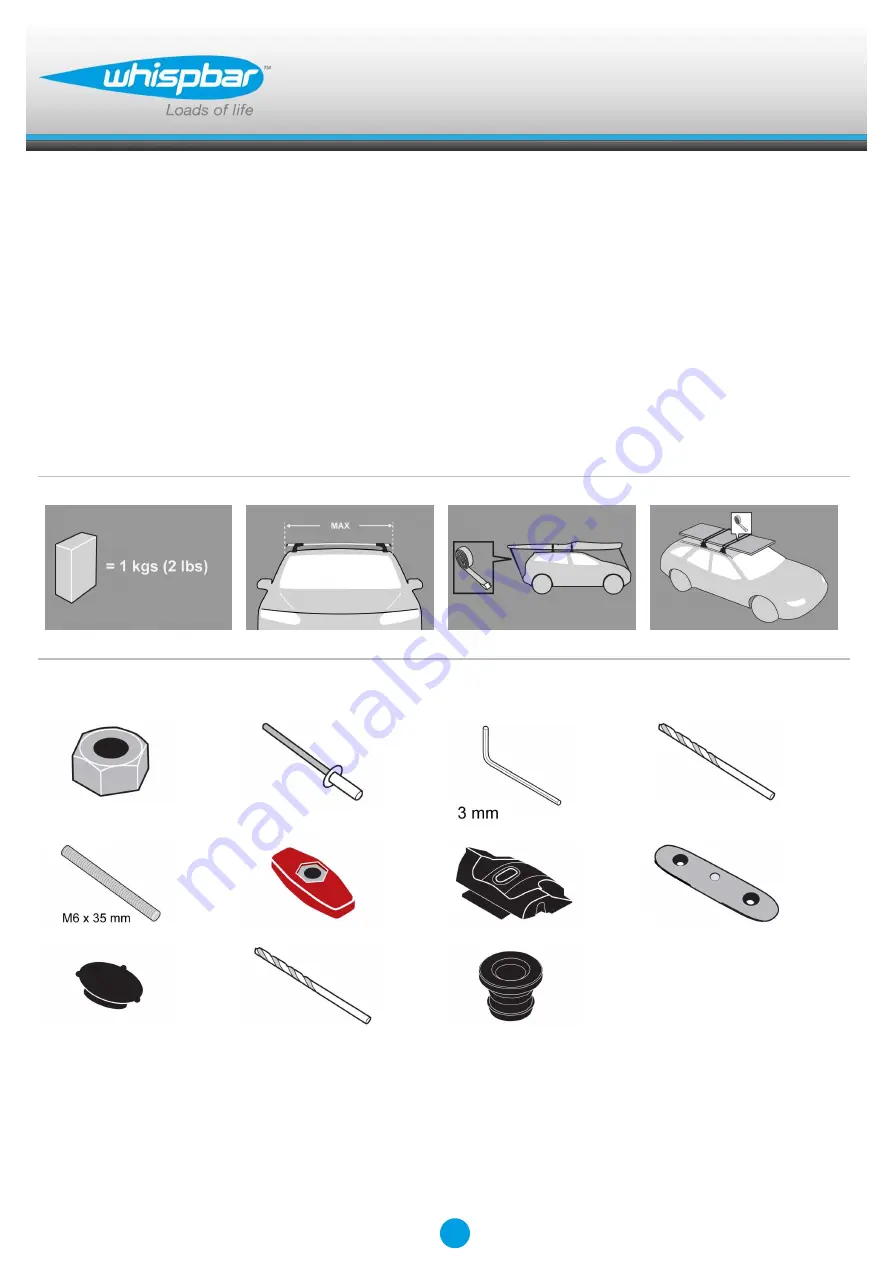
Page 3: ...ers or tin snips Hammer 8mm 3 8 punch Cordless drill Depth stop Vacuum cleaner Rust inhibitor Small paint brush Neutral cure silicon sealant Rivet gun First Time Installation Remove parts from inside the package and check Contact your dealer if any parts are missing or damaged This kit fits type D only 3 ...
Page 4: ...Fitting Kit EN K887W Use keys to remove covers 1 Adjusting Screw 2 Locking Screw Remove Hex Key from right hand cover 4 ...
Page 5: ...for all legs Hold adjusting screw in and slide crossbar in or out as required Ensure each end of the crossbar is adjusted equally Set bars to length revert to rear of these instructions Please check the rear of this manual for information relating specifically to your vehicle 5 ...
Page 6: ... to 3 Nm 2 2 ft lb hand tight Remove plastic clamp block by gripping bar leg with fingers and push firmly with thumbs until clamp block drops out behind leg Select plastic internal block from fitting kit and insert into foot Repeat for all legs 6 ...
Page 7: ...d fits into the holes underneath the foot Lift and pull ditch moulding back towards you and remove from the vehicle Apply masking tape to ditch in all four positions Place mount into position as pictured Line up the centre hole in the mounting block with the marked reference points 7 ...
Page 8: ...Fitting Kit EN K887W Mark reference point on masking tape with a pen Treat holes to prevent corrosion Apply neutral cure silicon sealant in and around drilled holes 8 ...
Page 9: ...k screws as an alternative fixing method to the rivets supplied with this kit Install rivets through permanent mount blocks Rivet into place Fit plastic plugs to permanent mount blocks over rivet heads Installed as shown Repeat for all four positions 9 ...
Page 10: ...Fitting Kit EN K887W Assemble as shown Fitment Select grubscrews and screw into the vehicle s fixed points Do not over tighten Repeat for all four positions Fit nut to grubscrew 10 ...
Page 11: ... Hex Key back grubscrew off half a turn and lock nut down Line up the centre hole in the mounting block with the marked reference points Record the dimension from the reference point to the centre hole Use the 8mm drill bit supplied to drill holes in marked positions 11 ...
Page 12: ...ting Kit EN K887W Re install rubber ditch mould back into roof channel and click into place Place crossbar foot over grubscrews Tighten the plastic knob The side with the nut showing should be facing up 12 ...
Page 13: ...ition shown when fully tightened Repeat for all four positions Use keys to fit and lock covers Check crossbar is securely attached to the vehicle Repeat for all four positions If crossbars are removed please install the rubber plugs into the ditch moulding 13 ...
Page 14: ...Fitting Kit EN K887W CAUTION Recheck all fasteners immediately after a load is applied to the crossbars Regularly check screws are tight 14 ...
Page 15: ...icle manufacturers roof load rating if it is lower than the maximum load capacity specified in the fitting instructions Loads should not overhang the sides of the product and be evenly distributed with the lowest possible centre of gravity Long loads should be secured with non elastic straps to the front and rear of the vehicle Objects with pointed ends e g ski poles should be carried with the poi...
Page 16: ...fitted Lubricate locks and adjusting screws at regular intervals Remove the products from the vehicle when not in use Make sure all loose parts are stored safely Yakima Australia Pty Ltd 17 Hinkler Court Brendale QLD 4500 AUSTRALIA www whispbar com www whispbar com au www whispbar co nz www whispbar co uk www whispbar co za www whispbar eu www whispbar ca 16 ...
Page 17: ...K887W X A B C 1 2 3 Silverado 4dr Truck 15 AU 300mm 500mm 1045mm 1045mm 11 13 16ths 19 11 16ths 41 1 8ths 41 1 8ths Silverado 4dr Truck 15 US 300mm 500mm 1045mm 1045mm 11 13 16ths 19 11 16ths 41 1 8ths 41 1 8ths 17 ...
Page 18: ...ranty cover defects loss or damage resulting from accidents unlawful use of the vehicle or defects inconsistencies in the vehicle on which the product or component is fitted Liability for direct indirect special punitive incidental exemplary contractual or consequential damage or loss arising from defects faulty materials or design omissions or negligence or workmanship in the product or its compo...
Page 19: ... those instructions and of returning the product to Yakima or the Whispbar dealer will be borne by you Following receipt of the product and purchase invoice or receipt Yakima or the Whispbar dealer must inspect the product to determine whether the claim falls within the warranty If 4 1 the claim falls within the warranty Yakima will remedy any defects in materials or workmanship becoming apparent ...