Parasound Zhd Owner'S Manual Download Page 8

OPERATION BY RS-232

6

Automatic Input Select when used with a Parasound Surround Controller

The Zhd inputs are selected automatically if its RS-232 Control port is connected to the RS-
232 port of a Parasound 7.1 Channel Surround Controller (C 1, C 2, 7100). Selecting the Video 
1 source on the C 1 or C 2 (“DVD” source on the 7100) will instruct the Zhd to select HDMI 
Input 1. Selecting the Video 2 source on the C 1 or C 2 (“SAT” source on the 7100) will instruct 
the Zhd to select HDMI Input 2, and so on. To use the automatic feature, connect the sup-
plied RS-232 serial cable between your Parasound controller and the Zhd. The supplied cable 
or equivalent “null-modem” (crossover) cable must be used as a “straight-through” (non-cross-
over) cable will not work. The Zhd will switch its HDMI input according to the source you have 
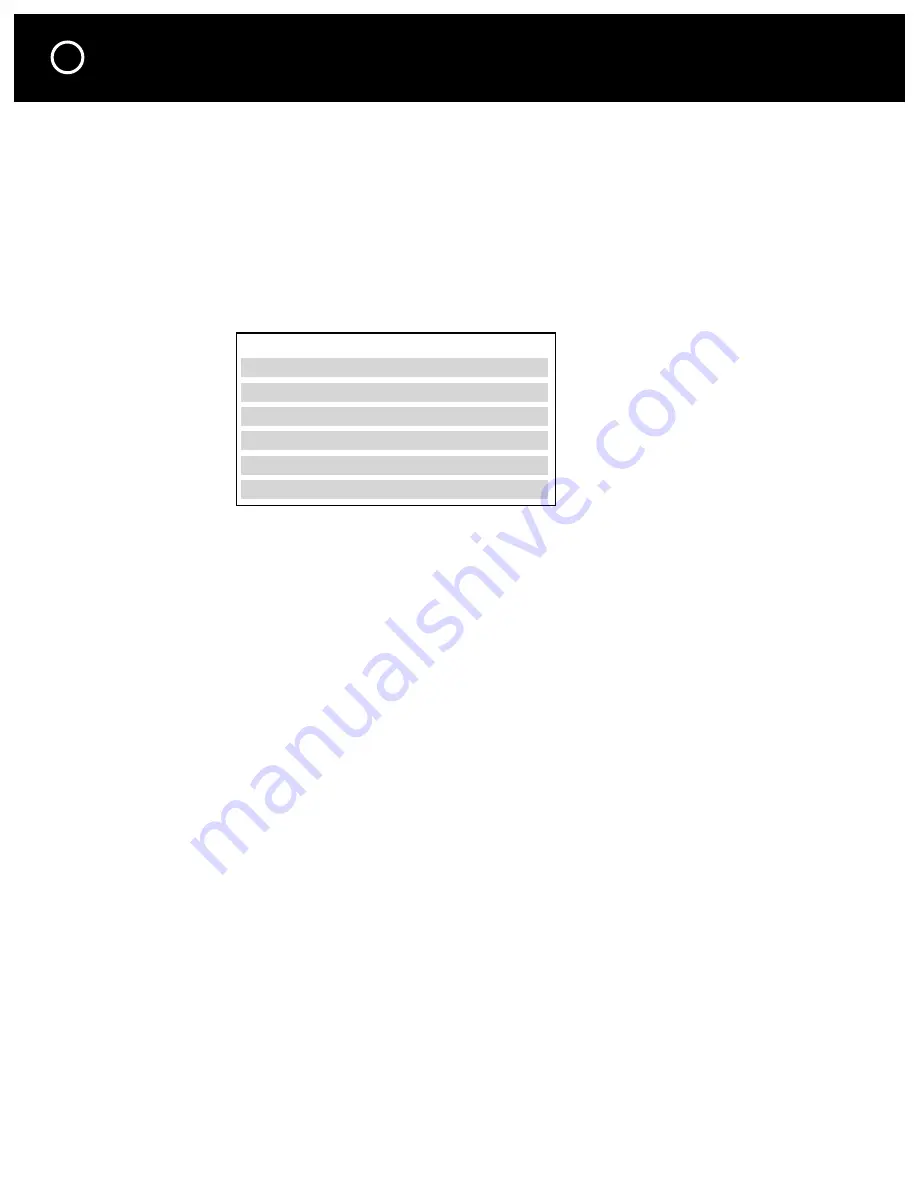
selected on your Parasound 7.1 Channel Surround Controller, according to this chart:

  C 1 and C 2 

7100 

HDMI Input 


Video 1 

DVD 

1


Video 2 

SAT 

2


Video 3 

VCR 

3


Video 4 

IN 4 

4


Video 5 

IN 5 

5


Video 6 

IN 6 

No control

Remember, you might have renamed the source input on your C 1, C 2 or 7100.

Note:

 If you require a different input selection from above you must operate the Zhd manually 

or program an IR macro into your system’s master remote.  

Note for Crestron or AMX users: 

If the RS-232 port on your Parasound 7.1 Channel Surround 

Controller is already connected to a Crestron or AMX type house controller you can not use this 
automatic selection feature. In this case you must run an additional serial cable from your house 
controller to the Zhd and program the house controller according to the Zhd’s RS-232 codes, 
which are supplied with the unit and also available at our website, www.parasound.com.

Programming Zhd IR Codes

You may program the Zhd’s RC-5 IR codes into another remote handset, such as Pronto, or a 
house control system which uses IR, rather than RS-232. The RC-5 code table is included on a 
separate sheet and is also available at our website, www.parasound.com.

Summary of Contents for Zhd

Page 1: ......

Page 2: ...ong grounding plug This plug will only fit into a grounding power outlet If you are unable to insert the plug into the outlet contact your electrician to replace your obsolete outlet Do not defeat the safety purpose of the grounding plug 11 Power Cord Protection Power supply cords should be routed so that they are not likely to be walked on or pinched by items placed upon or against them 12 Lightn...

Page 3: ...lications 2 115 230v AC Selector Switch 3 Rack Mounting 3 Rear Panel Connections and Settings 4 Operating the Zhd 5 Operation by RS 232 6 If You Require Assistance 7 Warranty Repair 7 Specifications 8 TABLE OF CONTENTS 1 ...

Page 4: ...ss you wish to operate it manually with its front panel buttons Please read this manual thoroughly before you begin installation Unpacking Carefully unpack your Zhd and these accessories Detachable AC power cord Remote control handset with two AAA batteries RS 232 control cable with DB9 connectors for use with Parasound 7 1 Channel Surround Controllers only not for use with other Parasound models ...

Page 5: ...or 230v Rack Mounting The Zhd occupies only half the width of a single rack space in a standard 19 equipment rack For rack mounting you can fasten it to another Parasound Z Custom model by using the Parasound SBS Side by Side mounting kit You can also mount a single Zhd in the rack with the accessory Zblank panel The SBS includes four rack mount bolts plus four pairs of plastic shoulder washers Th...

Page 6: ... amplified IR connecting block unlike Parasound Surround Controllers IR Remote Loop Jack The IR Remote Loop jack passes along the signal received at the IR Remote In jack to the next compo nent which is IR controlled It is provided as a courtesy to make your installation easier and neater RS 232 Control Port This is used for linking your Zhd to your Parasound 7 1 Channel Surround Controller a comp...

Page 7: ...o depend on the quality of your HDMI cable and your HDMI source and receiving components You may need to experiment to determine if your particular setup benefits from the boost feature HDMI Boost selection is a one time setup operation which you won t need to change after your initial setup Note You may activate or de activate HDMI Boost only with the Input 1 and 5 buttons on the front panel not ...

Page 8: ...s chart C 1 and C 2 7100 HDMI Input Video 1 DVD 1 Video 2 SAT 2 Video 3 VCR 3 Video 4 IN 4 4 Video 5 IN 5 5 Video 6 IN 6 No control Remember you might have renamed the source input on your C 1 C 2 or 7100 Note If you require a different input selection from above you must operate the Zhd manually or program an IR macro into your system s master remote Note for Crestron or AMX users If the RS 232 p...

Page 9: ... your Parasound dealer first If the dealer can t help you with your problem we encourage you to call Parasound s Technical Service Department toll free at 1 866 770 8324 Monday Friday 8am 4pm Pacific time We can suggest other diagnostic tests you can easily perform If we determine that your Zhd should be returned to Parasound or an Authorized Parasound Warranty Center for inspection and possible s...

Page 10: ...e Parasound warranty is not transferable 3 Unit s serial number was removed modified or defaced 4 Unit shows evidence of abuse and or misuse 5 Unit was modified in any way 6 A prior repair was attempted by an unauthorized repair station AC Power Requirement 110 120 V 220 240 V 50 60 Hz 5 watts Dimensions 91 2 Wide 10 Deep with connectors 2 High with feet 13 4 panel only 241 x 254 x 50mm 44 1mm pan...

Page 11: ...NOTES Notes 9 ...

Page 12: ...Rev 0 92 Parasound Products Inc 2005 ...

Reviews: