


BA_PH_680-100_EN_08-22.docx
37
10.4
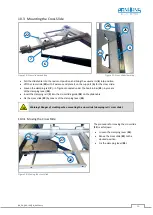
Use Cross-Cut Fence for 90° Cuts
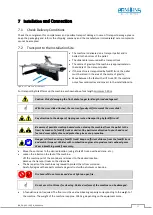
Figure 27: Mount cross-cut fence
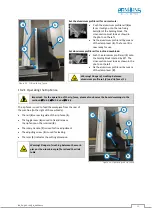
Figure 28: Cross-cut fence at zero position
Figure 29: Prepare 90 degree cut
Figure 30: Abut guide bolt to the angle stop plate
•
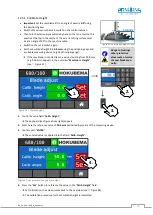
Place the cross-cut fence (
13
) on the cross slide (
22
). At the same time insert the pivot bearing (
D
) from
the cross-cut fence (
13
) into the locking guide (
U
) of the cross slide (
22
) as shown in
•
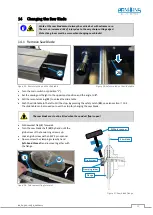
Engage the cross-cut fence (
13
) on the cross slide (
22
) with the rear locking bolt (
K
) in the provided groove
on the cross-cut fence (see
Figure 29). The guide bolt (
B
) must abut against the angle stop plate (
P
) as
shown in
•
The cross-cut fence (
13
) is thus automatically set to the 0° position (see
•
Now tighten the locking handwheel (
W
) and the star grip (
G
) firmly.
•
The cutting process can now be started.
D
U
W
13
27
K
B
G
P
Warning! Danger of crushing between cross slide (22) and cross-cut fence (13)!