background image

Using Media Player

54

Menu

Item

Adjustments / Configurations (alternatives)

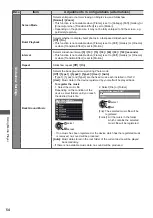
Slideshow Settings

Screen Mode

Selects enlarged or normal viewing on Single view and Slideshow  

[Normal] / [Zoom]

This function is not available when [Frame] is set to [Collage], [Drift], [Gallery] or 
[Cinema] or when [Transition Effect] is set to [Motion].

Depending on the photo size, it may not be fully enlarged to fill the screen, e.g. 
portrait style picture.

Burst Playback

Selects whether to display burst photos in a fast-paced slideshow mode  

[Off] / [On]

This function is not available when [Frame] is set to [Drift], [Gallery] or [Cinema] 
or when [Transition Effect] is set to [Motion].

Interval

Selects slideshow interval 

[5] / [10] / [15] / [30] / [60] / [90] / [120] (seconds)

This function is not available when [Frame] is set to [Drift], [Gallery] or [Cinema] 
or when [Transition Effect] is set to [Motion].

Repeat

Slideshow repeat 

[Off] / [On]

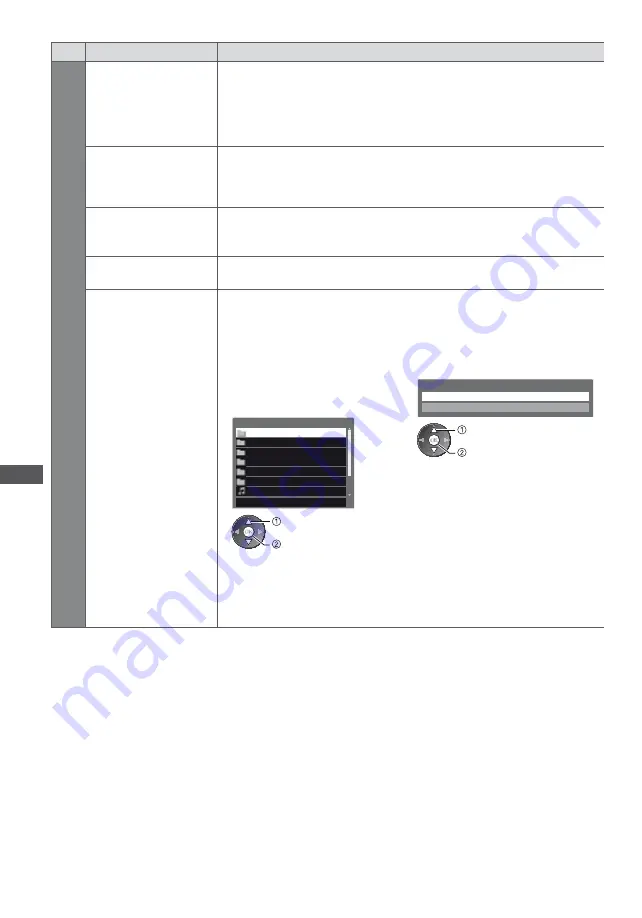
Back Ground Music

Selects the back ground music during Photo mode

[Off] / [Type1] / [Type2] / [Type3] / [User] / [Auto]

[Type1], [Type2] and [Type3] are the fixed music each installed in this TV.

[User]:

  Music data in the device registered by yourself will be played back.

To register the music

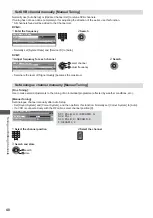
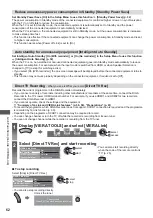
1.  Select the music file
Depending on the condition of the 
device, select folders until you reach 
the desired music file.

 DCIM
 MISC
 001photo
 002photo
 003music
 01  song.mp3

 PRIVATE

Back Ground Music

Type1

 select

 access

2.  Select [File] or [Folder]

Register Slideshow BGM?

File

Folder

 select

 set

[File]:  The selected music file will be 

registered.

[Folder]:  All the music in the folder 

which contains the selected 
music file will be registered.

If no music has been registered or the device which has the registered music 
is removed, no sound will be produced.

[Auto]:

  Music data stored in the root folder of the current device will be played 

back randomly.

If there is no available music data, no sound will be produced.

Summary of Contents for Viera TX-P42X50E

Page 1: ...e instructions carefully before operating this product and retain them for future reference The images shown in this manual are for illustrative purposes only Please refer to Pan European Guarantee Card if you need to contact your local Panasonic dealer for assistance English Model No TX P42X50E TX P50X50E ...

Page 2: ...al terrestrial services and DVB C MPEG2 and MPEG4 AVC H 264 digital cable services Consult your local dealer for availability of DVB T services in your area Consult your cable service provider for availability of DVB C services with this TV This TV may not work correctly with the signal which does not meet the standards of DVB T or DVB C Not all the features are available depending on the country ...

Page 3: ...erformance from usage of such other maker s peripheral devices This product is licensed under the AVC patent portfolio license for the personal and non commercial use of a consumer to i encode video in compliance with the AVC Standard AVC Video and or ii decode AVC Video that was encoded by a consumer engaged in a personal and non commercial activity and or was obtained from a video provider licen...

Page 4: ...r as live parts are accessible when it is removed There are no user serviceable parts inside High voltage components may cause serious electrical shock Have the TV checked adjusted or repaired at your local Panasonic dealer Do not expose to direct sunlight and other sources of heat Avoid exposing the TV to direct sunlight and other sources of heat To prevent the spread of fire keep candles or othe...

Page 5: ...ufficient space around the TV for radiated heat Minimum distance When using the pedestal keep the space between the bottom of the TV and the surface where the TV is set In case of using Wall hanging bracket follow the manual of it 10 10 10 7 cm Do not block the rear air vents Blocked ventilation by newspapers table cloths curtains etc may cause overheating fire or electrical shock Do not expose yo...

Page 6: ...0 mm Depth of screw minimum 17 mm maximum 35 mm Diameter M8 300 mm View from the side Screw for fixing the TV onto the wall hanging bracket not supplied with the TV Warning Using other wall hanging brackets or installing a wall hanging bracket by yourself have the risk of personal injury and product damage In order to maintain the unit s performance and safety be absolutely sure to ask your dealer...

Page 7: ... and personal injury may result Do not use the pedestal if it becomes warped or physically damaged If you use the pedestal while it is physically damaged personal injury may result Contact your local Panasonic dealer immediately During set up make sure that all screws are securely tightened If insufficient care is taken to ensure screws are properly tightened during assembly the pedestal will not ...

Page 8: ...ws loosely at first then tighten them firmly to fix securely Carry out the work on a horizontal and level surface D C A A L C R B Arrow mark Removing the pedestal from the TV Be sure to remove the pedestal in the following way when using the wall hanging bracket or repacking the TV 1 Remove the assembly screws from the TV 2 Pull out the pedestal from the TV 3 Remove the assembly screws from the po...

Page 9: ... navigation and operation of various functions 11 Teletext p 22 Switches to teletext mode 12 Subtitles p 16 Displays subtitles 13 Numeric buttons Changes channel and teletext pages Sets characters When in Standby mode switches TV on Press for about 1 second 14 Sound Mute Switches sound mute on or off 15 Volume Up Down 16 Input mode selection TV switches DVB C DVB T Analogue mode p 15 AV switches t...

Page 10: ...to Standby p 35 This function does not affect the recording of Timer Programming and Direct TV Recording 1 Function select Volume Contrast Brightness Colour Sharpness Tint NTSC signal Bass Treble Balance Auto Setup p 36 37 Music or Speech mode in the Sound Menu 2 Channel Up Down Value change when using the F button Switching the TV on press either button for about 1 second when in Standby mode 3 C...

Page 11: ... 49 2 CI slot p 46 3 Headphone jack p 67 4 USB port p 49 5 DIGITAL AUDIO OUT p 66 6 AV1 SCART p 12 7 AV2 COMPONENT VIDEO p 66 8 Terrestrial cable terminal see below 9 HDMI1 2 p 12 66 Connections Mains lead and aerial Cable DVB C DVB T Analogue AC 220 240 V 50 60 Hz Mains lead Terrestrial aerial RF cable Mains lead Push until both side tabs click Make sure that the mains lead is securely fixed To r...

Page 12: ...le Note Connect to the TV s AV1 for a DVD Recorder VCR supporting Q Link p 60 Q Link and VIERA Link connection p 58 59 Please also read the manual of the equipment being connected Keep the TV away from electronic equipment video equipment etc or equipment with an infrared sensor Otherwise distortion of image sound may occur or operation of other equipment may be interfered When using a SCART or HD...

Page 13: ... Malta Turkey Others Andorra Greece Croatia select set Depending on the country you select select your Region or store the Child Lock PIN number 0000 cannot be stored by following the on screen instructions 4 Select the mode to tune D A TV Signal Selection DVB C DVB T Analogue Start Auto Setup select tune skip tuning tune search for the available channels skip tuning 5 Select Start Auto Setup D A ...

Page 14: ... CH 29 CH 33 Channel Name BBC1 Analogue 2 Analogue Auto Setup This will take about 3 minutes Scan CH 2 CC 1 41 78 6 Select Home Select Home viewing environment to use in your home environment Please select your viewing environment Home Shop select set Shop viewing environment for shop display only Shop viewing environment is the demonstration mode to explain main features of this TV Select Home vi...

Page 15: ...rom the Channel List All DVB T Channels _ _ 6 7 8 2 4 J _ _ J To select a channel using Information banner p 16 1 Display Information banner if it is not displayed 2 While the banner is displayed select the channel To select a channel using TV Guide p 19 1 Display TV Guide 2 Select the current programme or channel 3 Select View _ _ J _ _ _ Note Using Common Interface p 46 ...

Page 16: ...annels Change category For info press 45 Dolby D Encrypted 1 2 3 4 5 6 7 1 _ 2 _ 3 4 J 5 6 J 7 _ _ Features available Message meanings _ Bad signal Encrypted J _ Dolby D Dolby D J J _ J J J _ J _ J _ _ _ J Stereo Mono _ _ 1 90 p 17 _ _ J _ _ J _ Banner Display Timeout p 34 Display subtitles Display hide subtitles J J Preferred Subtitles p 33 Note J _ _ J _ ...

Page 17: ...e Language J _ J Teletext Character Set p 34 Teletext Language J J MPX _ _ J p 30 Volume Correction _ _ _ _ Off Timer Turn the TV to Standby mode automatically after a fixed period J _ _ _ 0 15 30 45 60 75 90 Display Information banner p 16 You can also set the Off Timer via the Setup menu p 32 1 Display the menu 2 Select Setup Main Menu Picture Sound Setup 3 Select Off Timer and set the time in 1...

Page 18: ...ally 1 Display Aspect Selection list Aspect Selection ª Zoom2 ª 2 While the list is displayed select the mode _ J _ _ _ _ J _ _ _ _ p 68 _ _ _ ª _ _ _ J _ ª J _ _ J _ ª _ _ _ J _ _ Note _ _ J _ _ J _ _ _ _ _ _ Last view Switch to previously viewed channel or input mode easily Note J _ _ _ _ _ _ _ ...

Page 19: ... Erste DIY SOS The Bill Red Cap 19 30 20 00 20 30 21 00 The Bill Good bye Hot Wars Holiday Program Pepsi Char Emmerdal 10 O clock News BBC Coast Spring watch Panorama D D D D D BBC ONE 20 00 20 30 DIY SOS We open in the Battersbys 1 BBC ONE BBC THREE E4 BBC FOUR BBC 2W 1 7 14 70 72 Coronation Street _ _ _ _ 3 1 5 2 4 6 7 1 _ _ 2 _ _ 3 _ 4 5 _ 6 _ 7 Depending on the country you select you can selec...

Page 20: ...ee Radio Pay Radio Favourites1 Favourites2 Favourites3 Favourites4 p 38 _ Other useful functions View details of the programme DVB 1 Select the programme 2 View details _ View advertisement Depending on the country you select this TV supports the GUIDE Plus system in DVB T or Analogue mode _ _ _ Update Postcode in GUIDE Plus Settings p 35 _ _ _ _ _ J _ _ Display advertisement information _ _ Updat...

Page 21: ...te Start End Wed 26 10 2011 10 46 BBC ONE Ext Rec Wed 26 10 2011 20 00 30 min min min min min 20 30 D 1 TIMER _ Indicator Control panel p 10 _ Set timer programming event details p 43 To check change cancel a timer programming event To return to TV Guide Timer Programming p 42 44 If you select the current programme _ _ _ Note J _ J _ J _ _ J _ _ _ _ J _ _ J _ _ _ _ _ _ _ _ ...

Page 22: ...ntly viewed pages p 23 To change mode Teletext p 34 1 Switch to Teletext _ _ _ J _ 01 02 03 04 05 06 07 TELETEXT INFORMATION 17 51 28 Feb _ J J J J 2 Select the page or _ or _ J _ J To adjust contrast J J _ _ To return to TV Reveal hidden data Reveal hidden words e g quiz page answers _ _ INDEX Return to the main index page HOLD Stop automatic updating _ _ Call up a favourite page View a favourite...

Page 23: ...ed pages Store frequently viewed pages in the colour bar _ _ _ _ _ J _ _ J To change stored pages _ J J _ _ View sub page View sub page Only when Teletext is more than one page J J _ _ J _ _ To view specific sub page J _ J Watch TV while waiting for update View the TV picture while searching for a teletext page _ J J _ _ P108 _ _ _ _ ...

Page 24: ...ng with SCART p 12 J _ _ J J If input mode is not switched automatically _ 2 Display the input selection menu 3 Select the input mode connected to the equipment Input Selection AV2 TV _ J _ J _ _ _ _ _ _ Using Media Player p 49 J _ _ Input Labels p 34 _ J _ _ J _ 4 View AV1 _ _ Note _ _ _ _ To return to TV ...

Page 25: ...l _ _ _ J J Standby _J _ Play J _ _ Stop Rewind Skip Search _ _ _ _ _ J _ Fast forward Skip Search _ _ _ _ _ _ _ Pause _ _ _ Channel Up Down Direct TV Rec p 60 62 How to change the code _ _ _ _ J Press and hold during the following operations _ J J Press _ _ _ 72 _ _ Note _ _ J _ J _ J J _ ...

Page 26: ...turn to TV or Follow the operations of each feature VIERA Link p 62 65 Photo p 51 Video p 55 Music p 57 If 2 devices are available a selection screen will be displayed Please select the correct description and access Note If the selected feature is not available the demonstration to explain how to use it can be displayed Press the OK button to view the demonstration after selecting the unavailable...

Page 27: ...Moved Sharpness 5 change store Go to the next screen Displays the next screen Child Lock Access access To return to TV at any time To return to the previous screen To change menu pages up down Enter characters by free input menu You can enter names or numbers freely for some items A B C D E F G H I J K L M N O P Q R S T U V W X Y Z 0 1 2 3 4 5 6 7 8 9 a b c d e f g h i j k l m n o p q r s t u v w ...

Page 28: ...these options according to your personal preference Tint Adjusts the picture hue to suit your taste For NTSC signal reception Colour Balance Sets the overall colour tone of the picture Cool Normal Warm Not valid when Viewing Mode is set to True Cinema Vivid Colour Automatically adjusts colours to vivid ones Off On Eco Mode Automatic Brightness Control function Adjusts picture settings automaticall...

Page 29: ...ignals in AV mode Auto PAL SECAM M NTSC NTSC DVI Input Setting Changes the black level of the image for HDMI input mode with DVI input signal manually Normal Full When the DVI input signal from the external equipment especially from PC is displayed the black level may not be suitable In this case select Full The black level for HDMI input signal will be adjusted automatically For HDMI input mode w...

Page 30: ...le sound raise the level of the higher frequency To reset the levels of each frequency to the default settings select Reset to Defaults by using the cursor button and then press the OK button Balance Adjusts volume level of right and left speakers Headphone Volume Adjusts the volume of the headphones Surround Surround sound settings Off V Audio V Audio Surround V Audio Provides a dynamic enhancer ...

Page 31: ...mode SPDIF Selection SPDIF A standard audio transfer file format Selects the initial setting for digital audio output signal from DIGITAL AUDIO OUT and HDMI2 ARC function terminals Auto PCM Auto Dolby Digital Plus and Dolby Digital are output as Dolby Digital Bitstream HE AAC 48 kHz multi channel is output as DTS MPEG is output as PCM PCM Digital output signal is fixed to PCM For DVB mode or video...

Page 32: ...he signal to be transmitted from the TV to Q Link TV AV2 Monitor Monitor Image displayed on screen Component and HDMI signals cannot be output Power on Link Sets to use Power on Link function Off On p 60 61 Power off Link Sets to use Power off Link function Off On p 60 61 Standby Power Save Controls the connected equipment to reduce power consumption in Standby Off On p 62 This function is availab...

Page 33: ...n to enable a message to switch to the available service only available in some countries Off On For DVB C mode Signal Condition Checks the signal condition p 41 Not valid on Analogue mode Attenuator Automatically reduces the DVB C signal to avoid the interference Off On If the DVB C signal is too strong the interference may occur In this case set to On to reduce the signal automatically Add TV Si...

Page 34: ... Accesses the input labels list to select the label of each input mode or set to skip unconnected one for easier identification and selection in TV Selection p 15 Input Selection p 24 or banner To name each input mode freely select User input and set characters maximum 10 characters To skip the input mode select Skip Banner Display Timeout Sets how long the Information banner stays on screen 0 No ...

Page 35: ...ure from TV tuner Set to AV to view input from the external equipment connected to the AV1 or HDMI1 terminal e g set top box The external equipment must be switched on and sending a control signal for automatic switching at power on to occur Auto Standby Sets the duration of time that the TV will remain on when no operation is performed Off 2 4 hours Starting Timer Programming automatically does n...

Page 36: ...nalogue Tuning Menu Access select access 4 Select Auto Setup DVB C Tuning Menu Auto Setup Access select access 5 Set the Auto Setup settings DVB C DVB C Auto Setup Settings Search Mode Scan Mode Frequency Symbol Rate Network ID Auto Free Channels Quick Auto Auto select set store Scan Mode Full Scans the whole frequency range Quick Scans the suitable frequency in your country Normally set Frequency...

Page 37: ...BBC1 Analogue 2 Analogue Auto Setup This will take about 3 minutes Scan CH 2 CC 1 41 78 The channel language and country region settings are downloaded to Q Link or VIERA Link compatible equipment connected to the TV When the operation is completed the channel at the lowest position will be displayed Auto setup using the buttons on the TV For Auto Setup using the buttons on the TV p 10 1 Press the...

Page 38: ...u p 36 37 List favourite DVB channels Favourites Edit Create your favourite channel lists from various broadcasters up to 4 Favourites 1 to 4 The DVB Favourites lists are available from Category in the Information banner p 16 and the TV Guide screen p 19 1 Select a channel to list Encrypted channel Example DVB C DVB C Favourites Editor BBC One Wales All DVB C Channels Favourites1 BBC THREE E4 CBBC...

Page 39: ...DVB C Channels CBBC Channel Cartoon Nwk BBCi BBC Radio Wales BBC Radio Cymru BBC ONE Wales BBC THREE 70 72 105 719 720 1 7 Sorting 123 select Reveal Hide To reveal all channels yellow Reveal Hide skip To sort channel names in alphabetical order DVB red To change the category DVB blue To edit channels To swap move the channel position if available Select the new position Store Example Analogue gree...

Page 40: ... T Manual Tuning Frequency Signal Quality Signal Strength 474 00 MHz select channel adjust frequency Set where the level of Signal Quality becomes the maximum Set Analogue channel manually Manual Tuning Fine Tuning Use to make small adjustments to the tuning of an individual programme affected by weather conditions etc Manual Tuning Set Analogue channel manually after Auto Setup Set Sound System a...

Page 41: ...er to give a notification message when a new DVB channel is found New channels found Press OK to update channel list Press EXIT to ignore Selecting OK will perform Update Channel List Check DVB signal Signal Condition Selects a channel and checks the DVB signal condition A good Signal Strength is not an indication of suitable signal for DVB reception Use the Signal Quality indicator as follows Gre...

Page 42: ...rnal recorder be sure to make the proper settings on the recorder connected to the TV If a recorder compatible with Q Link VIERA Link or similar technologies is connected to the TV p 60 61 and Link Settings p 32 are completed no setting of the recorder is required Also read the manual of the recorder If the recorder is not compatible with Q Link VIERA Link or similar technologies make timer progra...

Page 43: ...he order of 1 to 4 select the item set 1 3 and 4 can also be entered with numeric buttons Wed 26 10 2011 10 46 Timer Programming Function Ext Rec Ext Rec Reminder Wed 26 10 2011 17 00 90 min 18 30 18 00 120 min 20 00 21 30 60 min 22 30 Wed 26 10 2011 Thu 26 10 2011 BBC1 TIMER 1 STTL D No Date Start End Channel Name BBC7 TIMER 7 D ITV1 TIMER 3 C 1 Records with subtitles if available To indicate thi...

Page 44: ...occurs You press the OK button to view the programme or the EXIT button to cancel the reminder The timer programming event that the reminder is set for ends identifies that two or more timer programming events are overlapped Ext Rec is given priority over Reminder As for the overlapped recording events the first event starts and finishes as programmed The next event can then start The recording of...

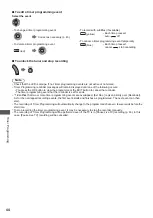
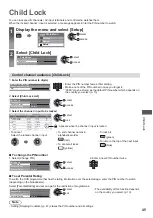
Page 45: ... AV1 AV2 AV AV Lock Name Input DVB C Free TV DVB T Free TV DVB T Free TV Analogue Analogue Analogue Analogue Analogue Analogue External External Type Child Lock List TV and AV Sorting 123 Appears when the channel input is locked select lock To cancel Select the locked channel input To sort channel names in alphabetical order red To cancel all locks yellow To lock all green To jump to the top of th...

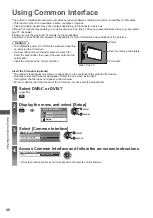
Page 46: ...card reader come as a set first insert the card reader then insert the view card into the card reader Insert the module in the correct direction Insert or remove completely CI slot CI module Side of the TV Insert the CI module optional The features that appear on screen are dependent on the contents of the selected CI module Normally encrypted channels will appear Follow the on screen instructions...

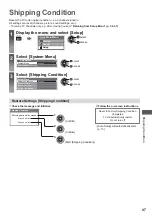
Page 47: ...tup Menu 2 2 System Menu Other Settings Access select access 3 Select Shipping Condition System Menu Shipping Condition System Update Software Licence System Information Access select access Restore Settings Shipping Condition 1 Check the message and initialise 2 Follow the on screen instructions Shipping Condition All tuning data will be erased Are you sure Are you sure 1 Confirm 2 Confirm 3 Star...

Page 48: ...elect Every time you set the TV automatically performs a search in Standby and downloads an update if any software updates are available The automatic updating is performed under the following conditions Standby TV turned off with the remote control Recording of Timer Programming or Direct TV Recording is not in progress If System Update is performed the software will be updated it may change TV f...

Page 49: ...ipment The file without record of the date is shown The picture may not appear correctly on this TV depending on the recording equipment used Display may take some time when there are many files and folders Partly degraded files might be displayed at a reduced resolution Picture setting may not work depending on the conditions The folder and file names may be different depending on the digital cam...

Page 50: ...ETURN Slideshow View Select Drive Select Contents Select Info View Option Menu SD Card Media Player Photo All photos Selected device name To display the information of the highlighted content 1 48 p1010001 JPG 23 10 2011 1600X1200 File name Date Pixel File number Total file number Note You can also access each mode directly by using VIERA TOOLS p 26 Select the appropriate device and content for pl...

Page 51: ...ion Menu SD Card Media Player Photo All photos To change the size of photos on a thumbnail screen select Change Size change Error display Single view Photos are displayed one at a time Select the file from the thumbnail of photos to be viewed select access Example Single view Single view Stop EXIT Select RETURN Rotate Operation guide To display hide the operation guide To return to thumbnail To op...

Page 52: ... access Folder view Displays the thumbnail grouped by folder The files which are not into a folder will be collected to the folder named Sort by Date Sort by Month Displays the thumbnail grouped by the same date or month The group of the photos without a recorded date is shown as Unknown To return to the thumbnail of all photos green select All photos access ...

Page 53: ...ed like flow images You can select to display the calendar or not The month of calendar is turned by pressing the left or right cursor button Gallery calendar Gallery The various sizes of photos in the frame are displayed You can select to display the calendar or not The month of calendar is turned by pressing the left or right cursor button Cinema Photos are displayed like old films sepia tone Co...

Page 54: ... to Motion Repeat Slideshow repeat Off On Back Ground Music Selects the back ground music during Photo mode Off Type1 Type2 Type3 User Auto Type1 Type2 and Type3 are the fixed music each installed in this TV User Music data in the device registered by yourself will be played back To register the music 1 Select the music file Depending on the condition of the device select folders until you reach t...

Page 55: ...Nature6 2011_9 Media Player Video Title view _ EXIT _ Video Setup p 56 J _ J _ _ _ J Playback from the selected scene in the title SD Video or AVCHD J _ _ 1 Select the title 2 Select the scene 3 Start playback _ _ _ _ _ _ _ J Video Setup p 56 How to operate in the playback J SD 19 02 2011 11 21 00 15 39 00 02 05 EXIT _ J _ _ _ _ J _ J J _ J _ ...

Page 56: ..._ _ J J J Multi Audio J J _ J _ _ J _ J Subtitle J J J _ J Subtitle Text _ J J J _ J Aspect Change Aspect1 _ _ Aspect2 Original J _ _ J _ J Repeat J _ _ _ Off On Audio output Settings _ _ _ see above 1 Display the menu and Select Sound Main Menu Picture Sound Setup 2 Select SPDIF Selection and set Sound Menu Auto Menu Item Adjustments Configurations alternatives Sound SPDIF Selection _ _ _ _ _ _ A...

Page 57: ...J _ _ _ J _ Playback from File view _ J _ J 1 Select the folder 2 Select the file 3 Start playback _ How to operate in the playback J My Song_9 My Favourite My Music_1 00 02 43 00 05 44 EXIT _ _ _ _ J _ J _ _ J Music Setup _ J J 1 Display the option menu 2 Select Music Setup Option Menu 3 Set Music Setup Menu Folder J _ _ One J _ ...

Page 58: ... on link Power off link Direct TV Recording Connection SCART cable DVD Recorder VCR with Q Link function Use fully wired SCART cable Connect the DVD Recorder VCR supporting Q Link to the TV s AV1 terminal via a SCART cable VIERA Link HDMI connection Connected equipment Features DIGA Recorder with VIERA Link function DVD Player Blu ray Disc Player with VIERA Link function HD Video Camera LUMIX Came...

Page 59: ... the Setup Menu p 32 Use the optical digital audio cable or SCART cable for audio output from the TV 1 Available with the equipment which has HDAVI Control 2 or later function 2 Available with the equipment which has HDAVI Control 3 or later function 3 Available with the equipment which has HDAVI Control 4 or later function 4 Available with a DIGA Recorder which has HDD 5 This function is availabl...

Page 60: ...ecorder s tuner AV Recorder s tuner AV watching recorder s external input AV Recorder s external input AV watching TV s external input AV TV monitor out When Direct TV Recording is performed the recorder is automatically turned on if it is in Standby mode You can change channel or turn the TV off while the recorder is recording from its own tuner Changing channel is not available while the recorde...

Page 61: ...ent Read the manual of the equipment For optimal recording the settings of the recorder may need to be changed For details read the manual of the recorder Download preset channel language and country region settings Preset download see below Set VIERA Link to On in the Setup Menu VIERA Link p 32 Set up the TV After connection turn the equipment on and then switch the TV on Select the input mode fr...

Page 62: ...t turns to standby This function may not work properly depending on the connected equipment If required set to Off Direct TV Recording What you see is What you record Direct TV Rec Records the current programme in the DIGA Recorder immediately If you connect a variety of recorders including other manufacturers recorders at the same time connect the DIGA Recorder to the TV s lower HDMI terminal num...

Page 63: ...on HDD from where it was paused If the paused TV picture disappears after a few minutes press OPTION button to restore the pause picture Follow the operation guide to operate Pause Live TV function To operate Pause Live TV Search backward Search forward Stop If you stop playback the recorded programme will be deleted from HDD Playback Pause Operations may vary depending on the recorder In this cas...

Page 64: ...If other manufacturers equipment is accessed Setup Contents Selection menu may be displayed Available VIERA remote control buttons depend on the connected equipment Note Some operations may not be available depending on the equipment In this case use its own remote control to operate the equipment If multiple recorders or players are connected VIERA Link Menu Pause Live TV Direct TV Rec VIERA Link...

Page 65: ...s is mute When the equipment is turned off TV speakers will be active TV TV speakers are active Multi channel sound If you want to enjoy the multi channel sound e g Dolby Digital 5 1ch via an Amplifier connect it with HDMI cable and Optical digital audio cable p 59 and then select Home Cinema If your Amplifier has HDAVI Control 5 function you only need to connect it with HDMI cable to the TV s HDM...

Page 66: ... are correct when connecting Rear of the TV To watch DVDs DVD Player Listening Viewing HDMI equipment Fully wired HDMI compliant cable Recorder Player Camcorder HDMI connection p 71 To listen with speakers Optical digital audio cable Amplifier with speaker system To enjoy the sound from the external equipment in multi channel sound e g Dolby Digital 5 1ch connect the equipment to the amplifier For...

Page 67: ...ettes DVDs VCR DVD Recorder To watch satellite broadcasts Set top box 1 To watch DVDs DVD Player To watch camcorder images Video camera To play games Game equipment To use amplifier with speaker system 2 Q Link VIERA Link with HDMI Direct TV Recording Recommended Connection 1 Use HDMI1 for automatic input switching 2 Use HDMI2 for connecting an amplifier This connection is applicable when using an...

Page 68: ...p 625 576 50i 50p 750 720 60p 50p 1 125 1 080 60i 50i HDMI1 HDMI2 525 480 60i 60p 625 576 50i 50p 750 720 60p 50p 1 125 1 080 60i 50i 1 125 1 080 60p 50p 24p Auto mode Auto mode determines the best aspect ratio to fill the screen using a four step process WSS Control signal through SCART HDMI terminal Letterbox detection or Justify to fill the screen This process may take several minutes depending...

Page 69: ...lable The compatibility with future products is not guaranteed MP4 mp4 H 264 BP MP HP AAC Dolby Digital MP3 This TV supports this container recorded by Panasonic products For details read the manual of the products AVI avi divx DivX3 DivX4 DivX5 DivX6 MPEG4 SP ASP Dolby Digital MPEG Audio MP3 Certified to play DivX HD video file in Media Player For details of DivX p 70 ASF asf wmv VC 1 Windows Med...

Page 70: ...AND This DivX Certified device must be registered in order to play purchased DivX Video on Demand VOD movies To obtain your registration code locate the DivX VOD section in the Setup Menu Go to vod divx com for more information on how to complete your registration To show DivX VOD registration code DivX VOD p 34 If you want to generate the new registration code you have to deregister the current r...

Page 71: ...to enjoy high definition digital images and high quality sound by connecting the TV and the equipment HDMI compatible equipment 1 with an HDMI or DVI output terminal such as a DVD player a set top box or game equipment can be connected to the HDMI terminal using an HDMI compliant fully wired cable For more information about connections p 12 66 Applicable HDMI features Input audio signal 2ch Linear...

Page 72: ...nal Signal name Horizontal frequency kHz Vertical frequency Hz 640 480 60 Hz 31 47 60 00 1 280 720 60 Hz 45 00 60 00 1 920 1 080 60 Hz 67 50 60 00 Applicable input signal for PC is basically compatible to HDMI standard timing Note Signals other than above may not be displayed properly The above signals are reformatted for optimal viewing on your display PC signal is magnified or compressed for dis...

Page 73: ...e 1 _ d e f 3 D E F g h i 4 G H I j k l 5 J K L m n o 6 M N O p q r s 7 P Q R S t u v 8 T U V w x y z 9 W X Y Z Space 0 a b c 2 A B C Numeric buttons Numeric buttons Characters Characters SCART and HDMI terminal information AV1 SCART terminal RGB VIDEO Q Link Socket Earth 21 CVBS out video 19 CVBS earth 17 Red in 15 Red earth 13 Green in 11 Green earth 9 Blue in 7 Blue earth 5 Audio out L 3 Audio ...

Page 74: ...or check the aerial and consult your local dealer Neither image nor sound is produced Check the TV is turned on Check the mains lead is plugged into the TV and the socket outlet Check the TV is in AV mode Check the correct input mode is selected Check the Picture Menu p 28 29 and volume Check all required cables and connections are firmly in place Auto aspect Auto aspect is designed to provide you...

Page 75: ... volume set to the minimum Sound level is low or sound is distorted Sound signal reception may be deteriorated Set MPX p 30 in the Sound Menu to Mono Analogue Unusual sound from the TV When power is on drive noise may be heard from inside the TV not a sign of faulty operation HDMI Sound is unusual Set the sound setting of the connected equipment to 2ch L PCM Check the HDMI1 2 Input setting in the ...

Page 76: ...ces of bright light not to shine on the TV s remote control signal receiver Parts of the TV become hot Even when the temperature of parts of the front top and rear panels has risen these temperature rises do not cause any problems in terms of performance or quality Permanently lit spots on screen Due to production process involved in this technology this may result in some pixels which are permane...

Page 77: ...loth at regular intervals Moisture and dust may lead to fire or electrical shock Licence Even if no special notation has been made of company or product trademarks these trademarks have been fully respected DVB and the DVB logos are trademarks of the DVB Project SDXC Logo is a trademark of SD 3C LLC AVCHD is a trademark of Panasonic Corporation and Sony Corporation DivX DivX Certified and associat...

Page 78: ...Mass 17 5 kg Net With Pedestal 16 0 kg Net TV only 22 5 kg Net With Pedestal 21 0 kg Net TV only Sound Speaker 160 mm 40 mm 2 8 Audio output 20 W 10 W 10 W Headphones M3 3 5 mm stereo mini Jack 1 Receiving systems Band name Check the latest information on the available services at the following website English only http panasonic jp support global cs tv PAL B G H I SECAM B G SECAM L L VHF E2 E12 V...

Page 79: ...HDAVI Control 5 function Card slot SD Card slot 1 Common Interface slot complies with CI Plus 1 USB USB2 0 DC 5 V Max 500 mA DIGITAL AUDIO OUT PCM Dolby Digital DTS Fibre optic 1 Energy consumption XYZ kWh per year based on the power consumption of the television operating 4 hours per day for 365 days The actual energy consumption will depend on how the television is used 2 when the TV is turned o...

Page 80: ...applicable for incorrect disposal of this waste in accordance with national legislation For business users in the European Union If you wish to discard electrical and electronic equipment please contact your dealer or supplier for further information Information on Disposal in other Countries outside the European Union These symbols are only valid in the European Union If you wish to discard these...

Reviews: