background image

Thank you for purchasing this Panasonic product.
Please read these instructions carefully before operating this product and retain 
them for future reference.
The images shown in this manual are for illustrative purposes only.

English

UK and Ireland model

Model No.

TX-L24E3B

Operating Instructions

LCD Television 

Summary of Contents for Viera TX-L24E3B

Page 1: ...e read these instructions carefully before operating this product and retain them for future reference The images shown in this manual are for illustrative purposes only English UK and Ireland model Model No TX L24E3B Operating Instructions LCD Television ...

Page 2: ...ound by using an HDMI cable t This TV supports HDMI Version 1 4 with Audio Return Channel Timer Programming p 19 41 Timer Programming enables you to use functions such as programme reminder and programme recording to the external recorder VIERA IMAGE VIEWER SD Card viewer in Media Player p 52 Enjoy your photos or videos recorded on an SD Card on the TV screen SDXC Card This TV supports SDXC Card S...

Page 3: ...ial use of a consumer to i encode video in compliance with the AVC Standard AVC Video and or ii decode AVC Video that was encoded by a consumer engaged in a personal and non commercial activity and or was obtained from a video provider licensed to provide AVC Video No license is granted or shall be implied for any other use Additional information may be obtained from MPEG LA LLC See http www mpegl...

Page 4: ... fuse is replaced If you lose the fuse cover the mains plug must not be used until a replacement cover is obtained A replacement fuse cover may be purchased from your local dealer If the fitted moulded mains plug is unsuitable for the socket outlet in your home then the fuse shall be removed and the mains plug cut off and disposed of safety There is a danger of severe electrical shock if the cut o...

Page 5: ...ains possibly dangerous parts that can be breathed in or swallowed by young children accidentally t Keep the dangerous parts out of reach of young children t Do not allow children to handle SD Card As with any small object the SD Card could be swallowed by young children Please remove SD Card immediately after use and store out of reach of young children Caution Ventilation Allow sufficient space ...

Page 6: ...ions accompanying optional accessories and be sure to take steps to prevent the TV from falling off t Handle the TV carefully during installation since subjecting it to impact or other forces may cause product damage which will void your warranty t Do not mount the unit directly below ceiling lights such as spotlights or halogen lights which typically give off high heat Doing so may warp or damage...

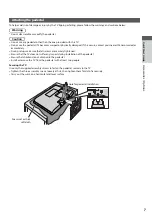
Page 7: ...st Panasonic dealer immediately t During setup make sure that all screws are securely tightened t Ensure that the TV does not suffer any impact during installation of the pedestal t Ensure that children do not climb onto the pedestal t Install or remove the TV from the pedestal with at least two people Securing the TV Use only the supplied assembly screws to fasten the pedestal securely to the TV ...

Page 8: ...teletext pages t Sets characters t When in Standby mode switches TV On Press for about 1 second 13 Sound Mute t Switches sound mute On or Off 14 Volume Up Down 15 Input mode selection t TV switches between DVB and Analogue modes p 14 t AV switches to AV input mode from Input Selection list p 24 16 Direct TV Recording p 61 63 t Records programme immediately in DVD Recorder VCR with Q Link or VIERA ...

Page 9: ...er Programming or Direct TV Recording in progress Red with orange flash Standby with Timer Programming On or Direct TV Recording t The LED blinks when the TV receives a command from the remote control Using the On Screen Displays Operation guide Many features available on this TV can be accessed via the On Screen Display menu Operation guide Operation guide will help you to operate by using the re...

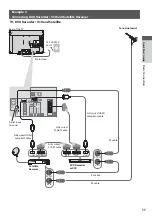
Page 10: ... shown are not supplied with this TV Please ensure that the unit is disconnected from the mains socket before attaching or disconnecting any leads Example 1 Example 2 Connecting aerial Connecting DVD Recorder VCR TV only Aerial input terminal DIGITAL AUDIO OUT PC Rear of the TV Terrestrial aerial AC 220 240 V 50 Hz Mains lead RF cable TV DVD Recorder or VCR DIGITAL AUDIO OUT PC RF OUT RF IN HDMI A...

Page 11: ...AL AUDIO OUT PC RF IN RF OUT RF IN RF OUT HDMI Recorder AV HDMI AV 1 AV 2 Rear of the TV Terrestrial aerial Mains lead AC 220 240 V 50 Hz Fully wired HDMI compliant cable Fully wired SCART cable Fully wired SCART cable Satellite Receiver DVD Recorder or VCR RF cable RF cable RF cable Fully wired HDMI compliant cable Aerial input terminal ...

Page 12: ...nels and store them in the numbered order as specified by the broadcasters t Actual number of channels may differ due to channel duplication Example Searching CH 62 62 62 62 29 33 Channel Name CBBC Channel BBC Radio Wales E4 Cartoon Nwk BBC1 Type Free TV Free TV Free TV Free TV Analogue Analogue Quality 10 10 10 10 Free TV 8 Pay TV 0 Radio 0 Analogue 2 Auto Setup DVB and Analogue DVB Scan This wil...

Page 13: ...select your viewing environment Home Shop set select Shop viewing environment for shop display only Shop viewing environment is the demonstration mode to explain main features of this TV Select Home viewing environment to use in your home environment t You can return to viewing environment selection screen at the stage of Shop confirmation screen and Automatic Demo Off On selection screen 1 Return...

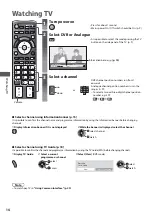
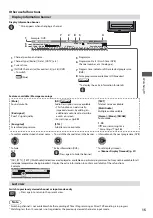
Page 14: ... SVO GSPN POXBSET OBMPHVF DIBOOFM QPTJUJPO OVNCFST SVO JO UIF SBOHFT t 5P TFMFDU B UXP PS UISFF EJHJU DIBOOFM QPTJUJPO OVNCFS F H def wxyz wxyz Select a channel using Information banner p 15 U JT QPTTJCMF UP DPOGJSN UIF DIBOOFM OBNF BOE QSPHSBNNF JOGPSNBUJPO CZ VTJOH UIF OGPSNBUJPO CBOOFS CFGPSF DIBOHJOH DIBOOFMT 1 Display Information banner if it is not displayed 2While the banner is displayed se...

Page 15: ...MF Multi Audio VMUJQMF BVEJP BWBJMBCMF Bad signal 1PPS 57 TJHOBM RVBMJUZ Stereo Mono NICAM VEJP NPEF 1 90 0GG 5JNFS SFNBJOJOH UJNF t PS TFUUJOHT p 16 Encrypted 4DSBNCMFE QSPHSBNNF STLL 4VCUJUMF TFSWJDF BWBJMBCMF t 5P DPOGJSN BOPUIFS UVOFE DIBOOFM OBNF t 5P XBUDI UIF DIBOOFM MJTUFE JO UIF CBOOFS t OGPSNBUJPO PO UIF OFYU QSPHSBNNF 7 t 5P IJEF t YUSB JOGPSNBUJPO 7 t 5P TFU EJTQMBZ UJNFPVU EXIT 1SFTT ...

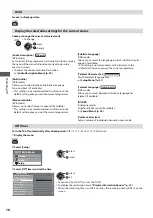
Page 16: ...MMPXT ZPV UP TFMFDU UIF MBOHVBHF JO XIJDI TVCUJUMFT TIPVME BQQFBS JG BWBJMBCMF t 5IJT TFUUJOH JT OPU NFNPSJ FE BOE JU XJMM SFUVSO UP UIF EFGBVMU TFUUJOH PODF ZPV FYJU UIF DVSSFOU QSPHSBNNF Teletext Character Set 4FUT UIF UFMFUFYU MBOHVBHF GPOU Setup Menu p 31 Teletext Language 7 NPEF MMPXT ZPV UP TFMFDU CFUXFFO BMUFSOBUJWF MBOHVBHF GPS UFMFUFYU JG BWBJMBCMF NICAM OBMPHVF NPEF 4XJUDIFT TPVOE JG BWB...

Page 17: ...PSQIJD JTQMBZT B MFUUFSCPY PS JNBHF XJUIPVU EJTUPSUJPO PPN JTQMBZT UIF JNBHF BU UIF TUBOEBSE XJUIPVU EJTUPSUJPO JTQMBZT B MFUUFSCPY BOBNPSQIJD JNBHF GVMM TDSFFO XJUIPVU EJTUPSUJPO PPN JTQMBZT UIF JNBHF BU UIF TUBOEBSE XJUIPVU EJTUPSUJPO JTQMBZT B MFUUFSCPY BOBNPSQIJD JNBHF GVMM TDSFFO XJUIPVU EJTUPSUJPO U EJTQMBZT UIF JNBHF BU JUT NBYJNVN XJUI TMJHIU FOMBSHFNFOU Note t 0OMZ i w BOE i w BSF BWBJMBC...

Page 18: ...OOFMT 4FMFDU DIBOOFM 5JNFS 1SPHSBNNJOH 9 5 4FMFDU QSPHSBNNF 3 563 IPVST IPVST 4FBSDI BUFHPSZ OGP 3 563 4FMFDU EWFSU 1BHF VQ 1BHF EPXO 3 1 4 7 8 9 6 2 5 YBNQMF 1 VSSFOU EBUF BOE UJNF 2 57 VJEF UJNF 3 EWFSUJTFNFOU 4 7 OBMPHVF 5 IBOOFM QPTJUJPO BOE OBNF 6 57 VJEF EBUF 7 4PNF QSPHSBNNFT NBZ BMTP CF CSPBEDBTU JO t PV DBO TFMFDU PS 4 CSPBEDBTU CFGPSF WJFXJOH PS TFUUJOH 5JNFS 1SPHSBNNJOH 8 1SPHSBNNF 9 PH...

Page 19: ...HSBNNJOH JT TFU 0SBOHF XJMM GMBTI JG UIF SFDPSEJOH PG 5JNFS 1SPHSBNNJOH JT JO QSPHSFTT Ext Rec UP SFDPSE UIF QSPHSBNNF UP UIF FYUFSOBM SFDPSEFS YU 3FD 8IFO UIF TUBSU UJNF DPNFT UIF DIBOOFM XJMM CF TXJUDIFE BVUPNBUJDBMMZ BOE UIF WJEFP BOE BVEJP TJHOBMT XJMM CF PVUQVU NJOVUFT CFGPSF UIF TUBSUJOH UJNF B SFNJOEFS NFTTBHF BQQFBST JG ZPV BSF XBUDIJOH 57 Reminder UP SFNJOE ZPV UP XBUDI UIF QSPHSBNNF 8IFO...

Page 20: ...1SPHSBN NNFSEBM PSPOBUJPO 4USFFU 5IF JMM 0 DMPDL FXT 1FQTJ IBS PPE CZF 1BOPSBNB 4QSJOH XBUDI PBTU N FMFCSJUZ 1PQ EPM FXT 3VHCZ 5P 4QPSUT D 0 D 5 3 D D 063 D 8 D J D 3BEJ 8FE 0DU 4FBSDI MM IBOOFMT i w PS i w XJMM CF EJTQMBZFE JO UIF 57 VJEF JG 5JNFS 1SPHSBNNJOH JT TFU BT UIF VJEF MJOL QSPHSBNNJOH Note t G ZPV FEJU UIF TUBSU UJNF PS FOE UJNF PG B VJEF MJOL QSPHSBNNJOH FWFOU CZ NPSF UIBO NJOVUFT JU X...

Page 21: ...NNFT IBWF EJHJUBM UFMFUFYU TFSWJDFT 2 Switch to Teletext TEXT 17 51 28 Feb YBNQMF How to operate services O BMM DBTFT JU JT QPTTJCMF UP OBWJHBUF UIF QBHFT VTJOH CVUUPOT PO UIF SFNPUF DPOUSPM CVU CFDBVTF UIF DPNNBOET BWBJMBCMF NVTU BQQMZ UP BMM NBOVGBDUVSFST PG EJHJUBM FRVJQNFOU TPNF PO TDSFFO DPNNBOET NBZ OPU DPSSFTQPOE FYBDUMZ UP UIF SFNPUF DPOUSPM CVUUPOT t 4FMFDU HP t 4ZNCPM t BDL LFZ RETURN t ...

Page 22: ...hange mode Teletext p 31 DIRECT TV REC N ASPECT AV SD CARD OPTION LAST VIEW EXIT INDEX HOLD STTL jkl ghi mno tuv pqrs wxyz abc def TEXT INPUT TV RETURN MENU To return to TV EXIT 1 Select Analogue TV 2 Switch to Teletext TEXT t JTQMBZT UIF JOEFY QBHF DPOUFOU WBSJFT EFQFOEJOH PO UIF CSPBEDBTUFST 01 02 03 04 05 06 07 TELETEXT INFORMATION 17 51 28 Feb 5JNF EBUF 4VC QBHF OVNCFS PMPVS CBS VSSFOU QBHF OV...

Page 23: ...s PMPVSFE CVUUPO ZPV XBOU UP DIBOHF OUFS OFX QBHF OVNCFS QSFTT BOE IPME jkl ghi mno tuv pqrs wxyz abc def View sub page View sub page Only when teletext is more than one page QQFBST BU UPQ PG UIF TDSFFO t 5IF OVNCFS PG TVC QBHFT WBSJFT EFQFOEJOH PO UIF CSPBEDBTUFST VQ UP QBHFT t U NBZ UBLF TPNF UJNF GPS TFBSDIJOH EVSJOH XIJDI UJNF ZPV DBO XBUDI 57 To view specific sub page MENU CMVF OUFS UIF EJHJU...

Page 24: ...selection menu AV 3 Select the input mode connected to the equipment Input Selection AV1 AV2 COMPONENT PC HDMI1 HDMI2 TV SD Card select watch t You can also select the input using the AV button on the remote control or the side panel of the TV except SD Card Press the button repeatedly until the desired input is selected t SD Card Switches to Media Player Using Media Player p 52 t You can label or...

Page 25: ...EC Record Start recording How to change the code for the type of the equipment Each type of the Panasonic equipment has its own remote control code Please change the code according to the equipment you want to operate If you operate in Video mode of Media Player p 56 or operate the connected equipment in VIERA Link p 64 select the code 73 Press and hold during the following operations Enter the ap...

Page 26: ... RETURN jkl ghi mno tuv pqrs wxyz abc def DIRECT TV REC MENU N ASPECT INPUT TV AV SD CARD OPTION INDEX HOLD STTL TEXT LAST VIEW PROGRAMME REC TV EXIT To return to TV EXIT or VIERATOOLS 1 Display icons of the feature VIERATOOLS 2 Select a feature VIERA Link Control access select 3 Follow the operations of each feature VIERA Link Control VIERA Link Control p 64 When two or more compatible equipment ...

Page 27: ...namic Choose from among alternatives To reset the settings t To reset the picture settings only Reset to Defaults in the Picture Menu p 28 t To reset the sound settings only Reset to Defaults in the Sound Menu p 30 t To reset the picture and sound settings together Colour Balance Normal Number and positions of alternatives Changed Adjust using the slide bar Sharpness Moved Also volume level and as...

Page 28: ...cture Noise Reduction Automatically reduces unwanted picture noise and flicker noise in the contoured parts of a picture Off Min Mid Max t Not valid on PC signal 3D COMB Makes still or slow moving pictures look more vivid Off On t Occasionally whilst viewing still or slow moving pictures colour patterning may be seen Set to On to display sharper and more accurate colours t For PAL or NTSC signal r...

Page 29: ...atial effects V Audio Surround Provides a dynamic enhancer of width and depth to simulate improved spatial effects Auto Gain Control Adjusts the current volume level if it is extremely different from the previous viewed channel or input mode Off On Volume Correction Adjusts the volume of individual channel or input mode Speaker Distance to Wall Adjusts the low frequency sound Over 30cm Up to 30cm ...

Page 30: ...ation guide GUIDE Plus Postcode Sets your postcode to display advertisements in the GUIDE Plus system p 20 GUIDE Plus Information Displays the system information of the GUIDE Plus system Off Timer Sets the time until the TV automatically goes to Standby mode Off 15 30 45 60 75 90 minutes p 16 Eco Navigation Automatically sets the TV to the most suitable energy saving mode t If you press the OK but...

Page 31: ...aster English Welsh Gaelic Irish Teletext Analogue teletext display mode FASTEXT List p 22 Teletext Character Set Selects teletext language font West East1 East2 West English French German Greek Italian Spanish Swedish Turkish etc East1 Czech English Estonian Lettish Rumanian Russian Ukrainian etc East2 Czech Hungarian Lettish Polish Rumanian etc Preferred Subtitles Selects the preferred language ...

Page 32: ...must be switched on and sending a control signal for automatic switching at power on to occur Power on Channel List Automatically selects All Channels or Favourites list in the Information banner p 15 when the TV is turned on All Channel List Last Set to All Channel List to display all the channels Set to Last to display the one you selected last time t Not available in Analogue mode Auto Standby ...

Page 33: ...s Tint Colour Balance Vivid Colour C A T S Warm Off Off Picture Menu 2 2 P NR Off 3D COMB Off Advanced Settings Access Reset to Defaults Reset Screen Display On p 28 Advanced Settings White Balance Access Gamma Access 16 9 Overscan On Resolution Enhancer Off DVI Input Setting Normal p 28 Equaliser 150 250 500 1k 2k 4k 8k 12k Hz Reset to Defaults Available when Mode is set to User Sound Menu 1 2 Mo...

Page 34: ...gation Setup Menu 2 2 Access Access Other Settings System Menu Network Setup Access p 30 32 All tuning data will be erased Are you sure Are you sure Shipping Condition p 47 Common Interface Slot 1 Module inserted Available in DVB p 49 Owner ID Please enter PIN for access PIN p 48 System Update Auto Update Search in Standby On System Update Search Now Access p 50 System Menu Shipping Condition Acce...

Page 35: ... 100 62 Cartoon Nwk Free TV 100 Free TV 4 Pay TV 0 Radio 0 Data 0 Searching p 36 All DVB Channels 70 72 105 719 720 1 7 CBBC Channel Cartoon Nwk BBCi BBC Radio Wales BBC Radio Cymru BBC ONE Wales BBC THREE p 39 DVB Manual Tuning Frequency No Channel Name Type New Free TV 0 Pay TV 0 Radio 0 Data 0 Stopped Signal Strength 0 10 Signal Quality 0 10 MHz 474 CH21 p 37 Link Settings VIERA Link On 1 2 AV1...

Page 36: ...he displayed item depends on the selected mode 5 Select Auto Setup Example DVB Tuning Menu Auto Setup Access access select 6 Start Auto Setup Settings are made automatically Example DVB All DVB tuning data will be erased DVB Auto Setup DVB Auto Setup This will take about 3 minutes Progress CH 21 68 62 CH Channel Name Type Quality CBBC Channel Free TV 100 62 BBC Radio Wales Free TV 100 62 E4 Free T...

Page 37: ...y or those for your preferred region appear nearer the top of your Channel List Normally you should select Best signal quality All Regions Channel Sorting by Region GBR Best signal quality All Regions England Regions Region choice available access select region select repeatedly until you reach the available region t If you choose to select your preferred region you could find channels with a weak...

Page 38: ...rs maximum ten characters Store User input Name A B C D E F G H I J K L M N U V W X Y Z 0 1 2 3 4 5 6 a b c d e f g h i j k l m n u v w x y z _ O P Q R S T 7 8 9 o p q r s t 1 2 abc 3 def 4 ghi 5 jkl 6 mno 7 pqrs 8 tuv 9 wxyz 0 select set RETURN t To use numeric buttons Characters table for numeric buttons p 72 3 Store RETURN Note t Channel position numbers known as logical channel numbers can be ...

Page 39: ...automatically Update Channel List You can add new channels delete removed channels update channel name and position automatically to Channel List Example DVB Update Channel List CH Channel Name Type Quality Searching Analogue Scan 21 68 Progress CH 21 68 This will take about 3 minutes Free TV 0 Pay TV 0 Radio 0 Data 0 t Channel List is updated while keeping your settings in Favourites Edit Channel...

Page 40: ... I J K L M N U V W X Y Z 0 1 2 3 4 5 6 a b c d e f g h i j k l m n u v w x y z _ O P Q R S T 7 8 9 o p q r s t 1 2 abc 3 def 4 ghi 5 jkl 6 mno 7 pqrs 8 tuv 9 wxyz 0 select set RETURN t To use numeric buttons Characters table for numeric buttons p 72 3 ITV 23 35 itv All Analogue Channels CH23 Channel position Channel name Note t If a VCR is connected only with the RF cable edit VCR Set Analogue cha...

Page 41: ... N ASPECT AV SD CARD OPTION INDEX HOLD STTL TEXT EXIT MENU INPUT TV To return to TV EXIT To unlock the tuner and stop recording EXIT 1 Select the tuner you want to use DVB or Analogue TV 2 Display the menu MENU 3 Select Setup Main Menu Picture Sound Setup access select 4 Select Timer Programming Setup Menu 1 2 Off Timer Off Link Settings Child Lock DVB Tuning Menu Access Display Settings Network S...

Page 42: ...led by information from the TV Guide if programme start and end times are changed by the broadcaster the timer programming event will follow the change A Split Programme programming is a Guide link programming which is interrupted by one or more other programmes Note that Guide link programming including Split Programme programming only works reliably if correct information is received from broadc...

Page 43: ...ld Lock List Child Lock Change PIN Child Lock List Access access select 3 Select the channel input to be locked VCR Lock Name BBC 1 Wales BBC THREE E4C BBC1 AV1 AV2 Input DVB Free TV DVB Free TV DVB Free TV Analogue Analogue Analogue Analogue Analogue Analogue External AV External AV Type 101 7 14 1 2 Child Lock List TV and AV Appears when the channel input is locked lock select t To cancel Select...

Page 44: ...ess select 4 Select Input Labels Access Input Labels Display Settings access select 5 Select an input terminal Input Labels AV1 DVD AV2 COMPONENT HDMI1 DVB Analogue AV2 COMPONENT HDMI1 DVB HDMI2 HDMI2 Analogue PC PC set select The labels you set will be displayed in the Input Selection menu p 24 TV Selection menu or banner t If Skip is selected the input will not be displayed in the Input Selectio...

Page 45: ...your ISP and telecommunications company t You cannot make settings for the network equipment on this TV You may be required to make settings on your computer t Depending on the terms and conditions of the contracts with your ISP or telecommunications company additional fees may be charged or multiple connections to the internet may be impossible t Please contact your ISP or telecommunications comp...

Page 46: ...ecified by the provider 1 Select Proxy 2 Enter the address 3 Store Proxy Settings Proxy Proxy Port 0 Proxy Host A B C D E F G H I J K L M N U V W X Y Z 0 1 2 3 4 5 6 a b c d e f g h i j k l m n u v w x y z _ O P Q R S T 7 8 9 o p q r s t 1 2 abc 3 def 4 ghi 5 jkl 6 mno 7 pqrs 8 tuv 9 wxyz 0 select set RETURN access select t To use numeric buttons Characters table for numeric buttons p 72 To set Pr...

Page 47: ...Menu Picture Sound Setup access select 3 Select System Menu 2 2 Setup Menu Access Other Settings System Menu access select 4 Select Shipping Condition System Menu Shipping Condition System Update Software Licence System Information Common Interface Owner ID Access access select Restore Settings Shipping Condition 1 Check the message and initialise 2 Follow the on screen instructions Shipping Condi...

Page 48: ...wxyz abc def t Enter the PIN number twice at first setting t Make a note of the PIN number in case you forget it The PIN number cannot be reset 2 Select the item NAME HOUSE NO POSTCODE and set characters Owner ID Data Entry PIN NAME HOUSE NO POSTCODE A B C D E F G H I J K L M N U V W X Y Z 0 1 2 3 4 5 6 a b c d e f g h i j k l m n u v w x y z _ O P Q R S T 7 8 9 o p q r s t 1 2 abc 3 def 4 ghi 5 j...

Page 49: ... came with the viewing card to tune in the encrypted channels If encrypted channels do not appear perform the below to verify the card is recognised by the TV t For more details see the manual of the CI module or check with the broadcaster RETURN jkl ghi mno tuv pqrs wxyz abc def DIRECT TV REC N ASPECT AV SD CARD OPTION INDEX HOLD STTL TEXT LAST VIEW PROGRAMME EXIT MENU INPUT TV To return to TV EX...

Page 50: ...ate To update automatically Select Auto Update Search in Standby and set to On System Update Auto Update Search in Standby On System Update Search Now set select t Automatically performs a search in standby and downloads an update if any software updates are available t The automatic updating is performed at night under the following conditions t Standby TV turned Off with the remote control t Rec...

Page 51: ...justs the white balance for blue areas Reset to Defaults Press the OK button to reset to the default White Balance Gamma Gamma Switches the gamma curve 1 8 2 0 2 2 2 4 2 6 t Please note the numerical values are reference for the adjustment Reset to Defaults Press the OK button to reset to the default Gamma Setup PC Setup Input Resolution Switches to a wide view t VGA 640 480 pixels WVGA 852 480 pi...

Page 52: ...ay may take some time when there are many files and folders t Partly degraded files might be displayed at a reduced resolution t The folder and file names may be different depending on the digital camera or digital video camera used To insert or remove the SD Card SD Card To insert the SD Card To remove the SD Card Gently insert the SD Card label surface facing front Cutout Push until a click is h...

Page 53: ... the sort type Folder view Sort by Date Sort by Month access select Folder view Displays the thumbnail grouped by folder t The files which are not into a folder will be collected to the folder named Sort by Date Displays the thumbnail grouped by the same date t The group of the photos without recorded date is shown as Unknown Sort by Month Displays the thumbnail grouped by the same month t The gro...

Page 54: ...ct Aspect Interval Repeat Back Ground Music 5 seconds On Off Fade Original Off Burst Playback Off access set or select access Back Ground Music Note t Picture quality may become lower depending on the slideshow settings t Picture setting may not work depending on the slideshow settings Menu Item Adjustments Configurations alternatives Slideshow Settings Frame Selects the frame type of the slidesho...

Page 55: ...ion is not available when Transition Effect is set to Motion Repeat Slideshow repeat Off On Back Ground Music Selects the back ground music during Photo mode Off Type1 Type2 Type3 User Auto t Type1 Type2 and Type3 are the fixed music each installed in this TV User Music data in the SD Card registered by yourself will be played back To register the music 1 Select the music file 2 Select File or Fol...

Page 56: ...Trip1_4 Trip1_5 Trip1_6 Trip1_7 Media Player Video Title view Trip1 SD Card EXIT Select RETURN Contents Select Info Play Play Option Menu The preview will start when the scene is highlighted if it supports a preview t To turn off the preview Video Setup p 57 t To display the information of the highlighted scene 1 8 Trip1_1 00h04m12s Scene Duration Date Time 19 02 2010 11 21 Scene number Total scen...

Page 57: ...ustments Configurations alternatives Video Setup Multi Audio Allows you to select between selectable sound tracks if available t It may take several seconds to change the sound Aspect Change Aspect1 Displays the content full screen Aspect2 Displays the content square Original Displays the content original size t You can also change the aspect using the ASPECT button t Aspect change may not work de...

Page 58: ...s OPTION Media Player Music Folder view My Music_1 My Song_1 My Song_2 My Song_3 My Song_8 My Song_9 My Song_10 My Song_4 My Song_11 My Song_5 My Song_6 My Song_7 SD Card EXIT Select RETURN Contents Select Info Play Play Folder Option Menu select t To display the information of the highlighted file 1 11 My Song_1 My Favourite Title Artist Album Track No Duration My Music_1 1 00h03m29s File number ...

Page 59: ...nction HD Video Camera LUMIX Camera with VIERA Link function Analogue channel download Easy playback Power on link Power off link Reduce unnecessary power consumption in standby 3 3 Auto standby for unnecessary equipment 3 3 Pause Live TV programme 2 4 Direct TV Recording 2 Control the menu of the connected equipment by VIERA remote control 1 1 1 Speaker control Connection DIGA Recorder DVD Player...

Page 60: ...supporting VIERA Link to the TV s AV1 terminal and set AV1 out to Monitor in the Setup Menu p 30 t Use the optical digital audio cable RCA cable or SCART cable for audio output from the TV 1 Available with the equipment which has HDAVI Control 2 or later function 2 Available with the equipment which has HDAVI Control 3 or later function 3 Available with the equipment which has HDAVI Control 4 or l...

Page 61: ...XT EXIT DIRECT TV REC DIRECTTVREC t Available conditions Picture source Mode Recording from Analogue TV TV monitor out AV Recorder s tuner DVB TV TV monitor out AV watching recorder s tuner AV Recorder s tuner AV watching recorder s external input AV Recorder s external input AV watching TV s external input AV TV monitor out t When Direct TV Recording is performed the recorder is automatically tur...

Page 62: ...of the equipment t For optimal recording the settings of the recorder may need to be changed For details read the manual of the recorder t Download Analogue channel setting Analogue channel download see below t Set VIERA Link On in the Setup Menu VIERA Link p 30 t Set up the TV After connection turn the equipment on and then switch the TV on Select the input mode to HDMI1 or HDMI2 p 24 and make su...

Page 63: ...ion may not work properly depending on the connected equipment If required set to Off Direct TV Recording What you see is What you record Direct TV Rec Recording the current programme on a DIGA Recorder immediately t If you connect a variety of recorders including other manufacturers recorders at the same time please connect the DIGA Recorder to the TV s lower HDMI terminal number For example if y...

Page 64: ... after a few minutes OPTION the paused picture will be restored t Follow the operation guide to operate Pause Live TV function To operate Pause Live TV search backward pause search forward playback stop t If you stop playback the recorded programme will be deleted from HDD t Operations may be different depending on the recorder In this case follow the operation guide or read the manual of the reco...

Page 65: ...ow to change the code for the type of the equipment p 25 2 Follow the operation guide t To display the operation guide OPTION If other manufacturers equipment is accessed Setup Contents Selection menu may be displayed t When the key words are displayed on colour bar red green yellow blue Note t Some operations may not be available depending on the equipment In this case use its own remote control ...

Page 66: ...equipment is turned off the TV speakers will be activated TV TV speakers are active Multi channel sound If you wish to enjoy multi channel sound e g Dolby Digital 5 1ch via an Amplifier connect the Amplifier to the TV with an HDMI cable and an Optical digital audio cable p 60 and then select Home Cinema If your Amplifier has HDAVI Control 5 function you only need to connect with an HDMI cable In t...

Page 67: ...order To watch satellite broadcasts Set top box 1 To watch DVDs DVD Player To watch camcorder images Video camera To play games Game equipment To use amplifier with speaker system 2 Q Link VIERA Link with HDMI Direct TV Recording Recommended Connection 1 Use HDMI1 for automatic input switching 2 Use HDMI2 for connecting an amplifier This connection is applicable when using an amplifier that has AR...

Page 68: ...DVD Player Listening Viewing HDMI equipment t HDMI connection p 72 Fully wired HDMI compliant cable Recorder Player Camcorder Camcorder Game equipment Viewing Listening Camcorder Game equipment PC t PC connection p 74 Listening Viewing Conversion adapter if necessary Computer ...

Page 69: ... cable RCA cable Amplifier with speaker system or To enjoy the sound from the external equipment in multi channel sound e g Dolby Digital 5 1ch connect the equipment to the amplifier For the connections read the manuals of the equipment and amplifier Headphones t To adjust volume Headphone Volume p 29 M3 stereo mini plug ...

Page 70: ... 480 60i 60p 625 576 50i 50p 750 720 60p 50p 1 125 1 080 60i 50i 1 125 1 080 60p 50p 24p Auto mode Auto mode determines the best aspect ratio to fill the screen It does this using a four step process WSS Control signal through SCART HDMI terminal Letterbox detection or Justify to fill the screen This process may take several minutes depending on the darkness of the image Letterbox detection If bla...

Page 71: ...2 standards Sub sampling 4 4 4 4 2 2 4 2 0 t Progressive JPEG is not supported 1 Design rule for Camera File system unified standard established by Japan Electronics and Information Technology Industries Association JEITA 2 Exchangeable Image File image file format used by digital cameras Video Container File extension Video codec Audio codec Details Restrictions SD Video mod MPEG1 MPEG SD Video S...

Page 72: ...rminal using an HDMI compliant fully wired cable For information about connections see External Equipment p 67 Applicable HDMI features t Input audio signal 2ch Linear PCM sampling frequencies 48 kHz 44 1 kHz 32 kHz t Input video signal 480i 480p 576i 576p 720p 1080i and 1080p Input signal that can be displayed p 73 Match the output setting of the digital equipment t Input PC signal Input signal t...

Page 73: ...4 768 85 Hz 68 68 85 00 1 280 768 60 Hz 47 70 60 00 1 280 1 024 60 Hz 63 98 60 02 1 366 768 60 Hz 48 39 60 04 Macintosh13 640 480 35 00 66 67 Macintosh16 832 624 49 73 74 55 Macintosh21 1 152 870 68 68 75 06 Applicable input signal for PC is basically compatible to VESA standard timing PC from HDMI terminal Signal name Horizontal frequency kHz Vertical frequency Hz 640 480 60 Hz 31 47 60 00 750 72...

Page 74: ... and sound is heard from the TV t To listen to PC sound from the TV connect the audio cable to COMPONENT AUDIO terminals p 68 t PC signals that can be inputted Horizontal scanning frequency 31 to 69 kHz vertical scanning frequency 59 to 86 Hz more than 1 024 signal lines could result in incorrect display of the image t A PC adapter is not necessary for the DOS V compliant D sub 15 pin connector No...

Page 75: ...l signals may be relatively low in some cases despite good reception of analogue channels t Turn the TV off with the Mains power On Off switch and then on again t If problem persists consult your local dealer Neither image nor sound is produced t Is the TV in AV mode t Check the correct AV input mode is selected t Check the mains lead is plugged into the socket outlet t Has the TV been turned On t...

Page 76: ...l t Set the sound setting of the connected equipment to 2ch L PCM t Check the HDMI1 2 Input setting in the Sound Menu p 29 t If digital sound connection has a problem select analogue sound connection p 72 Pictures from external equipment are unusual when the equipment is connected via HDMI t Check the HDMI cable is connected properly p 68 t Turn the TV and equipment Off then turn them On again t C...

Page 77: ...firm correct operation Bad signal t The signal is weak Check the aerial is plugged in properly It may be necessary to have an aerial installer check the signal and aerial alignment t Reset channels p 36 Child Lock is active Press OK to enter PIN t The selected channel is locked in Child Lock p 43 You must enter the PIN number before the channel will be displayed Feature not available t It is not p...

Page 78: ...ed Please switch off TV t Auto Setup will automatically start when Mains power On Off switch is next turned On p 12 Sending Preset Data t Q Link or VIERA Link channel download is in progress Software successfully updated Press EXIT to continue t The software updating is finished Software update failed Please try again later Press EXIT to continue t Perform System Update Search Now in System Update...

Page 79: ...these three video formats depending on personal preference and equipment requirement RGB Red Green and Blue MAC Address Media Access Control Address DVI Digital Visual Interface A high quality video interface standard to connect to the display MPEG2 Moving Picture Experts Group phase 2 A standard for efficiently compressing and expanding colour videos SCART 21 pin connection used for video audio a...

Page 80: ...ion has been made of company or product trademarks these trademarks have been fully respected t DVB and the DVB logos are trademarks of the DVB Project t VGA is a trademark of International Business Machines Corporation t Macintosh is a registered trademark of Apple Inc USA t S VGA is a registered trademark of the Video Electronics Standard Association t SDXC Logo is a trademark of SD 3C LLC t HDM...

Page 81: ...r 52 58 Menu Functions 27 32 Mode 29 Monaural Audio 16 Multi Audio 16 Music mode 58 N Network connections 45 Network Setup 45 New Channel Message 38 NICAM 29 Normalise 27 NTSC 28 82 O Off Timer 16 30 Optional accessories 6 Owner ID 13 48 P PAL 82 PC 51 68 72 74 Pedestal 7 Photo mode 53 PIN number 12 13 43 48 Playing Time Display 31 P NR 28 Power and Timer LED 9 19 41 Q Q Link 59 61 Q Link Download...

Page 82: ...scanning frequency 31 69 kHz Vertical scanning frequency 59 86 Hz Receiving Systems Band name DVB T T2 Digital terrestrial services PAL I UHF E21 68 PAL 525 60 Playback of NTSC tape from some PAL Video recorders VCR or NTSC disc playback from DVD player and recorder M NTSC Playback from M NTSC Video recorders VCR NTSC AV input only Playback from NTSC Video recorders VCR DVB T Digital terrestrial s...

Page 83: ...TV supports HDAVI Control 5 function PC HIGH DENSITY D SUB 15PIN R G B 0 7 V p p 75 W HD VD TTL Level 2 0 5 0 V p p high impedance Card slot SD Card slot 1 Common Interface slot 1 AUDIO OUT RCA PIN Type 2 0 5 V rms high impedance ETHERNET RJ45 IEEE802 3 10BASE T 100BASE TX DIGITAL AUDIO OUT PCM Dolby Digital DTS Fiber optic t Design and Specifications are subject to change without notice Mass and ...

Page 84: ...bol In this case it complies with the requirement set by the Directive for the chemical involved Sales and Support Information Customer Care Centre t For customers within the UK 0844 844 3852 t For customers within Ireland 01 289 8333 t Visit our website for product information www panasonic co uk t E mail customer care panasonic co uk Direct Sales at Panasonic UK t For customers 0844 844 3856 t O...

Reviews:

Related manuals for Viera TX-L24E3B