background image

11

English

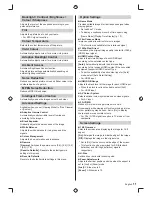
Backlight / Contrast / Brightness / 
Colour / Sharpness

Adjusts the levels of these options according to your 
personal preference.

Tint

Adjusts the picture hue to suit your taste.


For NTSC signal reception.

Colour Temperature

Selects the colour temperature of the picture.

Vivid Colour

Automatically adjusts colour for a more vivid picture.

Adaptive Backlight Control

Automatically adjusts colour for a more vivid picture.

Ambient Sensor

Automatic Brightness Control function.
Adjusts picture settings automatically depending on 
ambient lighting conditions.

Noise Reduction

Reduces unwanted picture noise and flicker noise in the 
contoured parts of a picture.

MPEG Noise Reduction

Reduces MPEG block noise.

Intelligent Frame Creation

Automatically makes the images smooth and clear. 

Advanced Settings

Available when you set [Viewing Mode] to [True Cinema] 
or [Custom].


Adaptive Gamma Control

Automatically controls middle level of luminance 
according to the images.


Black Expander

Gradually adjusts the dark shades of the image.


White Balance

Adjusts the white balance for red, green and blue 
signals.


Colour Management

Adjusts the hue, saturation and luminance.


Gamma

[Gamma]:

 Switches the gamma curve [2.6] / [2.4] / [2.2] 

/ [2.0] / [1.8].

[Reset to Defaults]:

 Resets to the default gamma 

settings in this menu.


Reset to Defaults

Resets to the default picture settings in this menu.

Option Settings


Game Mode

Provides suitable images for fast response signal when 
playing games.


Not valid on TV mode


To display a continuous record of time spent using
[Game Mode] [Playing Time Display] (p. 13)


Film Cadence Mode

Improves vertical resolution for movie images.


This function is available for the interlaced signal.


1080p Pixel Direct

Reproduces the original image quality in detail for 1080p 
(HDMI) input signal.


HDMI Content Type

Adjusts the picture settings of each HDMI input 
according to the selected content type.

[Auto]:

 Automatically adjusts the picture settings 

according to the received HDMI content if the connected 
equipment supports HDMI Content Type.


To set the availability of each content type for [Auto] 
mode, select [Auto Detail Setting].


For HDMI input.


HDMI RGB Range

Adjusts the black level of the image for each HDMI input.


When the black level is not suitable, select [Full].


For HDMI input.


AV Colour System

Selects optional colour system based on video signals.


For AV input


3D-COMB

Makes still or slow moving pictures more vivid.
Occasionally, while viewing still or slow moving pictures, 
colour patterning may be seen. Set to [On] to display 
sharper and more accurate colours.


For PAL / NTSC signal reception in TV mode or from 
composite.

Screen Settings


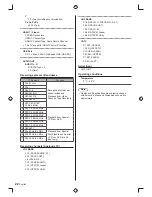
16:9 Overscan

Selects the screen area displaying the image for 16:9 
aspect.

[On]:

 Enlarges the image to hide the edge of the image.

[Off]:

 Displays the image in the original size.


Set to [On] if noise occurs on the edge of the screen.


This function can be memorised for SD (Standard 
definition) and HD (High definition) signals 
respectively.


H-Size

Switches over horizontal scanning size.


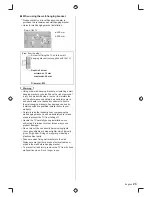
Zoom Adjustments

Adjusts the vertical position and size when the aspect is 
set to [Just] or [Zoom] mode.

[Just]:

 V-Size max is 3.

[Zoom]:

 V-Size max is 15.

Summary of Contents for Viera TH-60A430G

Page 1: ...iting Channels 13 Using Media Player 14 VIERA Link 16 Technical Information 18 Others FAQs 20 Maintenance 21 Specifications 21 TQB4GC1219 Operating Instructions LED TV Thank you for purchasing this Panasonic product Please read these instructions carefully before operating this product and retain them for future reference The images shown in this manual are for illustrative purposes only English M...

Page 2: ... under LGPL V2 1 or the other licenses with the obligation to do so as well as the respective copyright notice thereof Contact Information cdrequest unipf jp The source code and the copyright notice are also available for free in our website below http www unipf jp dl EUIDTV14 Even if no special notation has been made of company or product trademarks these trademarks have been fully respected HDMI...

Page 3: ...nstall or remove the TV from the pedestal with at least two people Install or remove the TV by the specified procedure Safety Precautions To help avoid risk of electrical shock fire damage or injury please follow the warnings and cautions below Mains plug and lead Warning If you detect anything unusual immediately remove the mains plug Mains plug types vary between countries This TV is designed to...

Page 4: ...ng the TV Caution Before moving the TV disconnect all cables Move the TV with at least two people When not in use for a long time Caution This TV will still consume some power even in the Off mode as long as the mains plug is still connected to a live socket outlet Remove the mains plug from the wall socket when the TV is not in use for a prolonged period of time Use conditions Caution This applia...

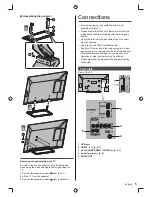
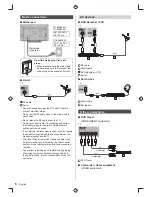
Page 5: ...frared sensor otherwise distortion of image sound may occur or operation of other equipment may be affected Please also read the manual of the equipment being connected Terminals Rear of the TV 1 2 3 5 4 1 USB port 2 HDMI1 2 p 6 7 3 AV IN COMPONENT VIDEO p 6 7 4 Aerial terminal p 6 5 AUDIO OUT Assembling the pedestal A C D 1 B 3 2 Removing the pedestal from the TV Be sure to remove the pedestal in...

Page 6: ...torted image Do not put the RF cable close to the mains lead to avoid noise Do not place the RF cable under the TV An aerial correct cable 75 coaxial and correct terminating plug are required to obtain optimum quality picture and sound If a communal aerial system is used you may require the correct connection cable and plug between the wall aerial socket and the TV Your local Television Service Ce...

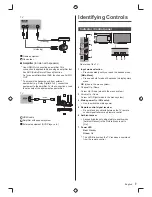
Page 7: ...ol 6 Ambient sensor Senses brightness to adjust picture quality when Ambient Sensor in the Picture Menu is set to On 7 Power LED Red Standby Green On The LED blinks when the TV receives a command from the remote control TV Viewing Listening Game equipment Camcorder Amplifier to listen with speakers Use HDMI2 for connecting an amplifier This connection is applicable when using an amplifier that has...

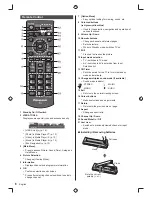
Page 8: ...g screen 16 Cursor buttons Makes selections and adjustments 17 Return Returns to the previous menu page 18 Aspect Changes aspect ratio 19 Channel Up Down 20 Sound Mute On Off 21 Last view Switches to previously viewed channel or input mode Installing Removing batteries Pull open Hook Note the correct polarity or Close Remote Control 1 Standby On Off switch 2 VIERA TOOLS Displays some special icons...

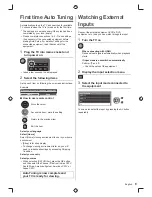
Page 9: ...ary of the connected equipment before starting Auto Setup For details of settings for the connected equipment read the manual of the equipment 1 Plug the TV into mains socket and turn power on POWER Takes a few seconds to be displayed 2 Select the following items Set up each item by following the on screen instructions Example Please select your viewing environment Home Shop How to use remote cont...

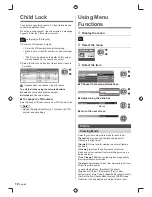
Page 10: ...trol Ambient Sensor Noise Reduction and MPEG Noise Reduction can be adjusted and stored for each input Child Lock You can lock specific channels AV input terminals and control who watches them When the locked channel input is selected a message appears Enter the PIN number to watch Setup Child Lock 1 Enter the PIN number 4 digits Enter the PIN number twice at first setting Make a note of the PIN n...

Page 11: ... To display a continuous record of time spent using Game Mode Playing Time Display p 13 Film Cadence Mode Improves vertical resolution for movie images This function is available for the interlaced signal 1080p Pixel Direct Reproduces the original image quality in detail for 1080p HDMI input signal HDMI Content Type Adjusts the picture settings of each HDMI input according to the selected content ...

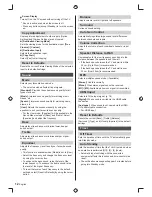
Page 12: ...ay Turns off on the TV screen without turning off the TV Sound is active even when the screen is off Press any buttons except Standby to turn the screen on Copy Adjustment Copies picture adjustments to other inputs Option Settings and Screen Settings are not copied Destination Viewing Mode Sets the viewing mode for the destination input True Cinema Custom Destination Input Selects the destination ...

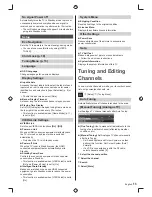
Page 13: ...ration is performed for 10 minutes The notification message will appear 3 minutes before going into Standby mode Setup Eco Navigation Sets the TV to operate in the most energy saving mode You can also access this item by using VIERA TOOLS Child Lock p 10 Tuning Menu p 13 Language OSD Language Changes language for on screen displays Display Settings Input Labels Accesses the input labels list to se...

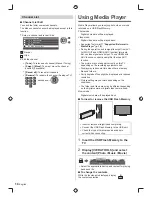
Page 14: ... video camera used Music mode Digital music data will be played back To insert or remove the USB Flash Memory Insert or remove straightly and completely Connect the USB Flash Memory to the USB port Check the type of terminals and devices are correct when connecting 1 Insert the USB Flash Memory to the TV 2 Display VIERA TOOLS and select the content Photo Music Movie VIERA TOOLS VIERA LINK VIDEO MU...

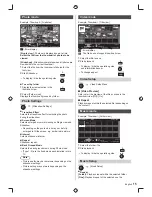
Page 15: ...oto mode Example Thumbnail All photos Media Player Photo All photos EXIT Info Option Menu USB 2 0 View Select Slideshow View Select Drive Select Contents Select RETURN Error display Single view Photos are displayed one at a time Select the file from the thumbnail of photos to be viewed Slideshow Slideshow completes when all photos are viewed within the current thumbnail 1 Select the file from the ...

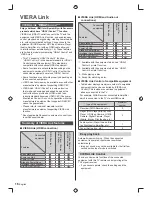
Page 16: ...with Panasonic products which have HDAVI Control function VIERA Link HDAVI Control connects the TV and the equipment with VIERA Link function and enables easy control playback energy saving creating home theatre etc without complicated settings Connections to the equipment DIGA Recorder HD Video Camera Player theatre Amplifier etc with an HDMI cable allow you to interface them automatically p 16 T...

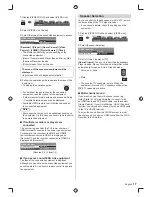
Page 17: ...RA Link Menu VIERA Link Control Speaker Selection Home Cinema Recorder H Ci Recorder Recorder Player Home Cinema Video Camera LUMIX Digital Camera Other The displayed item may vary depending on the connected equipment Home Cinema means Player theatre Blu ray Disc theatre or Recorder theatre Other means Tuner set top box The menu of the accessed equipment will be displayed Input mode will be change...

Page 18: ...ys the image at 16 9 without distortion anamorphic 14 9 Displays the image at the standard 14 9 without distortion Just Displays a 4 3 image full screen Stretching is only noticeable at the left and right edges 4 3 Displays the image at the standard 4 3 without distortion Zoom Displays a 16 9 letterbox or 4 3 image without distortion 4 3 Full Displays a 4 3 image enlarged horizontally to fit the s...

Page 19: ... USB devices or USB HUB may not be used with this TV You cannot connect any devices by using USB card reader Additional information for USB devices may be on the following website English only http panasonic net viera support Video AVI avi Video codec H 264 BP MP HP MPEG1 MPEG2 MPEG4 SP ASP VC 1 Windows Media Video Ver 9 Audio codec AAC ADPCM Dolby Digital DTS core HE AAC LPCM MPEG Audio MP3 WMA S...

Page 20: ...or assistance please follow these simple guides to solve the problem When an error message appears follow the message s instructions If the problem still persists contact your local Panasonic dealer or the authorised service centre Picture quality problem Check the settings of the Picture Menu Set Noise Reduction to remove noise p 11 Check nearby electrical products car motorcycle fluorescent lamp...

Page 21: ...ing a soft cloth to clean the dirt or fingerprints For stubborn dirt 1 First clean the dust on the surface 2 Dampen a soft cloth with clean water or diluted neutral detergent 1 part detergent to 100 parts water 3 Wring the cloth firmly Please note liquids do not enter the TV inside May lead to product failure 4 Finally wipe away all the moisture Caution Do not use a hard cloth or rub the surface t...

Page 22: ... USB Port DC 5 V Max 500 mA Hi Speed USB USB 2 0 AUDIO OUT AUDIO L R RCA PIN Type 2 0 5 V rms Receiving systems Band name 17 Systems Function 1 PAL B G H Reception of broadcast transmissions and Playback from Video Cassette Tape Recorders 2 PAL I 3 PAL D K 4 SECAM B G 5 SECAM D K 6 SECAM K1 7 NTSC M NTSC 3 58 4 5 MHz 8 NTSC 4 43 5 5 MHz Playback from Special VCR s or DVD 9 NTSC 4 43 6 0 MHz 10 NTS...

Page 23: ...a licensed contractor to secure the wall hanging brackets Any damage caused by installing without a qualified installer will void your warranty Carefully read the instructions accompanying the wall hanging bracket and be absolutely sure to take steps to prevent the TV from falling off Handle the TV carefully during installation since subjecting it to impact or other forces may cause product damage...

Page 24: ...ustomer s Record The model number and serial number of this product may be found on its rear panel You should note this serial number in the space provided below and retain this book plus your purchase receipt as a permanent record of your purchase to aid in identification in the event of theft or loss and for Warranty Service purposes Model Number Serial Number Web Site http panasonic net Panason...

Reviews: