background image

16

INFO

MUTE

REC

POWER

CH

VOL

EXIT

GUIDE

RETURN

SURROUND

MULTI PIP

STTL

G

R

Y

B

<< 01 02 03 04 05 06 07                       >>

TELETEXT

INFORMATION

17:51 28 Feb

R

G

Y

B

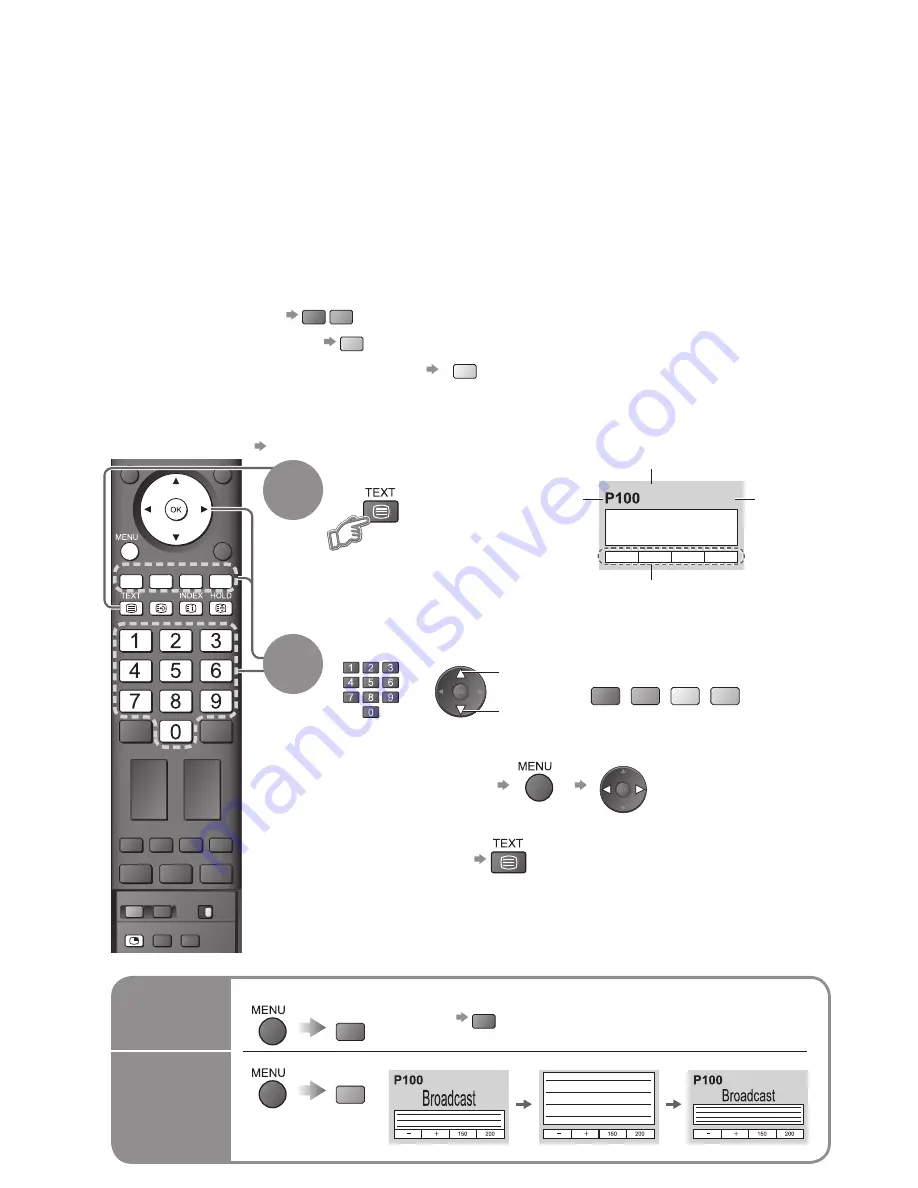
Viewing Teletext

Switch to Teletext

1

Select the page

or

You can enjoy teletext broadcasting, including news, weather forecasts and subtitles, if this service is 

provided by the broadcasters.

or 


To return to TV 


(Corresponds to the colour bar)

• 

Displays Index

(content varies

depending on the

broadcasters)

Time / date

Current 

page 

number

Sub page number

Colour bar

What is FASTEXT mode?

In FASTEXT mode, four differently coloured subjects are situated at the bottom of the screen. To access more 

information about one of these subjects, press the appropriately coloured button. This facility enables fast access to 

information on the subjects shown.

What is List mode?

In List mode, four differently coloured page numbers are situated at the bottom of the screen. Each of these 

numbers can be altered and stored in the TV’s memory. (“Store frequently viewed pages”, p. 17)


To change mode   

“Teletext” in Setup Menu (p. 21)


To adjust contrast 


As the blue bar is displayed

Reveal

hidden

data

R

• 

Re-hide   

R

Reveal hidden words e.g. quiz page answers


Using teletext conveniently

2

(TOP)

FULL / 

TOP / 

BOTTOM

G

Normal (FULL)

(BOTTOM)

(Expand the BOTTOM half)

(Expand the TOP half)

What is TOP mode? 

(in case of TOP text broadcasting)

TOP is a particular improvement of the standard teletext service that results in an easier search and effective guide.

• 

Fast overview of the teletext information available

• 

Easy to use step-by-step selection of the topical subject

• 

Page status information at the bottom of the screen

  Available page up / down   

R


G

  To select among subject blocks   

B

  To select next subject within the subject block

  (After the last subject, it moves to the next subject block.)

Y

up

down

(Press twice)

Summary of Contents for Viera TH-58PZ700A

Page 1: ...H Y B R ASPECT POWER Operating Instructions Plasma Television English Please read these instructions before operating your set and retain them for future reference The images shown in this manual are for illustrative purposes only TQBC2231 Model No TH 58PZ700A ...

Page 2: ...VB Digital Video Broadcasting Project 1991 to 1996 TH 58PZ700A Declaration of Conformity No 4597 28 February 2007 Receive digital terrestrial services using an integrated Digital Video Broadcasting tuner Sharp pictures with HDMI terminal Create home theatre and DVD recorder link ups with VIERA Link without complicated settings ...

Page 3: ... etc DVB Settings DVB 22 Editing and Setting Channels 24 Restore Settings 26 Input Labels 27 Displaying PC Screen on TV 28 HDMI Functions 29 Viewing from SD Card Photos and Movies 30 VIERA Link HDAVI ControlTM 32 External Equipment 34 Basic Features Watching TV 10 Using TV Guide 12 Watching Videos and DVDs 14 Viewing Teletext 16 Enjoy your TV Technical Information 36 FAQs 40 Licence 42 Specificati...

Page 4: ... remove SD card immediately after use Do not place the TV on sloped or unstable surfaces The TV may fall off or tip over Use only the dedicated stands mounting equipment Using an unauthorized stand or other fixtures may make the TV shaky risking injury Be sure to ask your local Panasonic dealer to perform setup Use optional stands mounts p 6 Handling the mains plug and lead Insert the mains plug f...

Page 5: ... could lead to product failure Use care not to subject surfaces to bug repellent solvent thinner or other volatile substances this may deteriorate the surface by peeling the paint Do not allow the cabinet to make contact with a rubber or PVC substance for a long time When TV will not be used for a long time remove the mains plug This TV will still consume some power even in the Off mode as long as...

Page 6: ...he clamper Caution In order to maintain the unit s performance and safety be absolutely sure to ask your dealer or a licenced contractor to secure the wall hanging brackets Carefully read the instructions accompanying the plasma TV stand or pedestal and be absolutely sure to take steps to prevent the TV from tipping over Handle the TV carefully during installation since subjecting it to impact or ...

Page 7: ...the preferred settings of the current programme easily p 10 Main Menu Press to access VIERA Link Picture Sound and Setup menus p 18 Subtitles Showing subtitles p 10 Multi window p 11 Viewing SD Card p 30 Returns to the previous menu Still picture p 10 Teletext Hold p 17 Changes the sound track if programme has multiple audio tracks DVB Stereo Bilingual Sound Selection p 37 Analogue Remote control ...

Page 8: ...er the TV To obtain optimum quality picture and sound an Aerial the correct cable 75 Ω coaxial and the correct terminating plug are required If a communal Aerial system is used you may require the correct connection cable and plug between the wall Aerial socket and the TV Your local Television Service Centre or dealer may be able to assist you in obtaining the correct Aerial system for your partic...

Page 9: ...Auto Tuning is now complete and your TV is ready for viewing You can now use the remote control to turn On the TV or turn the TV to standby mode Power LED On 2 To edit channels Editing and Setting Channels p 24 If tuning has failed Auto Tuning p 24 If you turned the TV Off during Standby mode last time the TV will be in Standby mode when you turn the TV On with Mains power On Off switch Select you...

Page 10: ...tion banner Select a service using TV Guide Using TV Guide p 12 INFO select service watch 1 TEN Digital 10 30 am Corontation Street 9 00 am 11 00 am Now Select FAV List All DVB Services Volume Freeze unfreeze picture Hold Display the current programme status OPTION Check or change the current programme status instantly Volume Correction Adjusts volume of individual channel or input mode Note Also ...

Page 11: ...to the main screen Enjoy viewing two images at once such as a TV programme and a DVD Picture in Picture mode PinP Picture and Picture mode PandP G Operations in multi window Swap sub screen for main screen Change the input mode or position by the remote control p 10 or p 14 Swap again B B Display information banner INFO Display programme information 1 TEN Digital 10 30 am Corontation Street Rating...

Page 12: ...0 30 am 10 30 am 11 00 am 11 00 am 11 30 am 11 30 am 1 00 pm 1 00 pm 3 00 pm 3 00 pm 3 10 pm Wed 12 05 04 10 15 am Fri 14th May Prog type Favourites GUIDE To previous day DVB mode R To next day DVB mode G To view a programme list of the selected favourites list B To view a programme list of the selected type DVB mode Y Using TV Guide select favourite list TV Guide Electronic Programme Guide EPG pr...

Page 13: ...the TV Guide is completely shown Watch the programme select Select the programme now on the air TV screen watch Other useful functions Operate after viewing TV Guide View details of the programme DVB mode TV Guide Thu 05 08 04 10 49 am View RETURN EXIT Return to List INFO Select the programme select Details To return to the start page INFO View details ...

Page 14: ...ct the input mode connected to the equipment Note If the external equipment has an aspect adjustment function set to 16 9 For details see the manual of the equipment or ask your local dealer To return to TV Display the Input select menu Displays the selected mode You can also select the input using the AV button on the remote control or the front panel of the TV Press the button repeatedly until t...

Page 15: ... and hold to play at slow speed Programme Up Down Select programme Record Start recording Panasonic equipment connected to the TV can be directly operated with the remote control Note Confirm correct operation after the code changed The codes will be reset to default values if batteries are replaced DVD means DVD player DVD recorders and Recorder home theatre Some operations may not be possible on...

Page 16: ...e In List mode four differently coloured page numbers are situated at the bottom of the screen Each of these numbers can be altered and stored in the TV s memory Store frequently viewed pages p 17 To change mode Teletext in Setup Menu p 21 To adjust contrast As the blue bar is displayed Reveal hidden data R Re hide R Reveal hidden words e g quiz page answers Using teletext conveniently 2 TOP FULL ...

Page 17: ...ages varies depending on the broadcasters up to 79 pages It may take some time for searching during which time you can watch TV Enter the 4 digit number example P6 Appears at upper left corner of the screen To view specific sub page B View sub page Only when teletext is more than one page Watch TV while waiting for update P108 Y Y Appears when updating is completed You cannot change the channel Te...

Page 18: ...ctions Display the menu 3 2 4 Various menus allow you to make settings for the picture sound and other functions Displays the functions that can be set varies according to the input signal Note To initialize all settings Shipping Condition p 26 To return to TV at any time EXIT To return to the previous screen RETURN Select the menu Select the item example Picture Menu Adjust or select example Pict...

Page 19: ...Edit Access Power Save Side Panel Off Off Picture Overscan On Input Labels Access 2 2 Setup Menu NSW ACT Region Select On SD Card LED 100Hz Refresh Rate Auto Daylight Saving Time System Information Access Software Licence Access 3 seconds VIERA Link Settings Access Banner Display Timeout p 21 Tuning Menu Auto Tuning Access Analogue Programme Edit Access DVB Manual Tuning Analogue Manual Tuning Acc...

Page 20: ...ulated Surround SRS TruSurround XT Simulated Surround Provides a dynamic enhancer to simulate improved spatial effects SRS TruSurround XT SRS TruSurround XT creates a high quality surround sound effect using just two speakers from the source which can output surround encoded signals Switching is also possible by the Surround button on the remote control p 7 Volume Correction Adjusts volume of indi...

Page 21: ...e Off Displayed the image in the original size Set to On if noise is generated on the edge of the screen This function is available when aspect is set to 16 9 1080i or 1080p signal only Input Labels Labels or skips each input terminals p 27 Banner Display Timeout Sets how long the information banner p 11 stays on screen 0 No display to 10 sec in 1 sec increments VIERA Link Settings VIERA Link Sets...

Page 22: ...E TV EXIT INPUT G R Y B 2 2 Setup Menu NSW ACT Region Select On SD Card LED 100Hz Refresh Rate Auto Daylight Saving Time System Information Software Licence 3 seconds VIERA Link Settings Banner Display Timeout 22 DVB Settings 4 3 5 Select Setup Select DVB Favourites Edit System Update Region Select or Daylight Saving Time Display the menu Set To return to TV EXIT DVB mode 1 If in Analogue mode Sel...

Page 23: ...t to edit and To name the List R Select the character RETURN To move the service G Select the new position Confirm G To delete the service Y To delete all services B Note Channel numbers cannot be changed due to broadcast restrictions Adjust the standard time Region Select Select the region where you live to adjust the standard time The time contained in the broadcast signal is UTC Universal time ...

Page 24: ...ignal Display are available in DVB mode only Analogue Programme Edit and Analogue Manual Tuning are available in Analogue mode only Auto Tuning Digital DVB and Analogue This will take about 3 mins Analogue Tuning 0 75 Digital DVB Tuning 6 69 2 RF Ch Service Name Type Quality ABC TV Sydney DVB 10 3 SBS DIGITAL 1 DVB 10 4 FTV guide DVB 10 7 7 Digital DVB 10 9 NINE DIGITAL DVB 10 CH 29 Analogue CH 33...

Page 25: ... Signal Strength Selects a service and checks the DVB signal condition Use for adjusting the direction of the aerial Signal Quality Green bar Good Yellow bar Poor Red bar Bad Check the aerial To change the service during the menu appears CH Check DVB signal DVB Signal Display Display a notification message New Service Message New DVB service found Press OK to add new service Press EXIT to lgnore S...

Page 26: ... Tuning will automatically start p 9 To re tune TV channels only e g after moving house Auto Tuning p 24 3 2 4 Select Setup Select Shipping Condition Display the menu Set To return to TV EXIT Restore Settings Shipping Condition Restore Settings Resets the TV to its original condition i e no channels tuned in All settings channels picture sound quality etc are reset 1 EXIT RETURN Confirm Analogue D...

Page 27: ...et To return to TV EXIT For easier identification and selection of the input mode you can label each input terminals or skip terminal that is not connected to any equipment To select the input mode p 14 1 The labels you set will be displayed in Input Selection menu p 14 or banner If Skip is selected you cannot select the mode User input You can name each input terminals freely Select User input Se...

Page 28: ...se Eliminates flicker and distortion Adjust after Clock adjustment Set to the minimum level if noise occurs Sync PC sync signal type H V On G H V Horizontal and Vertical sync from your PC Most common sync format On G Sync on Green sync from your PC Reset PC Settings Press the OK button to reset to the default settings OPTION SDCARD EXIT RETURN INPUT Input Selection AV1 AV2 AV3 AV4 PC HDMI1 HDMI2 H...

Page 29: ...gital audio signal only Use with a PC is not assumed If the connected equipment has an aspect adjustment function set the aspect ratio to 16 9 These HDMI connectors are type A These HDMI connectors are compatible with HDCP High Bandwidth Digital Content Protection copyright protection An equipment having no digital output terminal may be connected to the input terminal of either Component S VIDEO ...

Page 30: ...100 0003 100 0001 100 0008 100 0007 100 0006 100 0005 100 0012 100 0011 100 0010 100 0009 Photo View Mode Select View EXIT Select RETURN Reading Slide show Thumbnail screen Error display images that could not be loaded etc Selected photo Selected photo information is displayed view select Rewind Pause Playback Playback Fast forward Stop To previous photo Rotate 90 anti clockwise To next photo Rota...

Page 31: ...emove To insert Press the centre of the card Blue LED Blue LED lights while SD Card is inserted if set SD Card LED to On in Setup Menu p 21 This operation is not possible Your operation is not available Confirm SD card The inserted SD card has a problem Main Menu VIERA Link Picture Sound To confirm or change the current sound status operate in step Audio output settings operate in step or Audio Se...

Page 32: ...asonic s HDAVI Control and VIERA Link VIERA Link HDAVI Control based on the control functions provided by HDMI which is an industry standard known as HDMI CEC Consumer Electronics Control is a unique function that we have developed and added As such its operation with other manufacturers equipment that supports HDMI CEC cannot be guaranteed Refer to individual manuals for compatibility information...

Page 33: ...utomatically turned on Only when TV is in Standby mode Power off Link Set to Set When TV is set to Standby mode the connected Panasonic equipment is also automatically set to Standby This function will work even if the TV enters standby mode automatically by Off Timer function or auto power standby function The TV remains on even if the VIERA Link compatible equipment is turned off Display VIERA L...

Page 34: ...OUT COMPONENT S VIDEO AUDIO VIDEO COMPONENT MONO MONO MONO Y L R Y PR CR PB CB PR CR PB CB L R AUDIO VIDEO AV2 IN AV3 IN AV IN 1 2 34 These diagrams show our recommendations for how to connect the TV to your various equipment For other connections consult the instructions for each piece of equipment the table below and the specifications p 43 Recommended Connection Types of connectable equipment t...

Page 35: ...ct the COMPONENT or VIDEO terminal when using AV2 AV3 IN terminals Easy playback Easy control only with VIERA remote control Home Cinema Panasonic DVD Recorder HD Video Camera etc Panasonic Amplifier Panasonic DVD Recorder Speaker system Panasonic Player theatre HD Video Camera Use fully wired HDMI compliant cable Read the manuals of the equipment too or or VIERA Link p 32 Speaker system Amplifier...

Page 36: ...when a widescreen recorded programme is played back on a VCR adjust the tracking of the VCR See the VCR manual To select the ratio manually Only 16 9 or 4 3 in PC mode The optimum size and aspect can be chosen and you can enjoy finer images p 11 16 9 Directly displays the image at 16 9 without distortion anamorphic Zoom3 Displays a 2 35 1 letterbox anamorphic image full screen without distortion A...

Page 37: ... TV or touch any button The TV is automatically activated after downloading is completed Update system software regularly to ensure that you have latest version software If there is an update available a notification banner is displayed when the channel has the update information To download new software press OK Downloading approx 20 min If you choose not to download press EXIT To update automati...

Page 38: ...mes are changed Photo Still images recorded with digital still cameras compatible with JPEG files of DCF and EXIF standards Data format Baseline JPEG Sub sampling 4 4 4 4 2 2 or 4 2 0 Max number of files 9 999 Image resolution 160 120 to 10 000 000 Movie SD Video Standard Ver 1 2 MPEG 2 PS format and AVCHD Standard compatible files with an audio format that is either MPEG 1 Layer 2 format or Dolby...

Page 39: ... 63 98 60 02 1 366 768 60 Hz 48 39 60 04 Macintosh13 640 480 35 00 66 67 Macintosh16 832 624 49 73 74 55 Macintosh21 1 152 870 68 68 75 06 Mark Applicable input signal COMPONENT Y PB CB PR CR HDMI PC D sub 15P Pin No Signal Name Pin No Signal Name Pin No Signal Name R GND Ground NC not connected G GND Ground NC not connected B GND Ground HD NC not connected NC not connected VD GND Ground GND Groun...

Page 40: ... sound setting of the connected equipment to 2ch L PCM Check the HDMI1 3 Input setting in the Sound Menu p 20 If digital sound connection has a problem select analogue sound connection p 29 Blurry or distorted image no sound or low volume Reset channels p 24 No image can be displayed Is Colour or Contrast in the Picture Menu set to the minimum p 20 Chaotic image noisy Set P NR in the Picture Menu ...

Page 41: ...er of diagnostic and software checks before it can display any broadcast channels The channel cannot be changed Is the TV in Teletext mode p 16 The channel cannot be selected Is the channel locked p 25 TV goes into Standby mode Off Timer function is activated The TV enters Standby mode about 30 min after broadcasting ends The remote control does not work Are the batteries installed correctly p 6 H...

Page 42: ...s have been fully respected SDHC Logo is a trademark HDMI the HDMI Logo and High Definition Multimedia Interface are trademarks or registered trademarks of HDMI Licensing LLC HDAVI ControlTM is a trademark of Matsushita Electric Industrial Co Ltd TruSurround XT SRS and symbol are trademarks of SRS Labs Inc TruSurround XT technology is incorporated under license from SRS Labs Inc AVCHD and the AVCH...

Page 43: ...ng synchronization PB CB PR CR 0 35 V p p AV3 Input AUDIO L R RCA PIN Type 2 0 5 V rms VIDEO RCA PIN Type 1 1 0 V p p 75 Ω COMPONENT Y 1 0 V p p including synchronization PB CB PR CR 0 35 V p p AV4 Input AUDIO L R RCA PIN Type 2 0 5 V rms VIDEO RCA PIN Type 1 1 0 V p p 75 Ω S VIDEO Mini DIN 4 pin Y 1 0 V p p 75 Ω C 0 286 V p p 75 Ω Monitor Output AUDIO L R RCA PIN Type 2 0 5 V rms high impedance V...

Page 44: ...for the name address of the nearest Authorised Service Centre Send or bring the product to a Panasonic Authorised Service Centre together with your proof of purchase receipt as a proof of purchase date Please note that freight and insurance to and or from your nearest Authorised Service Centre must be arranged by you Note that home or pick up delivery service is available for the following product...

Reviews: