background image

English

26

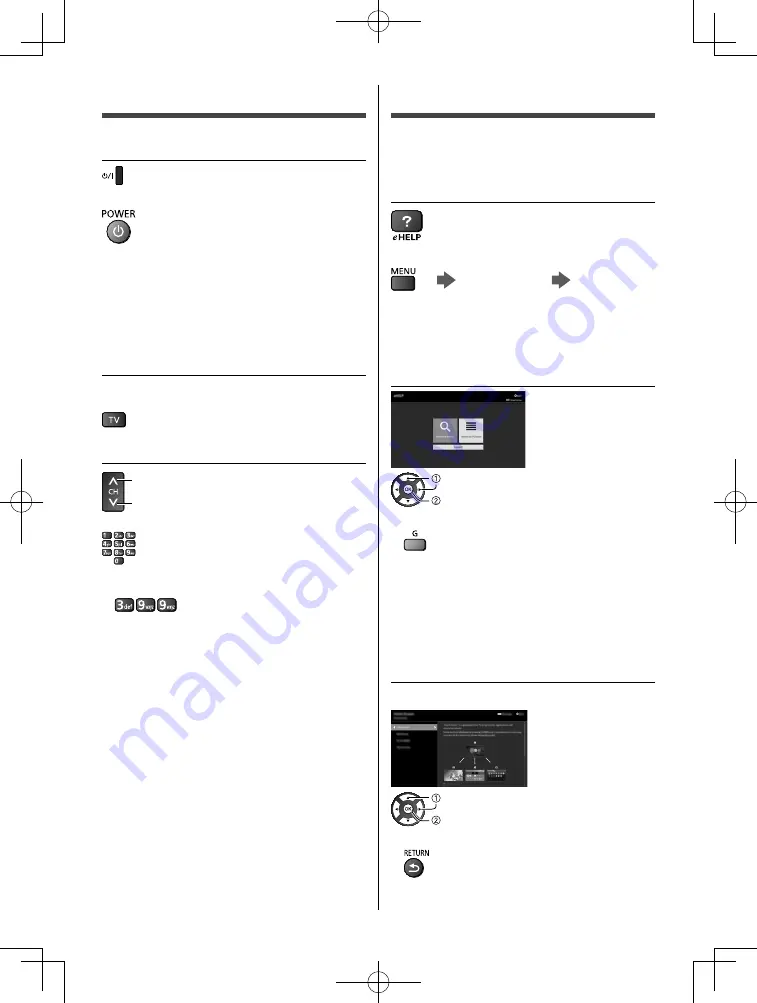
  How to Use eHELP

 [eHELP] is the detailed operating instructions built into 
the TV, and gives a more detailed explanation for a 
better understanding of the operation of each feature.

 1

  Display [eHELP]


 or


 [Help]


 [eHELP]

● 

 If the [eHELP] has been accessed previously since 
the TV was turned on, the confirmation screen is 
displayed to select whether to go to the [First page] or 
to the [Last viewed page].

 2

  Select the menu


   select

   access

● 

 To access [How to use]


 (green)

 [Keyword Search]:

 Search the content of eHELP in the keyword.

 [Search by Purpose]:

 Search the content of eHELP for each item.

 [Support]:

 Access the support information (FAQs, etc.).

 3

  Select the item

 Example:


   select

   access

● 

 To return to the previous screen / field


  Watching TV

 1

  Turn power on


 (TV)

 or


 (Remote Control)


● 

 Mains power On / Off switch should be on. 
(p. 24)

 Displays information bar on the edge of screen for 
several seconds.

● 

 For information about the operation and settings, 
refer to [eHELP]. (Search by Purpose > Read first > 
Features)

 2

  Select the mode

● 

 Selectable modes vary depending on the stored 
channels.


 3

  Select a channel


 up

 down

 or


● 

 To select a channel position with 2 or more-digit, e.g. 
399


Summary of Contents for VIERA TH-50EX780Z

Page 1: ...is manual before use The images shown in this manual are for illustrative purposes only For more detailed instructions please refer to eHELP Built in Operating Instructions How to use eHELP p 26 M0217 0 English English Model No Australia New Zealand TH 58EX780A TH 50EX780Z TH 65EX780A TH 58EX780Z TH 75EX780A TH 65EX780Z TH 75EX780Z Operating Instructions LED TV 50 inch model 58 inch model 65 inch ...

Page 2: ...ss otherwise mentioned Illustrations shown may be different between models and countries Contents Be Sure to Read Important Notice 3 Safety Precautions 3 Quick Start Guide Accessories 6 Connections 16 Identifying Controls 23 First time Auto Tuning 25 Using your VIERA Watching TV 26 How to Use eHELP 26 Viewing 3D images 27 Others FAQs 29 Maintenance 30 Specifications 30 ...

Page 3: ...t permission and explicitly disclaims any right ability or intention to obtain such permission on your behalf It is your responsibility to ensure that your use of this or any other device complies with applicable copyright legislation in your country Please refer to that legislation for more information on the relevant laws and regulations involved or contact the owner of the rights in the content...

Page 4: ... the TV yourself as live parts are accessible and risk of electric shock when they are removed There are no user serviceable parts inside Do not expose the TV to rain or excessive moisture This TV must not be exposed to dripping or splashing water and objects filled with liquid such as vases must not be placed on top of or above the TV Do not insert foreign objects into the TV through the air vent...

Page 5: ...s Such networks may be listed as a result of searches However using them may be regarded as illegal access SSID is a name for identifying a particular wireless network for transmission Do not subject the built in wireless LAN to high temperatures direct sunlight or moisture Data transmitted and received over radio waves may be intercepted and monitored The built in wireless LAN uses 2 4 GHz and 5 ...

Page 6: ...heir safety and health while they are viewing 3D images Stop viewing 3D images immediately if you feel tired feel unwell experience any other uncomfortable sensation or clearly see double images Take an appropriate break before continuing to view When you set the 3D effect by using 3D Adjustment take into account that the vision of 3D images varies among different individuals Do not view 3D images...

Page 7: ...care not to throw them away unintentionally Optional accessories 3D Eyewear If you need 3D Eyewear please purchase Panasonic optional accessories Use Panasonic 3D Eyewear supporting Bluetooth wireless technology for active shutter 3D For information about 3D Eyewear http panasonic jp support global cs tv Assembling Removing the pedestal 50 inch model 58 inch model 65 inch model Assembly screw 10 M...

Page 8: ...anel part Make sure not to scratch or break the TV Assembling the pedestal 50 inch model 58 inch model Do not remove the tapes fixing the fall prevention band until the installation is completed C A 1 About the pedestal height 50 inch model 58 inch model Select a pedestal height from the following 4 types The pedestal height can be changed according to step 2 in Assembling the pedestal p 9 For eac...

Page 9: ...English 9 E A 3 A E D A 4 D 2 High Low ...

Page 10: ...English 10 G 7 F 5 6 B ...

Page 11: ...d soft cloth 5 Remove the assembly screws from the support bracket 6 Pull out the pole from the main bracket 7 Remove the support bracket 8 Change the height p 9 9 Use the assembly screws to fasten the support bracket to the pole securely 10Assemble the pedestal according to steps 2 to 5 in Assembling the pedestal p 8 Preventing the TV from falling over It is recommended to secure the pedestal to ...

Page 12: ...English 12 4 A F 5 D 2 3 A E E A ...

Page 13: ...English 13 G 7 B 6 ...

Page 14: ... the TV falling over However no measure can guarantee protection in all cases Remove the tapes fixing the fall prevention bands H Adjusting the panel to your desired angle 50 inch model 58 inch model 65 inch model Do not place any objects within the full rotation range 15 15 View from the top Removing the pedestal Be sure to remove the pedestal in the following procedures when you repack the TV 1 ...

Page 15: ...English 15 Cover Wood screw Assembling the pedestal Do not remove the tapes fixing the fall prevention band until the installation is completed 1 B 2 A 3 C ...

Page 16: ...ctions External equipment and cables shown are not supplied with this TV Please ensure that the unit is disconnected from the mains socket before attaching or disconnecting any cables Check the terminal type and cable plugs are correct for connection Use a fully wired HDMI compliant cable Keep the TV away from electronic equipment video equipment etc or equipment with an infrared sensor otherwise ...

Page 17: ...rrect cable 75 coaxial and correct terminating plug are required to obtain optimum quality picture and sound If a communal aerial system is used you may require the correct connection cable and plug between the wall aerial socket and the TV Your local Television Service Centre or dealer may be able to assist you in obtaining the correct aerial system for your particular area and the accessories re...

Page 18: ... 4K compatible equipment To watch high definition 4K more accurately or HDR content connect the 4K compatible equipment to HDMI1 or 2 terminal Connect the 4K compatible equipment to HDMI terminal using a 4K compatible cable and you can watch content in 4K format HDMI Auto Setting Setup Menu Reproduces the image more precisely with the expanded colour gamut when connecting the 4K compatible equipme...

Page 19: ... external equipment e g Dolby Digital 5 1ch connect the equipment to the amplifier For information about the connections read the manuals of the equipment and amplifier TV HDMI cable Amplifier with speaker system External equipment DVD Player etc Headphones For information about the volume settings refer to eHELP Search by Purpose Settings Sound TV M3 stereo mini plug USB HDD for recording Use USB...

Page 20: ...he mains lead using the cable clamp 50 inch model 58 inch model 65 inch model 75 inch model Attach the cable clamp Insert the cable clamp in a hole Hole Bundle the cable Set To release Tab Keep pushing the tab To remove from the TV Keep pushing both side snaps Snaps Fixing the cables using the cable tie 50 inch model 58 inch model 65 inch model ...

Page 21: ...n the hooks To loosen Knob Keep pushing the knob To remove from the TV Keep pushing both side snaps Snaps 50 inch model 58 inch model Fixing the cables using the cable band Attach the cable band Bundle the cables Fix cables as necessary When using the optional accessory follow the option s assembly manual to fix cables ...

Page 22: ...e cables between the TV and the cable cover terminal cover When using USB 2 port USB 3 port or HDMI4 terminal you cannot attach the cable cover Keep the removed cable cover for future use When using AV terminal ETHERNET terminal or DIGITAL AUDIO you cannot attach the terminal cover Keep the removed terminal cover for future use ...

Page 23: ...put mode from Input Selection list 15 Aspect Changes aspect ratio 16 Subtitle Audio Description Displays Audio Description Subtitle Menu 17 Exit Returns to the normal viewing screen 18 HOME Displays Home Screen For details refer to eHELP Search by Purpose Read first Features 19 APPS Displays Apps applications list 20 Cursor buttons Makes selections and adjustments 21 Return Returns to the previous...

Page 24: ... Red Standby Green On Orange Standby with some functions recording etc active The LED blinks when the TV receives a command from the remote control 4 Input mode selection Press repeatedly until you reach the desired mode Main Menu Press and hold for about 3 seconds to display main menu OK when in the menu system 5 Channel Up Down Cursor Up Down when in the menu system 6 Volume Up Down Cursor Left ...

Page 25: ...ings Shipping Condition in System Menu Setup Menu First time Auto Tuning When the TV is turned on for the first time it will automatically search for available TV channels and give options to set up the TV These steps are not necessary if the setup has been completed by your local dealer Please complete connections p 16 22 and settings if necessary of the connected equipment before starting Auto T...

Page 26: ...d Search Search the content of eHELP in the keyword Search by Purpose Search the content of eHELP for each item Support Access the support information FAQs etc 3 Select the item Example select access To return to the previous screen field Watching TV 1 Turn power on TV or Remote Control Mains power On Off switch should be on p 24 Displays information bar on the edge of screen for several seconds F...

Page 27: ...e input mode is not switched automatically select the input mode connected to the player using the AV button 3D supported broadcast Please consult the suppliers of content or programmes for availability of this service 3D photos and 3D videos taken by 3D compatible Panasonic products Available in Media Player and Network services 2D images converted to 3D Set to 2D 3D mode in 3D Mode Selection Pic...

Page 28: ... TV The range may be shortened depending on the obstacles between the TV and the 3D Eyewear or the surrounding environment When viewing 3D images make sure your eyes are in a horizontal position where double vision does not occur If the room is lit by fluorescent lights 50 Hz and light appears to flicker when using the 3D Eyewear switch off the fluorescent light There are differences in the viewin...

Page 29: ...ntrol signal receiver within about 7 m and a 30 degree angle of the signal receiver Situate the TV away from sunshine or other sources of bright light so they do not shine on the TV s remote control signal receiver No image is displayed Check the TV is turned on Check the mains lead is plugged into the TV and the mains socket Check the correct input mode is selected Check the setting of AV COMPONE...

Page 30: ...e Gently wipe the surface of the display panel cabinet or pedestal by using a soft cloth to remove dirt or fingerprints For stubborn dirt 1 First clean the dust from the surface 2 Dampen a soft cloth with clean water or diluted neutral detergent 1 part detergent to 100 parts water 3 Wring out the cloth firmly Please note do not let liquid enter the TV inside as it may lead to product failure 4 Car...

Page 31: ...New Zealand Digital satellite services Receiver frequency range 950 MHz to 2150 MHz DiSEqC Version 1 0 Digital TV Australia 7 MHz VHF UHF Australia free to air TV broadcast reception New Zealand 8 MHz VHF UHF New Zealand free to air TV broadcast reception 75 inch model 62 5 Net With Pedestal 54 0 Net TV only Power Rating Australia 58 inch model AC 220 240 V 50 60 Hz 0 84 A 65 inch model AC 220 240...

Page 32: ...ealand Female F type 75 Aerial input Standard Belling Lee connector VHF UHF Operating conditions Temperature 0 C 35 C Humidity 20 80 RH non condensing Built in wireless LAN Standard compliance and Frequency range 1 IEEE802 11a n 5 15 GHz 5 35 GHz 5 47 GHz 5 85 GHz IEEE802 11b g n 2 400 GHz 2 4835 GHz Security WPA2 PSK TKIP AES WPA PSK TKIP AES WEP 64 bit 128 bit Bluetooth wireless technology 2 Sta...

Page 33: ... M8 Screw for fixing the TV onto the wall hanging bracket not supplied with the TV Warning When optional accessories such as wall brackets etc are used always read and follow the manufactures installation and usage instructions Do not mount the unit directly below ceiling lights such as spotlights or halogen lights which typically give off high heat Doing so may warp or damage plastic cabinet part...

Page 34: ......

Page 35: ... for the name address of the nearest Authorised Service Centre Send or take the product to a Panasonic Authorised Service Centre together with your proof of purchase receipt as a proof of purchase date Please note that freight and insurance to and or from your nearest Authorised Service Centre must be arranged by you Note that home or pick up delivery service is available for the following product...

Page 36: ... provided below and retain this book plus your purchase receipt as a permanent record of your purchase to aid in identification in the event of theft or loss and for Warranty Service purposes Model Number Serial Number Web Site http www panasonic com Panasonic Corporation 2017 English Printed in Malaysia New Zealand WARRANTY New Zealand only Distributed in New Zealand by Panasonic New Zealand Limi...

Reviews: