Panasonic Viera TH-42PZ81B Operating Instructions Manual Download Page 6

6

Accessories / Options

• 

This product contains possibly dangerous parts (such as plastic bags), that can be breathed in or swallowed by 

young children accidentally. Keep these parts out of reach of young children.

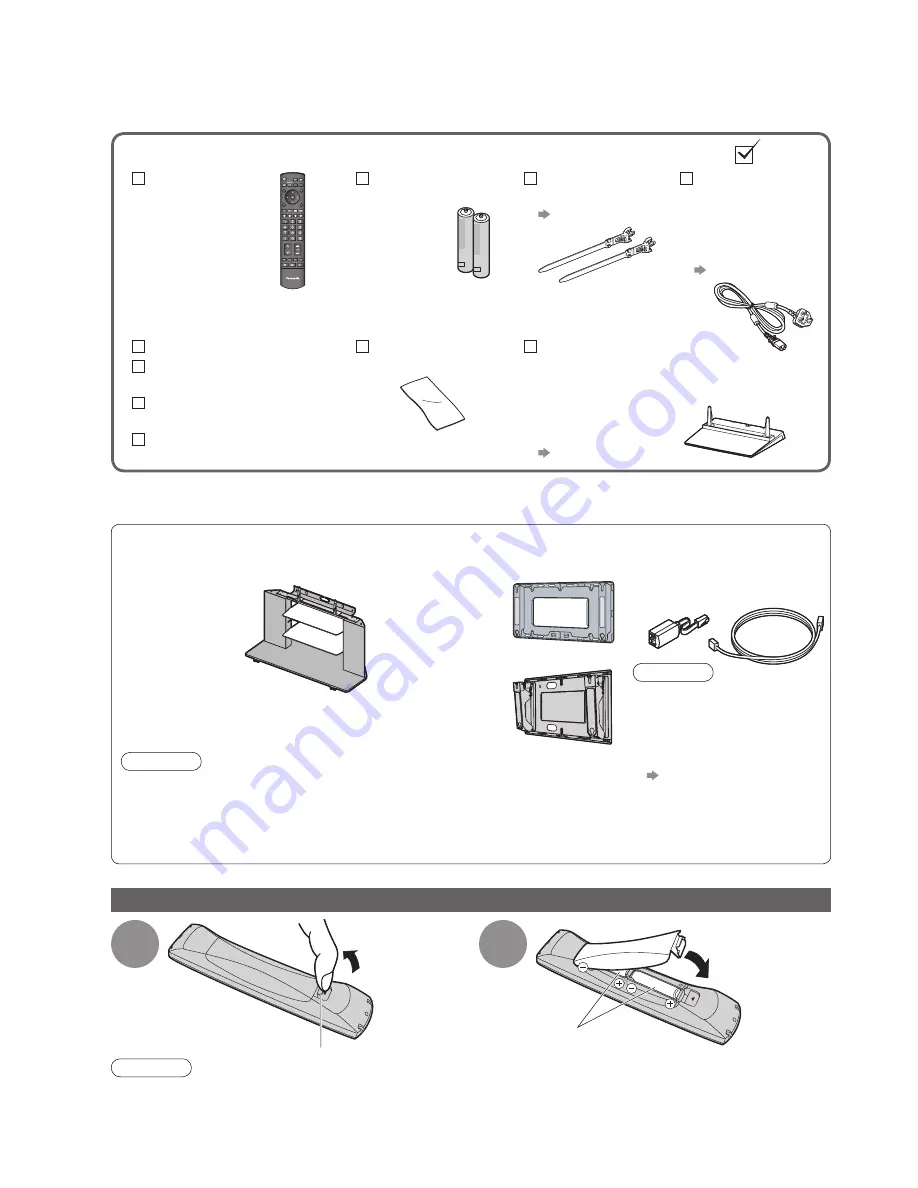
Installing / removing remote’s batteries

1

Pull open

Hook

2

Note the correct

polarity (+ or -)

Close

Caution

• 

Incorrect installation may cause battery leakage and corrosion, resulting in damage to the remote control.

Do not mix old and new batteries.

Do not mix different battery types (such as alkaline and manganese batteries).

Do not use rechargeable (Ni-Cd) batteries.

• 

Do not burn or breakup batteries.


Batteries must not be exposed to excessive heat such as sunshine, 

fi

 re or the like.

Standard accessories

Check that you have the accessories and items shown 

 Remote Control

• 

N2QAYB000238

TV

 Batteries for the 

Remote Control 

(2)

• 

R6 (UM3)   

 Clamper 

(2)

• 

TMME289 

 p. 8

 Mains Lead

• 

K2CT3DH00018

( TH-42PZ81B)

• 

K2CT3DH00025

(

 TH-46PZ81B
TH-50PZ81B

)

 p. 10


 Operating Instructions
 Pan European 

Guarantee Card

 1 Year Guarantee 

Registration

 CRM (Customer 

Relationship Management)

 Cleaning cloth

• 

TXFPE01RLTB


 Pedestal

• 

TBLX0043

(TH-42PZ81B)

• 

TBLX0045

(

 TH-46PZ81B 

TH-50PZ81B

)

• 

TXFBL01RLTD

 p. 7   

Optional accessories

Some items may not be available locally.

Regarding the purchase of Optional accessories, please consult your local Panasonic dealer.
Plasma TV stand

• 

TY-S42PZ80W

(TH-42PZ81B)

• 

TY-S46PZ80W

(TH-46PZ81B)

• 

TY-S50PZ80W

(TH-50PZ81B)

Wall-hanging 

bracket

(vertical)

• 

TY-WK42PV3W

• 

TY-WK42PV4W

LAN cable kit

• 

TY-DMJ100BT


Caution

• 

Please use this LAN cable 

kit when connecting to 

ETHERNET terminal of the 

TV. (to comply with the 

EMC standard - EN55022)

• 

For the connection 

 p. 56 and p. 57

(angle)

• 

TY-WK42PR3W

• 

TY-WK42PR4W

Caution

• 

In order to maintain the unit’s performance and safety, be absolutely sure to 

ask your dealer or a licenced contractor to secure the wall-hanging brackets.

• 

Carefully read the instructions accompanying the plasma TV stand or pedestal, 

and be absolutely sure to take steps to prevent the TV from tipping over.

• 

Handle the TV carefully during installation since subjecting it to impact or other 

forces may cause product damage.

Summary of Contents for Viera TH-42PZ81B

Page 1: ...d these instructions before operating your set and retain them for future reference The images shown in this manual are for illustrative purposes only Operating Instructions Plasma Television Model No TH 42PZ81B TH 46PZ81B TH 50PZ81B ...

Page 2: ...theatre without complicated settings etc p 50 Supports Audio Description signal p 15 and p 29 This function can add an additional audio track to describe events on screen and aids understanding and enjoyment particularly for visually impaired viewers Digital Switchover for Terrestrial broadcasts Starting in late 2007 and ending in 2012 TV services in the UK will go completely digital TV region by ...

Page 3: ...free This reduces the impact on the environment when recycling or disposing of them in the future Up to 100 000 hours Plasma Panel Lifetime The Plasma display panel used in the 2008 VIERA TV range is rated for up to 100 000 hours This measurement is based on the time taken for the brightness of the panel to reduce to half of it s maximum level The time taken to reach this level may vary depending ...

Page 4: ...n Transporting the TV with its display panel facing upright or downward may cause damage to the internal circuitry AC 220 240 V 50 60 Hz IMPORTANT THE MOULDED MAINS PLUG FOR YOUR SAFETY PLEASE READ THE FOLLOWING TEXT CAREFULLY This TV is supplied with a moulded three pin mains plug for your safety and convenience A 5 amp TH 42PZ81B 10 amp TH 46PZ81B TH 50PZ81B fuse is fitted in this mains plug Sha...

Page 5: ...e or electrical shock First remove the mains plug from the socket outlet Do not block the rear ventilation openings Ventilation should not be impeded by covering the ventilation openings with items such as newspapers tablecloths and curtains Do not expose to rain or excessive moisture To prevent damage which might result in electric shock or fire do not expose this TV to rain or excessive moisture...

Page 6: ...uctions Pan European Guarantee Card 1 Year Guarantee Registration CRM Customer Relationship Management Cleaning cloth TXFPE01RLTB Pedestal TBLX0043 TH 42PZ81B TBLX0045 TH 46PZ81B TH 50PZ81B TXFBL01RLTD p 7 Optional accessories Some items may not be available locally Regarding the purchase of Optional accessories please consult your local Panasonic dealer Plasma TV stand TY S42PZ80W TH 42PZ81B TY S...

Page 7: ...ged and personal injury may result Do not use the pedestal if it becomes warped or physically damaged If you use the pedestal while it is physically damaged personal injury may result Contact your nearest Panasonic dealer immediately During set up make sure that all screws are securely tightened If insufficient care is taken to ensure screws are properly tightened during assembly the pedestal will...

Page 8: ...per in a hole Attach the clamper Bundle the cables Keep pushing the knob knob hooks To remove from the TV hole Adjust the panel to your desired angle Ensure that the pedestal does not hang over the edge of the base even if the TV swivels to the full rotation range Do not place any objects or hands within the full rotation range b c c a View from the top Set the mark at the centre as illustrated to...

Page 9: ...enus Subtitles p 15 Displays subtitles Input mode selection TV switches freesat DVB Analogue Other Sat mode p 14 AV switches to AV input mode from Input Selection list p 24 SD Card p 48 Switches to SD Card viewing mode Return Returns to the previous menu page Hold Freeze unfreeze picture p 15 Holds the current teletext page teletext mode p 23 Normalise p 27 Resets picture and sound settings to the...

Page 10: ...t Example 1 Connecting dish or aerial TV only RF cable Terrestrial aerial Mains lead supplied AC 220 240 V 50 60 Hz To remove from the TV Push until both side tabs click Press both tabs and pull on mains connector to release tabs Make sure that the mains lead is securely fixed Note The freesat service uses Astra 2 at 28 2 East and Eurobird 1 at 28 5 East satellites To ensure your satellite dish is...

Page 11: ...DIGITAL AUDIO OUT RF OUT RF IN Rear of the TV Example 2 Connecting DVD Recorder VCR TV DVD Recorder or VCR Rear of the TV Example 3 Connecting DVD Recorder VCR and Cable TV box TV DVD Recorder VCR and Cable Mains lead supplied SCART cable fully wired DVD Recorder or VCR Terrestrial aerial RF cable AC 220 240 V 50 60 Hz DVD Recorder or VCR Cable TV box SCART cable fully wired SCART cable fully wire...

Page 12: ...tart to search for TV programmes and store them in the numbered order as specified by the broadcasters If Auto Setup freesat stopped FAQs p 62 To check programme list at a glance Using TV Guide p 18 To edit programmes Editing Programmes p 40 Home and Shop are equal to Normal and Dynamic respectively Viewing Mode in Picture Menu p 28 4 Select the picture setting 1 Your postcode is required to recei...

Page 13: ...st levels select from a range of options Access the menu store settings after adjustments have been made or options have been set RETURN Return to the previous menu EXIT Exit the menu system and return to the normal viewing screen Note If tuning has failed Auto Setup p 34 and p 39 If you wish to tune in other satellite services Add Other Sat Services p 37 If downloading has failed Q Link Download ...

Page 14: ...of the TV p 9 freesat programme numbers run in the ranges 100 999 and 0100 0999 To select a three digit programme number e g 133 To select a four digit programme number e g 0246 DVB and Other Sat programme numbers run from 1 onwards Analogue programme numbers run in the ranges 0 99 To select a two or three digit programme number e g 39 Display Information banner if it is not displayed While the ba...

Page 15: ...0 FS Current time All freesat Services or Favourites To switch Using TV Guide p 18 Programme type if it is Radio or Data service Programme position and name Event Example freesat Event Start Finish time Features available Message meanings TV mode 1 BBC ONE Wales 19 35 Radio Coronation Street Mute Encrypted Now For info press All DVB Services Subtitles AD TXT Multi Audio 45 19 30 20 00 D Change cat...

Page 16: ...parately for SD Standard definition and HD High definition signals Off Timer Main Menu VIERA Link Picture Sound Setup 1 3 Timer Programming DVB Profile Edit DVB Service List Link Settings Child Lock Tuning Menu Off Timer GUIDE Plus Settings Setup Menu Off Intelligent Frame Creation On MENU Display the menu Select Setup access select Select Off Timer and set the time set select To cancel Set to Off...

Page 17: ...es first show the colour bar Remote control operations apply to the main screen To change the layout green yellow To swap blue To exit multi window red To change the input mode or programme of sub screen Swap sub screen for main screen blue Change the input mode or programme by the remote control p 14 or p 24 Swap again blue Display the selectable settings for the current programme OPTION Check or...

Page 18: ... broadcast and the forthcoming broadcasts over the next seven days depending on the broadcasters When this TV is turned on for the first time or the TV is switched off for more than a week it may take some time before the TV Guide is completely shown freesat mode To the previous day red To the next day green To view a programme list of the selected genre blue To view a programme list of the select...

Page 19: ...selected type DVB mode yellow select category select type Category list Type list To list favourite programmes p 40 To return to TV EXIT view view Only Analogue TV programmes are listed View advertisement OPTION Enter your postcode when using this function for the first time Postcode in GUIDE Plus Settings p 30 If you have already entered your postcode in Auto Setup when first using the TV p 12 yo...

Page 20: ...cording to the TV Guide signal Timer Programming Wed 05 08 04 18 50 Select timer Edit timer RETURN Delete Timer off EXIT 0 9 Page up 1 1 Page down Info 1 D BBC1 TIMER Name 6 8 FR 18 00 20 00 120 Off Pos Date Start End min 1 D BBC1 Holiday News 7 8 SA 21 30 22 30 60 Off Guide 3 D ITV1 Freshly Squeezed Extra 7 8 SA 22 30 23 30 60 Off S P Event recording is a timer programme controlled by information...

Page 21: ... differ greatly from analogue teletext When you switch to a digital teletext service the images you see can contain graphics and text laid out and controlled in a manner decided by the broadcaster Displayed if programme has teletext service 1 Select freesat or DVB p 14 2 The availability of teletext services for a programme is indicated by TXT in the information banner Note As soon as you switch t...

Page 22: ...erently coloured subjects are situated at the bottom of the screen To access more information about one of these subjects press the appropriately coloured button This facility enables fast access to information on the subjects shown What is List mode In List mode four differently coloured page numbers are situated at the bottom of the screen Each of these numbers can be altered and stored in the T...

Page 23: ...View the TV picture while searching for a teletext page Teletext automatically updates itself when new information becomes available Store frequently viewed pages Store frequently viewed pages in the colour bar List mode only press and hold As page is displayed The number changes to white Corresponding colour button If you wish to use Subtitles do not change number on blue button To change stored ...

Page 24: ...o available for HDMI connections p 56 If input mode is not switched automatically Perform and Dependant on the setup of the equipment 2 Display the Input select menu 3 Select the input mode connected to the equipment Input Selection AV1 AV2 S COMPONENT AV3 S PC HDMI1 HDMI3 HDMI2 TV select watch You can also select the input using the AV button on the remote control or the front panel of the TV Pre...

Page 25: ...dly in reverse DVD Skip to the previous track or title Press and hold to search backward Fast forward Skip Search VCR Fast forward view the picture rapidly forward DVD Skip to the next track or title Press and hold to search forward Pause Pause Resume DVD Press and hold to play at slow speed Programme Up Down Select programme Record Start recording Setting your remote control to operate Panasonic ...

Page 26: ...ording to the input signal 2 Select the menu Main Menu VIERA Link Picture Sound Setup example Picture Menu access select 3 Select the item Picture Menu 1 2 Viewing Mode Dynamic Contrast Brightness Colour Sharpness Tint Colour Balance Warm Colour Management Off P NR Off select example Picture Menu 4 Adjust or select 1 2 Viewing Mode Dynamic Contrast Brightness Colour Sharpness Tint Colour Balance W...

Page 27: ...p 28 To reset the sound settings only Reset to Default in Sound Menu p 29 To reset the picture and sound settings together N Also volume level and aspect mode are reset To initialize all settings Shipping Condition in Setup Menu p 42 Changed Number and positions of alternatives Moved Displays the next screen up down User input Name A B C D E F G H I J K L M N U V W X Y Z 0 1 2 3 4 5 6 a b c d e f ...

Page 28: ...viewing requirement e g you may require different settings for viewing sports films news etc Set for each input signal Changes will be stored automatically Contrast Brightness Colour Sharpness Increases or decreases the levels of these options according to your personal preference Tint With an NTSC signal source connected to the TV the picture hue can be adjusted to suit your taste For NTSC signal...

Page 29: ...i Audio Selects the preferred language for DVB multi audio depending on the broadcaster NICAM NICAM Near Instantaneous Companded Audio Multiplex A format for digital sound over television Reproduces stereo sound Off On Off if reception is poor FM monaural sound Analogue mode only HDMI1 3 Input Select to fit the input signal Auto Digital Analogue p 58 Auto Automatic detection of digital or analogue...

Page 30: ...m the TV to Q Link TV AV1 AV2 AV3 Monitor Monitor Image displayed on screen Component PC and HDMI signals cannot be outputted Q Link Download Downloads analogue programme information to a Q Link compatible equipment connected to the TV Child Lock Locks a programme AV input to prevent access to it p 41 freesat Setup Auto Setup Automatically sets the freesat programmes received in the area p 34 Sign...

Page 31: ...Sets the Low and High band frequency for the other satellite programmes p 37 Please consult the received satellite broadcasting companies for the setting Shipping Condition Resets all settings for example when moving house p 42 Owner ID Inputs the owner ID p 43 Common Interface Uses include to watch pay TV p 36 System Update Downloads new software to TV p 37 Power Save Reduces brightness of pictur...

Page 32: ...reesat Service List Access Other Sat Service List Access freesat Setup Access Child Lock Access Access Tuning Menu Access Setup Menu 2 3 Preferred Subtitles English Shipping Condition Access Owner ID Access Setup Menu Teletext FASTEXT Power on Preference TV GUIDE Plus Settings Access Off Timer Off Add Other Sat Services Access Intelligent Frame Creation On p 30 and p 31 3 3 System Information Acce...

Page 33: ...I2 HDMI2 HDMI3 HDMI3 p 44 p 41 Child Lock Child Lock List Change PIN Access p 30 GUIDE Plus Settings Menu System Information Postcode Access p 41 BBC1 Analogue Service List 1 2 3 4 5 6 7 Wed 12 05 04 10 46 Favourites Editor BBC 1 Wales All freesat Services 101 BBC 2 Wales 102 ITV1 WALES 103 BBC THREE 108 BBC FOUR 109 BBC HD 110 ITV2 112 ITV2 1 113 Favourites p 40 BBC 1 Scotland freesat Service Lis...

Page 34: ...lay the menu To return to TV EXIT 1 Select freesat p 14 Advanced Settings provide access to various freesat features 2 access select access select Select a function and set access select 5 For Auto Setup using the buttons on the front of the TV p 9 Press repeatedly until Auto Setup appears Access Auto Setup Start Auto Setup To return to TV EXIT RETURN Start Auto Setup All freesat tuning data will ...

Page 35: ...mask Gateway Primary DNS and Secondary DNS For most users the recommended method of connection to your network is by using Auto feature Select Acquire IP address and then set to Auto Select Acquire DNS address and then set to Auto The available settings are displayed automatically set select Manual settings If you wish to set these functions manually select Manual Select IP address Subnet mask Gat...

Page 36: ...ommon Interface CI Modules This TV receiver works only Pay TV modules complying with CI standard This function is not available for BSkyB s Sky services Off 2 of 2 Common Interface Slot 1 Module inserted Access Common Interface Follow the on screen instructions example select go Coloured characters red green yellow blue On screen operation guide may not correspond to the remote control buttons Cau...

Page 37: ...0 Signal Strength 0 10 10 Signal Lock Locked Auto Setup Other Satellite Services All Services in the Other Satellite Service list will be deleted All is selected Ensure that the Signal Lock status is shown as Locked If it is not locked the search cannot be executed If the status is shown as Not locked and Signal Quality Signal Strength have no indications please check the dish alignment If the sta...

Page 38: ...s New Service Message DVB Signal Condition Access On MENU Tuning Programmes DVB Analogue Select Setup 3 Select Tuning Menu 4 Display the menu Select a function 5 You can retune DVB or Analogue programmes when moving house or search for new services which may have recently started broadcasting To return to TV EXIT 2 access select access select access select 1 Select DVB or Analogue p 14 DVB Manual ...

Page 39: ... of suitable signal for DVB reception Please use the Signal Quality indicator as follows Signal Quality Green bar Good Yellow bar Poor Red bar Bad Check the Terrestrial aerial Check DVB signal DVB Signal Condition Set Analogue programme manually Analogue Manual Tuning 1 BBC1 CH33 Analogue Manual Tuning Manual Tuning 21 68 Set Analogue programme manually after Auto Setup If a VCR is connected only ...

Page 40: ...le from Service Genre in TV Guide p 18 The DVB Profile lists are available from Category in Information banner p 15 and TV Guide p 19 Select a programme and add it to the list select Wed 12 05 04 10 46 Profile Editor BBC One Wales All DVB Services 1 BBC THREE 7 E4 14 CBBC Channel 70 Cartoon Nwk 72 BBCi 105 BBC Radio Wales 719 BBC Radio Cymru 720 Profile 1 To change the category DVB mode red To dis...

Page 41: ...ts all the tuned DVB programmes in DVB mode Analogue Service List lists all the tuned Analogue programmes in Analogue mode Other Sat Service List lists all the tuned Other Sat programmes in Other Sat mode Select a service and add delete add delete select CBBC Channel DVB Service List Cartoon Nwk BBCi BBC Radio Wales BBC Radio Cymru BBC ONE Wales BBC THREE 70 72 105 719 720 1 7 add delete skip To r...

Page 42: ...lly start when Mains power On Off switch is next turned On p 12 To retune TV programmes only e g after moving house Auto Setup p 34 and p 39 3 2 4 Select Setup Select Shipping Condition Display the menu Set To return to TV EXIT Shipping Condition Resets the TV to its original condition i e no programmes tuned in All settings other than Owner ID programmes picture sound quality etc are reset 1 acce...

Page 43: ... p 12 and input it later start from If you input the Owner ID in Auto Setup p 12 perform Select Setup Display the menu 2 1 access select access select Owner ID HOUSE NO NAME A POSTCODE EXIT Enter the PIN number twice at first setting Make a note of the PIN number in case you forget it Enter the PIN number 4 digits To change the PIN number To check the personal information stored Hold down for abou...

Page 44: ...XIT For easier identification and selection of the input mode you can label each input terminals or skip terminal that is not connected to any equipment To select the input mode p 24 set select 1 The labels you set will be displayed in Input Selection menu p 24 or banner If Skip is selected you cannot select the mode access select access select User input You can name each input terminals freely S...

Page 45: ...ck Phase Eliminates flicker and distortion Adjust after Clock adjustment Set to the minimum level if noise occurs Sync Chooses another synchronous signal if the image is distorted H V On G H V by the horizontal and vertical signals from your PC On G by the green signal from your PC if available Reset to Default Press the OK button to reset to the default Setup settings Other items p 28 31 OPTION S...

Page 46: ...1 you do not need to programme the recorder the TV will control the recording progress If the recorder is not compatible with Q Link or similar technologies set Q Link in Setup Menu p 30 to the connected terminal AV1 or AV2 and make timer programming of the recorder Read the manual of the recorder Recording is possible in composite video via SCART only including HD content While recording you cann...

Page 47: ...MO SA Monday to Saturday Daily MO FR Monday to Friday Weekly SA FR TH WE TU MO SU Same time on the same day every week To change a timer programming event Select the programme to be changed To cancel a timer programming event Select the programme to be deleted red To cancel a timer programming event temporarily Select the programme to be cancelled blue Each time pressed cancel stop cancelling To v...

Page 48: ... the date is shown as Unknown select the group to be viewed view the thumbnail of the selected group View Displayed one at a time To display hide the operation guide or OPTION To the previous photo Rotate 90 anti clockwise To the next photo Rotate 90 clockwise To return to thumbnail RETURN Movie View No Date Time Duration Movie View Mode Select Play EXIT RETURN 1 01 12 2006 22 12 00h01m01s 2 01 12...

Page 49: ... Select SPDIF Selection and set access Other items p 28 31 select Multi Audio Stereo Option Menu OPTION Current sound status change Mode Music Bass Treble Balance Headphone Volume Surround Off Volume Correction SPDIF Selection Auto Sound Menu 1 2 Speaker Distance to Wall Over 30cm set select It may take several seconds to change the sound During the operation no signals are output from any of the ...

Page 50: ...Link SCART cable DVD Recorder VCR with Q Link function Connect the DVD Recorder VCR supporting Q Link to the TV s AV1 or AV2 terminal via a fully wired SCART cable VIERA Link SCART cable HDMI cable DIGA Recorder HD Video Camera with VIERA Link function Connect the equipment supporting VIERA Link to the TV s AV1 AV2 HDMI1 HDMI2 or HDMI3 terminals via fully wired SCART and HDMI cables together Some ...

Page 51: ... p 30 AV1 AV2 out p 30 Download Analogue programme setting Q Link Download p 30 or Auto Setup in Analogue mode p 39 or Auto Setup when first using the TV p 12 Features available Some recorders are not applicable Read the manual of the recorder Direct TV Recording What you see is What you record Recording the current programme in DVD Recorder VCR immediately Available conditions When Direct TV Reco...

Page 52: ... connected equipment Read the manual of the equipment For optimal recording the settings of the recorder might be required For details read the manual of the recorder Download Analogue programme setting Q Link Download p 30 or Auto Setup in Analogue mode p 39 or Auto Setup when first using the TV p 12 Set VIERA Link On in Setup Menu VIERA Link p 30 Set up the TV After connection turn the equipment...

Page 53: ...l3 and RecorderwithHDD Pause Live TV You can pause the live TV programme and resume later Live TV programme will be recorded on HDD of the connected DIGA Recorder This function is available with DIGA Recorder which has HDD and HDAVI Control 3 function Connect DIGA Recorder with both HDMI and SCART cables to use this function If you cannot operate check the settings and the equipment Preparations p...

Page 54: ...layed But you cannot access it Use its own remote control to operate the equipment Direct TV Rec Speaker Selection VIERA Link Menu Home Cinema Start VIERA Link Control Speaker Selection Home Cinema Others Pause Live TV When the equipment of other types or manufacturers is connected Others Others is displayed You cannot access it Use its own remote control to operate the equipment Direct TV Rec Spe...

Page 55: ...ailable by using the remote control for Amplifier or Player theatre Read the manual of the equipment About HDMI cable for connecting Panasonic HD Video Camera read the manual of the equipment If more than one equipment of the same type are connected to the TV by HDMI cables for example two DIGA Recorders to HDMI1 and HDMI2 VIERA Link will only be available for the lower terminal number in this cas...

Page 56: ... of connectable equipment to each terminal Terminal Recording Playback equipment AV1 AV2 AV3 Front of TV To record playback videocassettes DVDs VCR DVD recorder To watch DVDs DVD player To watch camcorder images Video camera To watch cable broadcasts Set top box To play games Game equipment To use amplifier with speaker system To use Network services for freesat Q Link VIERA Link with HDMI with HD...

Page 57: ...VCR Fully wired HDMI compliant cable or HDMI equipment Camcorder Game equipment Fully wired HDMI compliant cable RCA cable Fully wired HDMI compliant cable Amplifier with speaker system Optical digital audio cable or Internet Network Hub or Router Terrestrial aerial Shielded Twist Pair STP straight LAN cable Cable Please use LAN cable kit TY DMJ100BT Optional accessories p 6 To enjoy the sound fro...

Page 58: ... compliant equipment 2 Enquire at your local digital equipment retailer shop Auto Aspect The optimum size and aspect can be chosen and you can enjoy finer images p 16 Auto Auto aspect determines the best aspect ratio to use to fill your screen It does this using a four step process to determine if the picture being viewed is a widescreen picture If Auto aspect detects a widescreen signal it switch...

Page 59: ...d Display may take some time when there are many files and folders This function cannot display Motion JPEG and still image not DCF formatted i e TIFF BMP A data modified with a PC may not be displayed Images imported from a PC must be compatible with EXIF Exchangeable Image File 2 0 2 1 and 2 2 Partly degraded files might be displayed at a reduced resolution All JPG extension datas in the card wi...

Page 60: ... 9 TMDS Data0 7 TMDS Data1 Shield 5 TMDS Data2 3 TMDS Data2 1 Technical Information Network connection ETHERNET If you do not have a Broadband network service please consult your retailer for assistance About connections see External Equipment p 56 Preparations Confirm the terms and conditions of the contracts with your Internet Service Provider ISP or telecommunications company Set up and connect...

Page 61: ...nal that can be displayed COMPONENT Y PB PR HDMI Mark Applicable input signal Signal name COMPONENT HDMI 525 480 60i 525 480 60p 625 576 50i 625 576 50p 750 720 60p 750 720 50p 1 125 1 080 60i 1 125 1 080 50i 1 125 1 080 60p 1 125 1 080 50p 1 125 1 080 24p PC D sub 15P Signal name Horizontal frequency kHz Vertical frequency Hz 640 400 70 Hz 31 47 70 07 640 480 60 Hz 31 47 59 94 640 480 75 Hz 37 50...

Page 62: ...the aerial and consult your nearest dealer On Screen messages I e EC AV1 You can simply clear these Press again to redisplay Auto Setup freesat is stopped before it is completed Check connections and dish alignment The dish needs to be pointing at Astra 2 at 28 2 East and Eurobird 1 at 28 5 East If the problem persists consult your freesat registered retailer or call Freesat UK Ltd on 0844 881 670...

Page 63: ... dish If problem persists consult your local Panasonic dealer Turn the TV off with the Mains power On Off switch then turn it On again Some programmes cannot be tuned Check the aerial or dish Cannot find a programme you have previously watched The programme may broadcast for part of the day Check the programme in TV Guide p 18 and p 19 Programme numbers may be changed by broadcasters In freesat mo...

Page 64: ... been detected Check the IP address of other equipment such as computers routers and ensure that there are no duplicate IP address IP address not set Please enter an IP address Key not available You cannot select the same input source between Main and Sub screen when you are viewing in multi window p 17 Manual IP setting not correct The system is unable to set the IP address Please consult your In...

Page 65: ...EXIT to continue Perform System Update Search Now in System Update p 37 If this is still unsuccessful there may not be any new software available Timer already expired Starting time in Timer Programming is already past Set correctly p 47 Timer Event Due to Start DVB 1 BBC1 has been Programmed for recording at 20 00 This message will appear 2 minutes before timer programming event due to start Time...

Page 66: ... EPG 18 19 Eurobird 1 10 62 External equipment 11 24 56 External input 24 45 Event recording 20 F FAQs 62 63 Free input menu 27 freesat Favourites Edit 40 freesat Setup 34 G GUIDE Plus Settings 30 H HDMI 58 60 61 Hold 15 23 Home Cinema 50 55 Hotbird 37 I Information banner 15 Input Labels 44 Input signal 61 Intelligent Frame Creation 31 L Licence 66 M Mains Lead 10 Mains power On Off switch 9 12 M...

Page 67: ...t terminal 21 Pin terminal Audio Video in Audio Video out RGB in S Video in Q Link AV3 VIDEO RCA PIN Type 1 1 0 V p p 75 Ω S VIDEO Mini DIN 4 pin Y 1 0 V p p 75 Ω C 0 286 V p p 75 Ω AUDIO L R RCA PIN Type 2 0 5 V rms COMPONENT VIDEO Y 1 0 V p p including synchronization PB PR 0 35 V p p AUDIO L R RCA PIN Type 2 0 5 V rms Others HDMI1 2 3 TYPE A Connectors HDMITM Version 1 3 with Deep Colour x v Co...

Page 68: ...es These symbols on the products packaging and or accompanying documents mean that used electrical and electronic products and batteries should not be mixed with general household waste For proper treatment recovery and recycling of old products and used batteries please take them to applicable collection points in accordance with your national legislation and the Directives 2002 96 EC and 2006 66...

Reviews: