6
7
Quick Start Guide
TV
OK
1
3
2
4
6
5
7
9
8
0
+
-
-
+
B
D
A
D
C
C
D
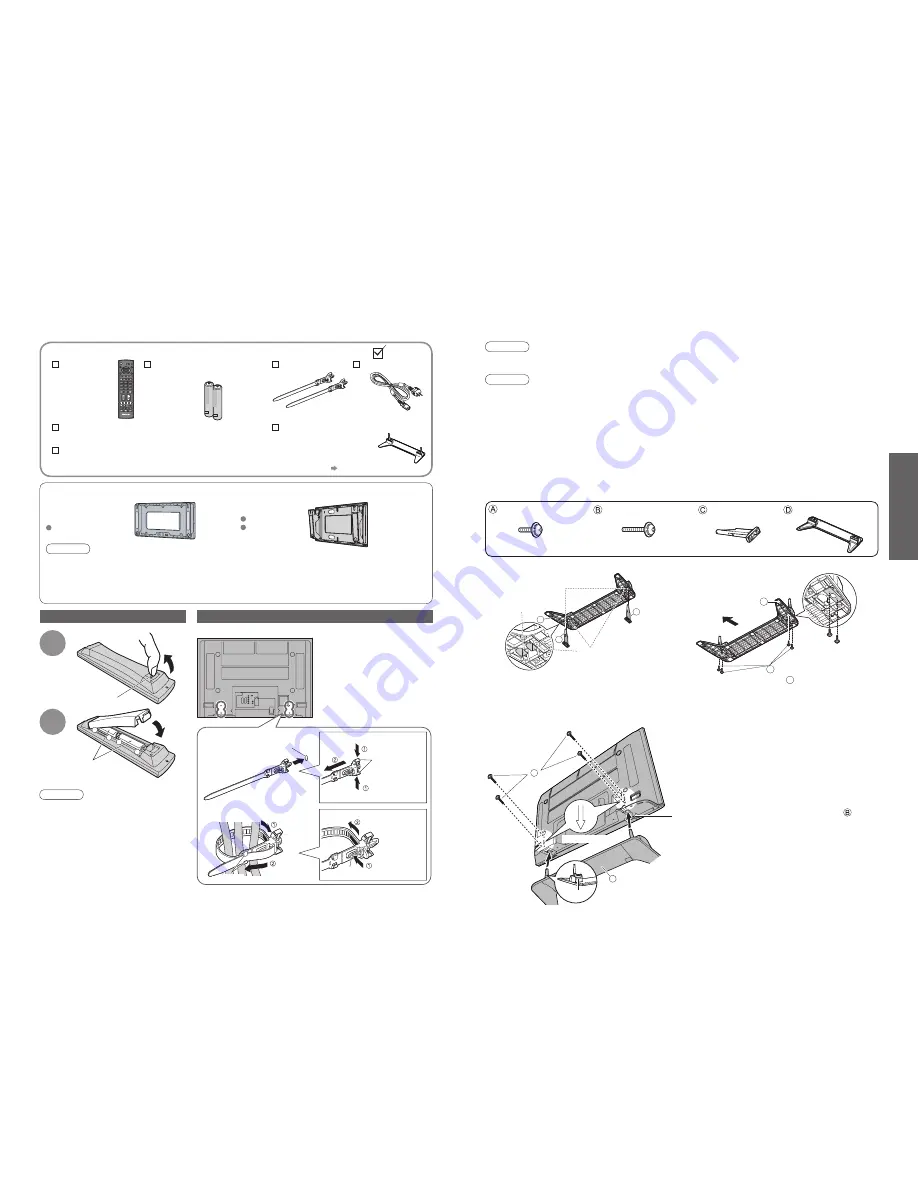
Accessories / Options
Installing remote’s batteries
Batteries for the Remote
Control Transmitter
(2)
•
R6 (UM3)
1
Pull
open
Hook
2
Note the correct
polarity (+ or -)
Close
Caution
•
Incorrect installation may cause battery
leakage and corrosion, resulting in
damage to the remote control.
•
Do not mix old and new batteries.
•
Do not mix different battery types (such
as alkaline and manganese batteries).
•
Do not use rechargeable (Ni-Cd)
batteries.
•
Do not burn or breakup batteries.
Remote Control
Transmitter
•
EUR7651110
Standard accessories
Check that you have the accessories and items shown
Operating Instructions
Pan European Guarantee Card
Clamper
(2)
Using the clamper
•
Do not bundle the RF cable
and mains lead together (could
cause distorted image).
•
Fix cables with clampers as
necessary.
•
When using the optional
accessory, follow the option’s
assembly manual to
fi
x cables.
Rear of the TV
snaps
To remove from the TV:
To loosen:
Keep pushing
both side snaps
Set the tip
in the hooks
Insert the clamper
in a hole
hole
1. Attach the clamper
2. Bundle the cables
Keep pushing
the knob
knob
hooks
Caution
•
In order to maintain the unit’s performance and safety, be absolutely sure to ask your dealer or a licenced
contractor to secure the wall-hanging brackets.
•
Carefully read the instructions accompanying the plasma TV stand or pedestal, and be absolutely sure to take
steps to prevent the TV from tipping over.
•
Handle the TV carefully during installation since subjecting it to impact or other forces may cause product damage.
Mains Lead
Optional accessories
Wall-hanging bracket
(vertical)
TY-WK42PV3W
(angle)
TY-WK42PR2W
TY-WK42PR3W
Pedestal (ST-42H2-WK / ST-50H2-WK)
•
TBLX0024
(TH-37PX7E, TH-42PX7E)
•
TBLX0025
(TH-50PX7E)
For installation p. 7 and p. 8
•
Attaching the pedestal
•
Accessories / Options
Do not disassemble or modify the pedestal.
•
Otherwise the TV may fall over and become damaged, and personal injury may result.
■
Securing the TV
Label
View from the bottom
Arrow mark
Hole for pedestal
installation
■
Assembling the pedestal
Insert the poles into the left and right holes in the
underside of the base so that they
fi
t securely as
shown in the illustration above.
Installing the poles
Securing the poles
Front
Use the assembly screws
A
to secure the poles
fi
rmly to the bottom of the base.
•
Forcing the assembly screws the wrong way will
strip the threads.
Caution
Do not use any other TV and displays.
•
Otherwise the TV may fall over and become damaged, and personal injury may result.
Do not use the pedestal if it becomes warped or physically damaged.
•
If you use the pedestal while it is physically damaged, personal injury may result. Contact your nearest
Panasonic Dealer immediately.
During set-up, make sure that all screws are securely tightened.
•
If suf
fi
cient care is not taken to ensure screws are properly tightened during assembly, the pedestal will not be
strong enough to support the TV, and it might fall over and become damaged, and personal injury may result.
Use the accessory fall-prevention brackets to secure the TV.
•
If the TV is knocked or children climb onto the pedestal with the TV installed, the TV may fall over and personal
injury may result.
Two or more people are required to install and remove the TV.
•
If two or more people are not present, the TV may be dropped, and personal injury may result.
Warning
Attaching the pedestal
Assembly screw (4)
M5 × 20
Assembly screw (4)
M5 × 30
Pole (2)
Base
For TH-42PX7E,
TH-50PX7E
(Outside)
For TH-37PX7E
(Inside)
Carry out work on a horizontal and
level surface.
Use the assembly screws to
fasten securely.


