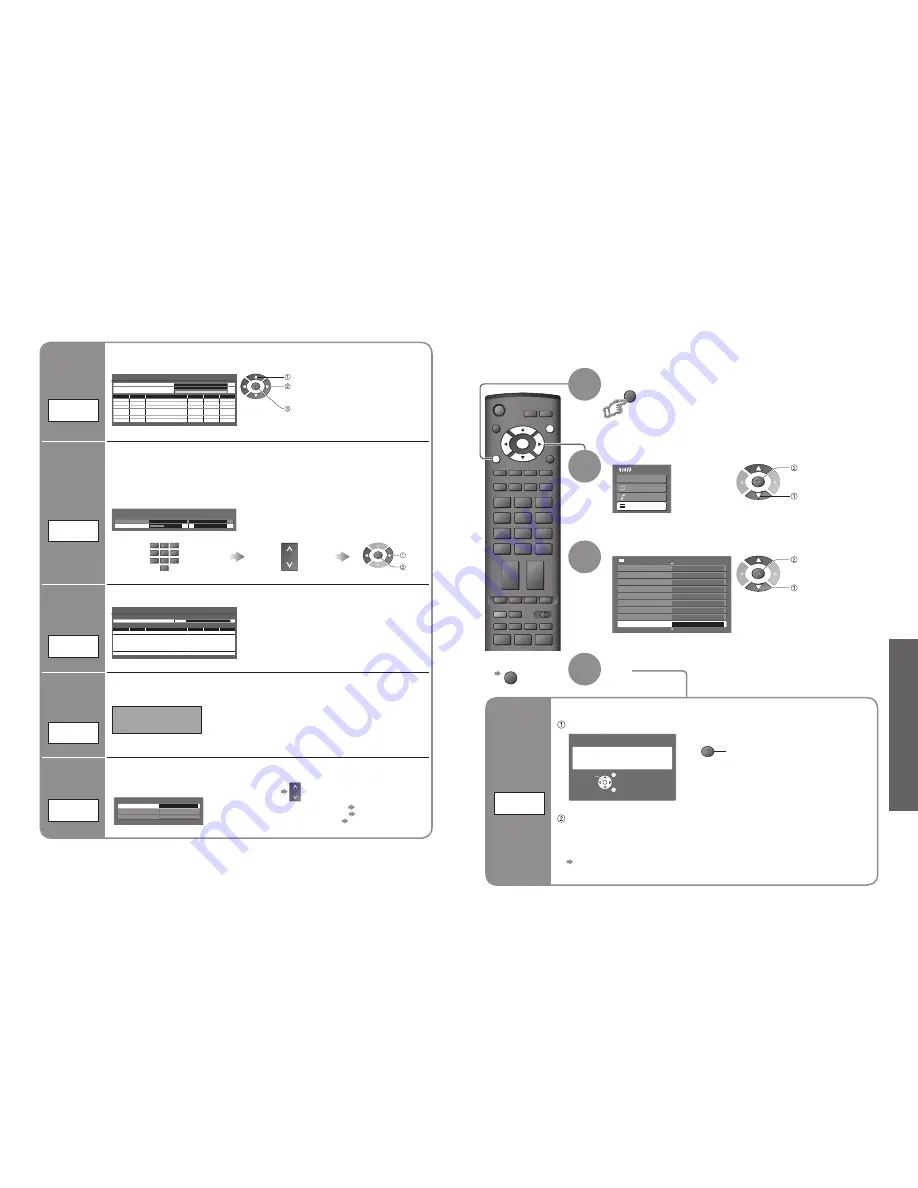
background image

Advanced

Main Menu

VIERA Link

Picture

Sound

Setup

1/3

Q-Link Settings 


Child Lock 

Tuning Menu 


Off Timer 

Off 

Language 


Teletext 

Shipping Condition 

Access 

TOP 

       Setup Menu 

DVB Profile Edit 


DVB Service List


GUIDE

INPUT

RETURN

ASPECT

OPTION DIRECT TV REC

VCR

1

3

2

4

6

5

7

9

8

0

REC

TEXT STTL INDEX HOLD

PROGRAMME

VCR

DVD

EXIT

MENU

OK

MENU

30

31

 Check the message and initialise

 Follow the on-screen instructions

• 

“Auto Setup” will automatically start. (p. 12)


To re-tune TV channels only, e.g. after moving house

 “Auto Setup” (p. 29)

Tuning Channels

3

2

4

Select “Setup”

Select “Shipping Condition”

Display the menu

Set


To return to TV


EXIT

Restore Settings

Shipping

Condition

Restore

Settings

Resets the TV to its original condition, i.e. no channels tuned in.

All settings (channels, picture, sound quality, etc.) are reset.

1

All tuning data will be erased

Are you sure?

Are you sure?

EXIT

RETURN

Confirm

Shipping Condition

Restore Settings

T

uning Channels

Off

DVB Signal Condition

DVB Programme

[70] CBBC Channel

0                5              10

Signal Quality
Signal Strength

Selects a channel and checks the DVB signal condition.

Use for adjusting the direction of the aerial.

Signal Quality:

• 

Green bar   Good

• 

Yellow bar   Poor

• 

Red bar   Bad (Check the aerial)

• 

To change the programme during the menu appears   

Check 

DVB signal

DVB Signal 

Condition

Display a 

noti

fi

 cation 

message

New Service 

Message

New DVB service found!

Press OK to add new service.

Press EXIT to lgnore.

Selects whether to give a noti

fi

 cation message when a new DVB service is found. 

(Off / On)

set

Set DVB 

channel 

manually

Normally use “Auto Setup” or “Add New DVB Services” for the DVB channel setting.

If tuning has not done completely, use this function.

DVB Manual Tuning 


Signal Quality 

Stopped

0 10 

Signal Strength 

0 10 

Frequency 

MHz 

[CH21] 

474,00 


Prog. Channel 

Net 

ID.

Quality


TS ID.

Service Name

• 

All services found will be added to the 

DVB Service List (p. 27) automatically.

DVB Manual 

Tuning

Add 

DVB channel 

automatically

Any new services found will be added to the DVB Service List (p. 27) automatically.

Add New DVB Services

Please wait!

This will take about 3 mins.

5

69

Prog.

Channel

Service Name

Net ID.

TS ID.

Quality

ZDF
ARD

• 

The new service is added with the current settings 

saved as they are.

Add New 

DVB Services

Set Analogue 

channel

manually

Fine Tuning

Programme 1 

[CH33] 

Analogue Manual Tuning 

Manual Tuning 

2

78

41

1


Fine Tuning

Use to make small adjustments to the tuning of an individual channel (affected by weather 

conditions, etc.)


Manual Tuning

Set Analogue channel manually after Auto Setup.

If a VCR is connected with only the RF cable, select programme position “0”.

Search and store

Select the channel

Select the programme position

VCR

1

3

2

4

6

5

7

9

8

0

Analogue 

Manual Tuning

 adjust frequency

( set where the level of “Signal Quality” 

becomes the maximum)

 select channel

 search

 store

 search

 access

 select

 access

 select

Summary of Contents for Viera TH-37PX7E

Page 1: ...ness users in the European Union If you wish to discard electrical and electronic equipment please contact your dealer or supplier for further information Information on Disposal in other Countries outside the European Union This symbol is only valid in the European Union If you wish to discard this product please contact your local authorities or dealer and ask for the correct method of disposal ...

Page 2: ...4 HDMI Functions 35 HDMI terminal VIERA Link External Equipment 38 Basic Features Watching TV 14 Watching Videos and DVDs 16 Viewing Teletext 18 Enjoy your TV Technical Information 40 FAQs 42 Specifications 43 Licence 44 FAQs etc Accessories Options 6 Attaching the pedestal 7 Identifying Controls 9 Basic Connection 10 Auto Setup 12 Quick Start Guide Notice for DVB functions Any functions related t...

Page 3: ... detergent Then wring the cloth and wipe the surface clean with it Finally wipe the surface clean with a dry cloth Wipe the mains plug with a dry cloth at regular intervals Moisture and dust may lead to fire or electrical shock First remove the mains plug from the socket outlet Caution The surface of the display panel has been specially treated and may be easily damaged Do not tap or scratch the s...

Page 4: ... ST 50H2 WK TBLX0024 TH 37PX7E TH 42PX7E TBLX0025 TH 50PX7E For installation p 7 and p 8 Attaching the pedestal Accessories Options Do not disassemble or modify the pedestal Otherwise the TV may fall over and become damaged and personal injury may result Securing the TV Label View from the bottom Arrow mark Hole for pedestal installation Assembling the pedestal Insert the poles into the left and r...

Page 5: ...owing subtitles p 15 Changes the input mode TV switches DVB digital broadcasting Analogue mode p 14 AV changes AV input mode p 16 Returns to the previous menu Still picture p 15 Teletext Hold p 19 Main Menu Press to access VIERA Link Picture Sound and Setup menus p 20 The TV must be fastened to both a base and a wall Remove the screws at both top corners on the rear of the TV and attach the clamps...

Page 6: ...Connecting aerial Example 2 Connecting DVD Recorder VCR TV only TV DVD Recorder or VCR Note Connect to AV1 2 for a DVD Recorder VCR supporting Q Link p 34 Example 3 Connecting DVD Recorder VCR and Set top box TV DVD Recorder VCR and Set top box DVD Recorder or VCR SCART cable fully wired RF cable Aerial Mains lead supplied Rear of the TV Set top box AC 220 240 V 50 60 Hz RF cable RF cable SCART ca...

Page 7: ...e setup has been completed by your local dealer Auto Setup is now complete and your TV is ready for viewing You can now use the remote control to turn On the TV or turn the TV to standby mode Power LED On To edit channels Editing Channels p 26 Analogue Programme Edit p 29 ON SCREEN HELP Instructions box Open the main menu Return to the previous menu Move the cursor select the menu Move the cursor ...

Page 8: ...splay subtitles STTL Display hide subtitles if available To change the language for DVB Preferred Subtitles p 23 If available Turn power on Note To watch pay TV p 25 To select from the Programme Guide GUIDE Display the current programme status OPTION Check or change the current programme status instantly To change Subtitle Language DVB mode Possible if the programme has some languages of subtitles...

Page 9: ... AV1 AV2 AV2S COMPONENT HDMI TV 2 Display the Input select menu VCR DVD VCR DVD switch Select VCR to operate Panasonic VCR or DVD equipment Select DVD to operate Panasonic DVD equipment or Player home theatre Standby Set to Standby mode Turn on Play Playback videocassette DVD Stop Stop the operations Rewind Skip Search VCR Rewind view the picture rapidly in reverse DVD Skip to the previous track o...

Page 10: ...varies depending on the broadcasters up to 79 pages It may take some time for searching during which time you can watch TV Enter the 4 digit number example P6 Appears at upper left corner of the screen To view specific sub page MENU blue View sub page Only when teletext is more than one page Watch TV while waiting for update P108 MENU yellow yellow Appears when updating is completed You cannot cha...

Page 11: ...m example Picture Menu Adjust or select example Picture Menu example Picture Menu Changed Number and positions of alternatives Moved Choose from among alternatives Adjust using the slide bar 1 Displays the next screen Go to the next screen To change menu pages up down Overview VIERA Link Control Speaker Selection VIERA Link Menu Home Cinema Recorder p 37 Main Menu VIERA Link Picture Sound Setup Th...

Page 12: ...the unwanted DVB channels p 27 Q Link Settings Q Link Selects which AV terminal is to be used for data communication between this TV and a compatible recording equipment AV1 AV2 p 34 AV1 AV2 out Chooses the signal to be transmitted from the TV to Q Link Analogue DVB AV1 AV2 Monitor Monitor Image displayed on screen Component and HDMI signals cannot be outputted Download Downloads analogue channel ...

Page 13: ... TV receiver works only Pay TV modules complying with CI standard Off 2 of 2 Common Interface Slot 1 Module inserted Access Common Interface select go Coloured characters red green yellow blue Follow the on screen instructions example On screen operation guide may not correspond to the remote control buttons Caution Turn Off Mains power On Off switch whenever inserting or removing the CI module If...

Page 14: ...atches them When a channel is selected a message appears by entering the PIN number you can watch the channel Appears when the channel is locked Enter the PIN number 4 digits Select Service List To cancel Select the locked channel To lock all channels yellow To cancel all channel locks blue Select the channel to be locked Note Setting Shipping Condition p 31 erases the PIN number and all settings ...

Page 15: ... Type Quality CBBC Channel DVB 10 62 BBC Radio Wales DVB 10 62 BBC Radio Cymru DVB 10 62 E4 DVB 10 62 Cartoon Nwk DVB 10 CH 29 Analogue CH 33 BBC1 Analogue Settings are made automatically 3 4 5 2 1 access select access select access select For Auto Setup using the buttons on the front of the TV Press repeatedly until Auto Setup appears Access Auto Setup Start Auto Setup To return to TV Edit Analog...

Page 16: ...essage New Service Message New DVB service found Press OK to add new service Press EXIT to lgnore Selects whether to give a notification message when a new DVB service is found Off On set Set DVB channel manually Normally use Auto Setup or Add New DVB Services for the DVB channel setting If tuning has not done completely use this function DVB Manual Tuning Signal Quality Stopped 0 10 Signal Streng...

Page 17: ...ct Input Labels Display the menu Select a input terminal and set To return to TV EXIT For easier identification and selection of the input mode you can label each input terminals or skip terminal that is not connected to any equipment To select the input mode p 16 1 The labels you set will be displayed in Input Selection menu p 16 or banner If Skip is selected you cannot select the mode How to set...

Page 18: ... 1 with an HDMI or DVI output terminal such as a set top box or a DVD player can be connected to the HDMI terminal using an HDMI compliant fully wired cable About connections see External Equipment p 38 Note HDMI is the world s first complete digital consumer AV interface complying with a non compression standard If the external equipment has only a DVI output connect to the HDMI terminal via a DV...

Page 19: ...he connected Panasonic equipment is also automatically set to Standby This function will work even if the TV enters standby mode automatically by Off Timer function or auto power standby function Preparations Setup the equipment to enable this function Read the manuals of the equipment About connections see External Equipment p 39 Read the manuals of the equipment too For the first time When addin...

Page 20: ...ifications p 43 External Equipment Easy playback Easy control only with VIERA remote control Home Cinema Panasonic DVD Recorder HD Video Camera etc Panasonic Amplifier Panasonic DVD Recorder Speaker system Panasonic Player theatre Use fully wired HDMI compliant cable Read the manuals of the equipment too VIERA Link p 36 Speaker system Recommended Connection Types of connectable equipment to each c...

Page 21: ...ading is completed The message might be the notification beforehand In this case the schedule information the date that the new version can be used will appear You can set the reservation for update The update will not start when the TV is set to Off To update automatically Set Auto Update Search in Standby to On p 25 If there is a new version software being broadcast the TV will download this aut...

Page 22: ...esult On Screen messages I e EC AV1 You can simply clear these by pressing the button Press again to redisplay No DVB programmes shown after Auto Setup Check the DVB transmitter Adjust the direction of the aerial to another transmitter installed nearby Check the analogue broadcast If the image quality is poor check the aerial and consult your nearest dealer An error message appears Follow the mess...

Reviews: