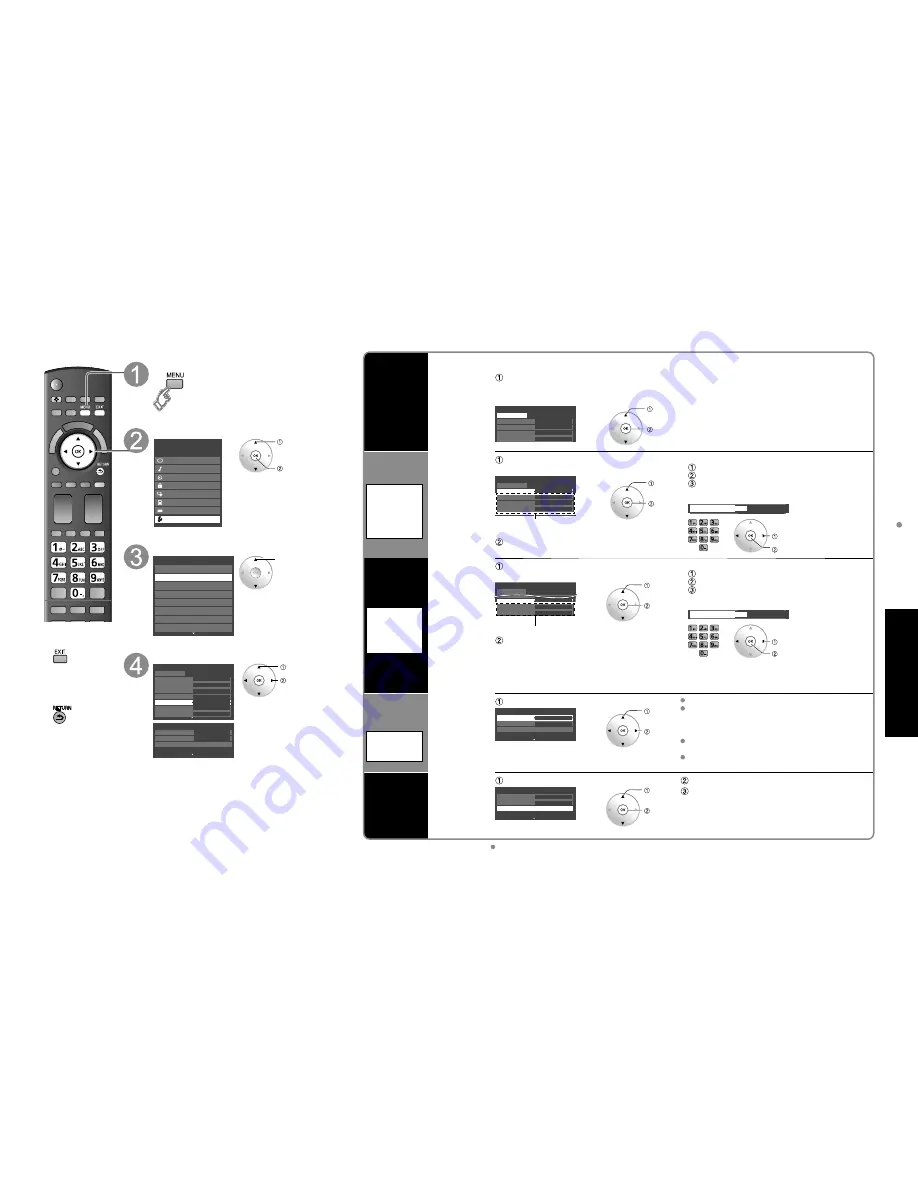
Panasonic Viera TC-P54Z1 Operating Instructions Manual Download Page 26

50

51

Advanced

 Network Setting

Network Setting

This is a setting for connecting to a broadband environment.


Press to exit from 
a menu screen


Press to return 
to the previous 
screen

Display menu

Select “Setup”

Menu

Picture
Audio
Timer
Lock
VIERA Link
SD card
Closed caption

Setup

 select

 set or next

Select “Network setting”

Setup

2/2

Advanced setup
About
Reset to defaults

VIERA Link settings

Network setting

VIERA CAST setting
Network Cameras list
ECO/energy saving

select

Select the item and adjust

Network setting

2/2

MAC address

12-34-56-78-80-ab

LAN speed setting

Automatic

LAN speed

- - -

Software update

Network setting

1/2

Connection test

Succeeded

IP setting mode

Automatic

IP address

---.---.---.---

Subnet mask

---.---.---.---

Default gateway

---.---.---.---

DNS setting mode

OK

Primary DNS

---.---.---.---

Automatic

Secondary DNS

---.---.---.---

 select

 adjust

 The network settings become effective when you close the menu and run “Connection test”.

Connection 

test

Check that the network settings are as shown below, and then start “Connection test”.

  Select “Connection test” and press OK.

Succeeded: “Connection test” succeeded

Only home network:

    Home 

network 

is 

available.

Failed:  

Check the broadband environment connection 

and settings and the network settings, and then 

perform the test again.

Test in progress

---:      Test not yet performed

*Press OK again to cancel the test.

(It takes a while to cancel the test.)

Network setting

1/2

Connection test

Succeeded

IP setting mode

Manual

IP address

192.168.0.5

Subnet mask

255.255.255.0

Default gateway

192.168.0.254

 select

 ok

IP setting

•  

IP setting 

mode

•  

IP address

•  

Subnet mask

•  

Default 

gateway

  Select “IP setting mode” and set to “Automatic”.


Manual setting


 Select “IP setting mode” and set to “Manual”


 Select the item and press OK


  Check the specifications of the broadband router and 

enter each IP address.

(When IP automatic acquisition in DHCP can be used)

Network setting

1/2

Connection test

Succeeded

IP setting mode

Automatic

IP address

---.---.---.---

Subnet mask

---.---.---.---

Default gateway

---.---.---.---

The acquired address is displayed.

 select

 ok


Subnet mask

OK

10I

0

  .

0  .

0  .

0

 change 

channel

 ok

or

  Each IP address is acquired automatically.

DNS setting

•  

DNS setting 

mode

•  

Primary DNS

•  

Secondary 

DNS

  Select “DNS setting mode” and set to “Automatic”.

(When DNS automatic acquisition in DHCP can be used)

Network setting

1/2

Connection test

Succeeded

IP setting mode

Automatic

Default gateway

192.168.0.254

DNS setting mode

OK

Primary DNS

---.---.---.---

Automatic

Secondary DNS

---.---.---.---

The acquired address is displayed.

 select

 ok

  Each IP address is acquired automatically.

If you are using a broadband router, IP automatic 

acquisition in DHCP can be used under normal 

circumstances. If you are not sure, check with the 

person who installed the equipment, or check the 

instructions for each device.


Manual setting


 Select “DNS setting mode” and set to “Manual”


 Select the item and press OK


  Enter each IP address as was specified by the 

provider.


Primary DNS

10I

0

  .

0  .

0  .

0

 select

 ok

or

Connection 

speed 

setting

•  

LAN speed 

setting

•  

LAN speed

  Select “LAN speed setting” (Default is “Automatic”)

   Normally, select “Automatic”.

  If “Connection test” failed, set the “LAN speed setting” 

to “manual” and then select “10BASE half duplex”, 

“10BASE duplex”, “100BASE half duplex” or “100 BASE 

duplex”.

  Cannot be selected when the “LAN speed setting” is 

“Automatic”.

  Changing the settings may make it impossible to 

connect some types of equipment. 

Network setting

2/2

MAC address

12-34-56-78-80-ab

LAN speed setting

Automatic

LAN speed

- - -

Software update

 select

 adjust

Software 

update

  Select “Software update”

 Press OK to start the software update screen.
  Follow directions of the screen.

 * Set “Clock” first. (p. 24)

Network setting

2/2

OK

MAC address

12-34-56-78-80-ab

LAN speed setting

Automatic

LAN speed

- - -

Software update

 select

 ok

Summary of Contents for Viera TC-P54Z1

Page 1: ...A 958 4372 or visit us at www panasonic com contactinfo For assistance Canada please call 1 866 330 0014 or visit us at www vieraconcierge ca Customer s Record The model number and serial number of th...

Page 2: ...ing 52 Lock 54 Editing and Setting Channels 56 Closed Caption 58 Input Labels 59 Using Timer 60 Remote control registration 61 Recommended AV Connections 62 Ratings List for Lock 63 Technical Informat...

Page 3: ...any foreign objects get inside the Plasma TV please consult an Authorized Service Center AC Power Supply Cord To prevent fire or electric shock The Plasma TV is designed to operate on a 120 V AC 60 H...

Page 4: ...Card photo Video game Computer image Set up Do not place the unit where it s exposed to sunlight or other bright light including reflections Use of some types of fluorescent lighting may reduce the re...

Page 5: ...tely sure to take steps to prevent the TV from tipping over Handle the TV carefully during installation since subjecting it to impact or other forces may cause its panel to crack Wall hanging bracket...

Page 6: ...s temporarily in the screw outermost holes of the speaker and fix the speaker mounting screws to the speaker mounting bracket Orient the front side of the Mounting bracket toward the rear side of the...

Page 7: ...acing the Wireless Unit Receiver Wireless Unit Transmitter is placed significantly far from the front of Wireless Unit Receiver direction Especially in a high position near the TV display behind the T...

Page 8: ...d interactive television If no Cable Box AC Cord Connect after all the other connections have been made Cable TV AC 120 V 60 Hz VHF UHF Antenna Cable Box or or Accessories Optional Accessory Continued...

Page 9: ...an RF cable and Composite Video S Video cable p 18 VHF UHF Antenna TV AV Equipment e g DVD Recorder or VCR AC Cord AC 120 V 60 Hz VHF UHF Antenna AV Equipment e g DVD Recorder or VCR with TV tuner Con...

Page 10: ...Recorder AV Equipment e g VCR The S Video input will override the composite video signal when S Video cable is connected Connect either S Video or Video cable Connecting to S VIDEO terminals will enab...

Page 11: ...for at least 3 seconds If there is no registered remote control the Remote control registration screen is displayed every time the TV is turned on VIERA CAST V I E R A T O O L S V I E R A L i n k Rem...

Page 12: ...tup ANT in Auto program set select ANT in Cable Cable TV Antenna Antenna Not used Skip TV tuning go to 5 Select Not used when no wire is connected to the Antenna Cable terminal Typical when Cable Sate...

Page 13: ...mode Press to exit from a menu screen Note About broadcasting systems Analog NTSC Conventional broadcasting Digital ATSC New programming that allows you to view more channels featuring high quality v...

Page 14: ...g OK or Delete a favorite channel Set favorite 1 3 26 1 1 2 3 4 5 select delete while holding down Favorite Feature Use Favorite Feature 1 Display Favorite channels 2 Select the channel Favorite chann...

Page 15: ...00h05m27s PLAY 00 00 14 Pause Date and time Duration 06 10 2009 11 34 00h05m27s PLAY 00 00 14 Skip Skip R Y G B Pause Stop RETURN Play To display hide banner Navigation area Elapsed time of current mo...

Page 16: ...how settings Background music select change next Set the Background music Off Background music select change Select the Background music from 3 types Each Background music plays for 90 seconds Off Mus...

Page 17: ...minal that has GAME label Video 2 GAME HDMI 4 GAME HDMI 1 GAME Cycle through the input terminals if there are multiple Input terminals that have GAME label p 59 If there is no Input terminal with GAME...

Page 18: ...ay choose a wired connection If the Cable DSL modem is far from the TV and or you have more TVs in the house you may want to use a wireless network Connecting to the Internet A Basic connection If you...

Page 19: ...t RETURN Single screen Camera name Camera 1 Model BL C210A For more details on setting and operation of Network camera please also read the operating manuals for the Network camera Network Camera You...

Page 20: ...connector p 68 On green Uses a synchronized signal on the Video G signal which is input from the G connector p 68 Dot clock Alleviates the problem if a picture appears to be vertically striped flicker...

Page 21: ...e 2 Adjust image size according to aspect mode for reducing noise p 67 H size Size 1 Audio Reset to defaults Resets Bass Treble and Balance adjustments to factory default settings Reset to defaults Ba...

Page 22: ...a status Search Registration Connection Deleting Default setting etc p 37 Network cameras list ECO energy saving No signal for 10 minutes To conserve energy the TV automatically turns off when NO SIGN...

Page 23: ...nection diagrams below for HDAVI control of a single piece of AV equipment such as a DVD recorder DIGA RAM theater or Player theater system Refer to page 46 49 for Setup Menu settings and additional c...

Page 24: ...the equipment Auto power save for HDAVI Control 2 or later Condition Auto power stand by Yes The equipment has HDAVI Control 2 or later for available equipment only connected with HDMI cable Examples...

Page 25: ...ntrol Select the equipment you want to access Recorder Home theater Player Camcorder LUMIX Network Camera Using VIERA TOOLS p 27 If there is more than one equipment item a number after the name indica...

Page 26: ...outer and enter each IP address When IP automatic acquisition in DHCP can be used Network setting 1 2 Connection test Succeeded IP setting mode Automatic IP address Subnet mask Default gateway The acq...

Page 27: ...specified by the provider It is not required for normal household use Proxy setting Proxy address Proxy port Proxy address This is the address of the relay server that is connected to the target serve...

Page 28: ...el 3 Channel 4 Channel 5 select set To lock unlock all channels Select Mode and set to All or Off All Locks all channels Off Unlocks all channels Game lock Locks Channel 3 Channel 4 and external input...

Page 29: ...nge OK RETURN Delete ABC abc G Y Edit CH caption Caption Channel select change set next or Caption Select the station identifier maximum 7 characters available Favorite Set favorite 1 3 26 1 1 2 selec...

Page 30: ...text box Back opacity Opacity of text box Outline Outline color of text Identify the setting options on the screen To reset the settings Select Reset to defaults and press OK Press to exit from a men...

Page 31: ...ay The time to turn On On time The time to turn Off Off time Select the inputs Inputs AM PM Timer setting On Off Timer set Clear Remote control registration CH S VIDEO VIDEO VIDEO IN 2 L AUDIO R VOL I...

Page 32: ...no sexual dialogue or situations TV PG D L S V all selected Any combination of D L S V Parental guidance suggested The program may contain infrequent coarse language limited violence some suggestive s...

Page 33: ...roneous operation may damage the data or card Back up the recorded data at regular intervals in case of deteriorated or damaged data or erratic operation of the unit Panasonic is not liable for any de...

Page 34: ...quality that the movie makers intended in order to provide the ultimate cinematic experience at home Game For playing video game This mode will be set automatically if GAME is selected from Input labe...

Page 35: ...ontact with volatile substances such as insect sprays solvents and thinner otherwise the quality of the surface may be adversely affected Cabinet If the cabinet becomes dirty wipe it with a soft dry c...

Page 36: ...ord plugged into the outlet Is the TV unit turned On Check Picture menu p 40 and volume Check the AV cable connections p 15 18 Check that the correct input has been selected p 32 Black Box appears Cha...

Page 37: ...actory Service Center or other Authorized Servicer or damage that is attributable to acts of God THERE ARE NO EXPRESS WARRANTIES EXCEPT AS LISTED UNDER LIMITED WARRANTY COVERAGE THE WARRANTOR IS NOT L...

Page 38: ...INCLUDING ANY IMPLIED WARRANTIES OF MERCHANTABILITY AND FITNESS FOR A PARTICULAR PURPOSE IN NO EVENT WILL PANASONIC CANADA INC BE LIABLE FOR ANY SPECIAL INDIRECT OR CONSEQUENTIAL DAMAGES In certain i...

Reviews: