


40
41
Advanced
How to Use Menu Functions
(picture, sound quality
, etc.)
Menu
Item
Adjustments/Configurations (alternatives)
Picture
Reset to defaults
Resets all picture adjustments to factory default settings except for “Advanced picture”.
Reset to defaults
Picture mode
Basic picture mode
(Vivid/Standard/Studio ref/THX/Game/Custom)
(p. 66)
Picture mode
Vivid
Contrast, Brightness,
Color, Tint, Sharpness
Adjusts color, brightness, etc. for each picture mode to suit your taste
•
Display range
Contrast/Brightness/Color/Sharpness:
0 - 100
Tint:
-50
-
+50
Contrast
+20
Brightness
0
Color
0
Tint
0
Sharpness
0
Color temp.
Selects a choice of Cool(blue), Normal, or Warm(red) color.
(Cool 2/Cool 1/Normal/Warm 1/Warm 2)
Color temp.
Normal
Color mgmt.
On: Enhances green and blue color reproduction, especially outdoor scenes.
(On/Off)
Color mgmt.
On
x.v.Color
Auto: Provide the appropriate picture when images corresponding to “x.v.Color” are input via the HDMI input of this TV.
(Off/Auto)
x.v.Color
Auto
C.A.T.S.
Adjusts the brightness and gradation according to the ambient lighting condition.
(Off/On)
C.A.T.S.
Off
Video NR
Reduces noise, commonly called snow. Leave it off when receiving a strong signal.
(Off/Weak/Medium/Strong)
Video NR
Off
Pro setting
Adjust the “Picture mode” setting in more detail. (p. 66)
(This setting can be adjusted only when “Custom” or ”Photo” is selected.)
Pro setting
Zoom adjustments
Adjusts vertical alignment and size when aspect setting is “ZOOM” (p. 64)
Zoom adjustments
PC adjustments
Sets PC display (p. 38)
PC adjustments
Advanced picture
3D Y/C filter
Minimizes noise and cross-color in the picture.
(On/Off)
3D Y/C filter
On
Color matrix
Selects image resolution of component-connected devices
(HD/SD)
•
SD: Standard Definition HD: High Definition
•
Only 480p signal accepted; regular TV (NTSC) is not available.
Color matrix
SD
Block NR
Reduces noise of specific digital signals of DVD, STB, etc.
(On/Off)
Block NR
Off
Mosquito NR
Reduces HDTV flicker noise in the contoured sections of an image
(Off/On)
Mosquito NR
Off
Black level
Selects Dark or Light. Valid only for external input signals.
(Dark/Light)
Black level
Light
3:2 pulldown
Adjust the picture recorded in 24 fps for optimum quality.
(On/Off)
3:2 pulldown
Off
24p Direct in
96Hz/48Hz: Achieves more cinematic playback by reproducing the movie contents at 2 or 4 times the
speed of 24 frames per second.
(96Hz/60Hz/48Hz)
•
If flicker is seen using 48Hz, please use 60Hz or 96Hz.
•
If you use the Wireless Unit system and select 24p Direct in 48Hz or 96Hz, the link between the transmitter
and receiver may disconnect and reconnect causing the picture to briefly drop out when the signal changes
between 1080/24p and another format, i.e. 1080/60p, 1080/60i, 720/60p. This is normal operation.
24p Direct in
60 Hz
HD size
Selects between 95 % (Size 1) or 100 % (Size 2) for the scanning area with High-definition signal.
(Size 1/ Size 2)
Select “Size 1” if noise is generated on the edges of the screen.
•
Size 1: Selected item for “HD size”. Scanning 95%
•
Size 2: Selected item for “HD size”. Scanning 100%
HD size
Size1
H size
Adjust horizontal display range to reduce noise of both side edges of an image.
(Size 1/Size 2)
Size 2: Adjust image size according to aspect mode for reducing noise. (p. 67)
H size
Size 1
Audio
Reset to defaults
Resets Bass, Treble and Balance adjustments to factory default settings.
Reset to defaults
Bass
Increases or decreases the bass response.
Bass
0
Treble
Increases or decreases the treble response.
Treble
0
Balance
Emphasizes the left / right speaker volume.
Balance
0
Advanced audio
A.I. sound
Equalizes overall volume levels across all channels and external inputs.
(On/Off)
A.I. sound
On
BBE ViVA
BBE ViVA HD3D (High-Definition 3D) Sound provides musically accurate natural 3D image with Hi-Fi sound. The clarity of the sound
is improved by BBE while the width, depth and height of sound image are expanded by BBE’s proprietary 3D sound process. BBE
ViVA HD3D Sound is compatible with all TV programs including news, music, dramas, movies, sports and electronic games.
(On/Off)
BBE ViVA
On
BBE
BBE High Definition Sound restores clarity and presence for better speech intelligibility and musical realism.
(On/Off)
BBE
On
Surround
Enhances audio response when listening to stereo.
(On/Off)
Surround
Off
Volume leveler
Minimizes volume disparity after switching to external inputs.
Volume leveler
0
TV speakers
Switch to “Off” when using external speakers
(On/Off)
•
“A.I. sound”, “BBE ViVA”, “BBE”, “Surround” and “Volume leveler” do not work if “Off” is selected.
TV speakers
On
HDMI 1 in, HDMI 2 in,
HDMI 3 in, HDMI 4 in
The default setting is “Digital” for HDMI connection. (Digital input signal)
Select audio input terminal when DVI cable is connected. (Analog audio input
signal)
(Digital/Component 1/Component 2/Video 1/Video 2)
HDMI1 in
Digital
HDMI2 in
Digital
HDMI3 in
Digital
HDMI4 in
Digital
Timer
Sleep, Timer 1-5
The TV can automatically turn On/Off at the designated date and time (p. 60)
Lock
Locks the channels and programs (p. 54)
VIERA
Link
Record now
Stop recording
VIERA Link control
Speaker output
[Record now/Stop recording]
Records programs on the recorder immediately with the TV’s remote control (p. 48-49).
[VIERA Link control]
Selects equipment to access and operate.
(Recorder/Home theater/Player/Camcorder/LUMIX/Network Camera)
(p. 48-49)
[Speaker output]
Selects an audio output.
(Home theater/TV)
(p. 48-49)
•
VIERA Link menu is accessible directly by pressing the VIERA Link button on the remote control.
(p. 48)
SD card
SD card
[Photo viewer]
To view the still picture. (p. 30)
[Movie player]
To view moving pictures recorded in MPEG 2 or AVCHD format. (p. 28)
SD card
Closed
caption
Closed caption
Displays subtitles (Closed caption) (p. 58)
Closed caption
In AV mode, the Audio menu and Setup menu give fewer options.
■
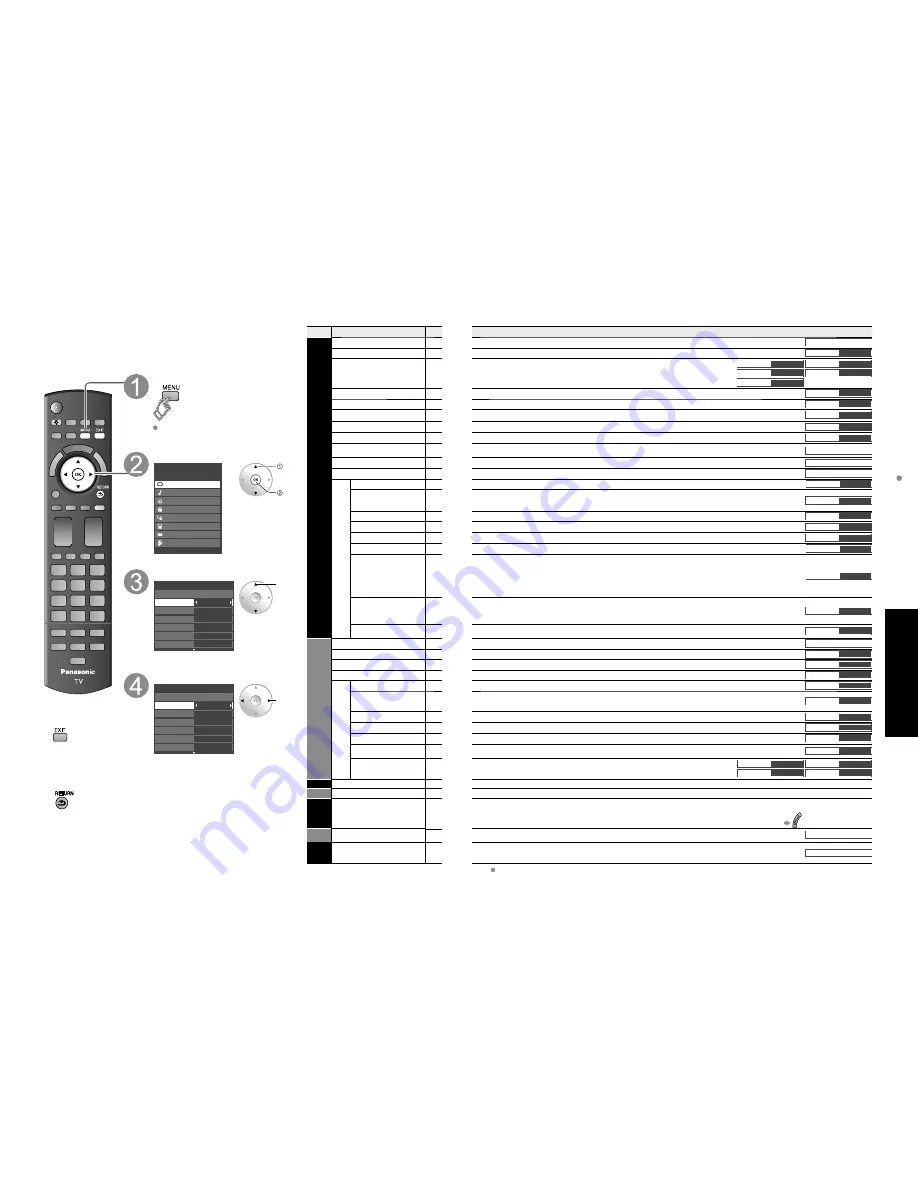
Menu list
Various menus allow you to make settings for the picture, sound, and
other functions so that you can enjoy watching TV best suited for you.
■
Press to exit from
a menu screen
■
Press to return
to the previous
screen
Display menu
Displays the functions that can be set
(varies depending on the input signal)
Select the menu
Menu
VIERA Link
Picture
Audio
Timer
Lock
SD card
Closed caption
Setup
select
next
Select the item
0
0
0
0
0
Vivid
Picture
1/3
Brightness
Color
Tint
Sharpness
Picture mode
Contrast
Reset to defaults
(example: Picture menu)
select
Adjust or select
0
0
0
0
0
Vivid
Picture
1/3
Brightness
Color
Tint
Sharpness
Picture mode
Contrast
Reset to defaults
(example: Picture menu)
adjust
or
select
How to Use Menu Functions


