DIRECT TV REC
N
ASPECT
TEXT STTL INDEX HOLD
G
U
ID
E
VIERA TOOLS
INPUT
TV
AV
EXIT
OPTION
BACK/
RETURN
MENU
58
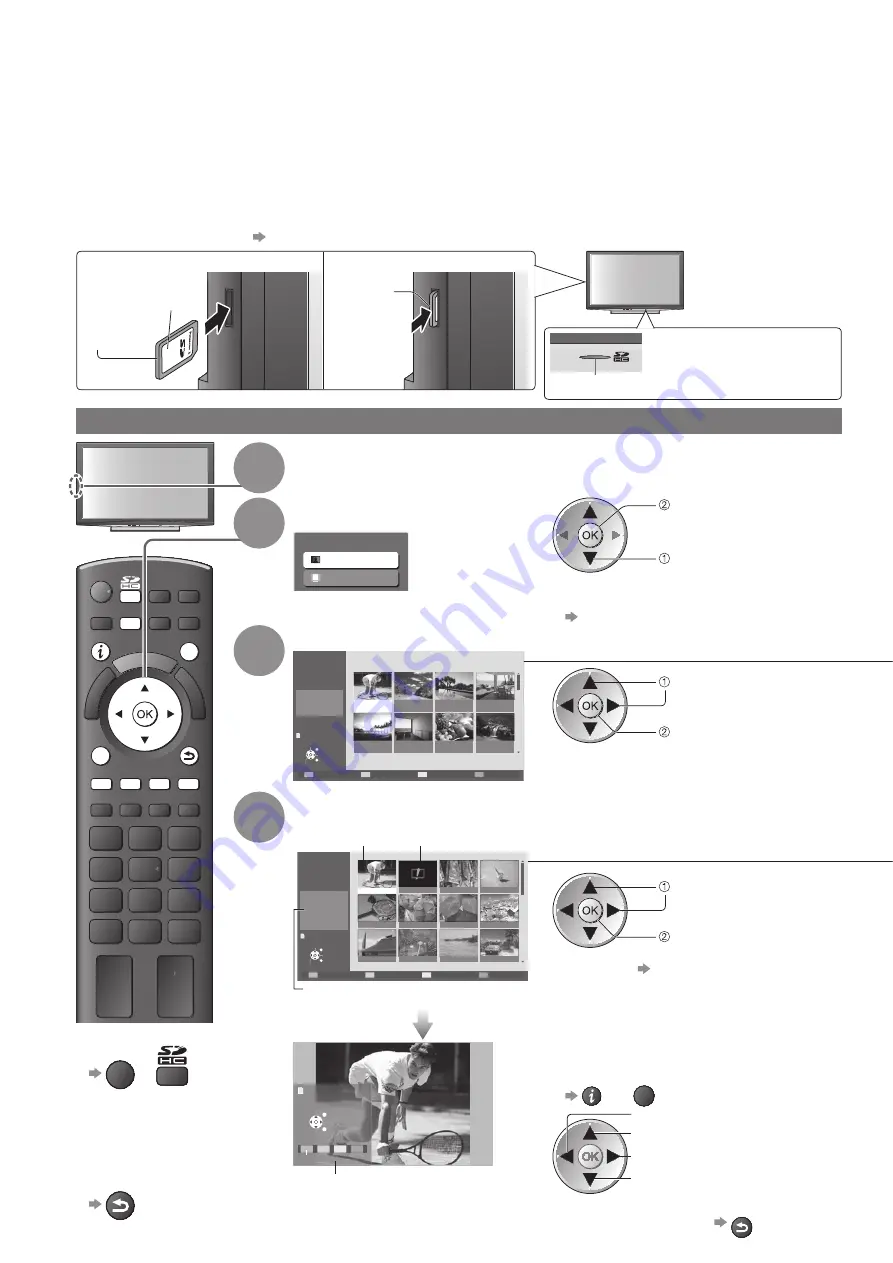
Viewing from SD Card
(VIERA IMAGE VIEWER)
To return to TV
■
EXIT
or
To return to
■
the previous
screen
BACK/
RETURN
1
Insert the SD Card
2
Select “Photo View”
access
select
You can also access directly by using
●
VIERA TOOLS
“How to Use VIERA TOOLS” (p. 49)
SD Card
Photo View
Movie View
3
Select the folder to display the thumbnail
Folder name
Number of pictures
100_PANA
1/23
38 pictures
200_PANA
20 pictures
102_PANA
14 pictures
101_PANA
3 pictures
100_PANA
38 pictures
Nature
14 pictures
Fruit
18 pictures
ROOM
1 picture
201_PANA
7 pictures
Photo View Mode
Folder view
Select
EXIT
Select
RETURN
All pictures
View
(Folder view)
select
thumbnail
The files which are not into a folder will
●
be collected to the folder named “/”.
4
Select the file from the thumbnail to be viewed
File name
Date
Pixel
p1010001
1/38
23/10/2008
1600 x 1200
p1010004
p1010003
p1010002
p1010001
p1010008
p1010007
p1010006
p1010005
p1010012
p1010011
p1010010
p1010009
Photo View Mode
Folder view
100_PANA
Slideshow
Sort by Month
Sort by Date
Select
EXIT
Select
RETURN
View
(Thumbnail)
Error display
(images that could not be loaded, etc.)
Selected
photo
Selected photo
information is displayed
select
single view
Slideshow
●
p. 59
Rotate
Rotate
Select
Slideshow
Single view
EXIT
List
Operation guide
(Single view)
Displayed one at a time
To display / hide the operation guide
●
or
OPTION
To the previous photo
Rotate 90
˚
(anti-clockwise)
To the next photo
Rotate 90
˚
(clockwise)
To return to thumbnail
●
BACK/
RETURN
Photo View
Photo View : Still images recorded by digital cameras will be displayed.
Movie View : Moving pictures recorded by digital video cameras will be played back.
During the operation, sound signal is output from AV1, AV2, AUDIO OUT and DIGITAL AUDIO OUT terminals. But
●
no video signals are output.
“Date” shows the date on which the recording was made by the digital camera or digital video camera. The file
●
without record of the date is shown “**/**/****”.
For details on SD Cards
●
p. 75
Blue LED lights while SD
●
Card is inserted if “SD
Card LED” is set to “On” in
the Setup Menu (p. 31).
Blue LED
To insert the SD Card
■
To remove the SD Card
■
Label
surface
Push until
a click is
heard
Press the
centre of
the card


