English
12
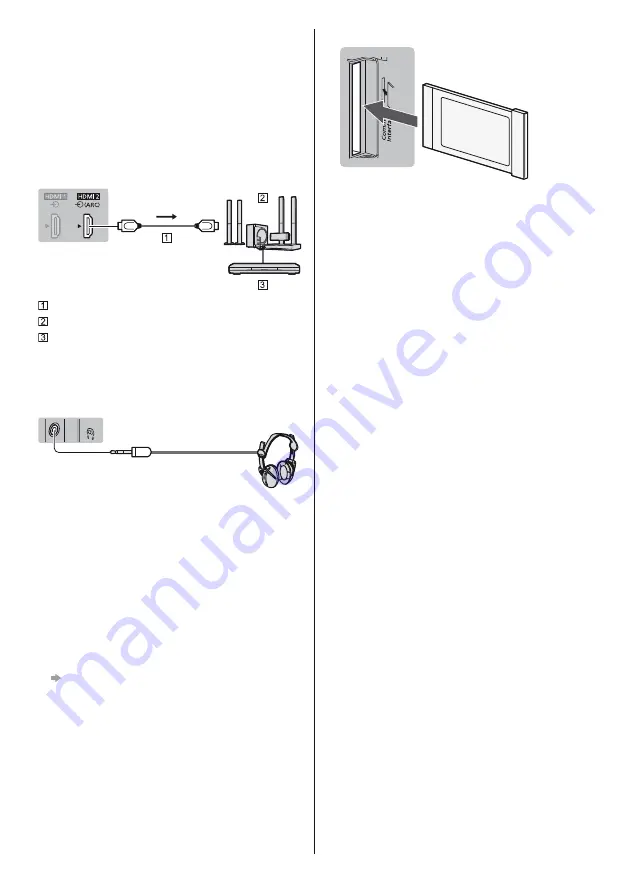
Amplifier
(listening with external speakers)
Use HDMI2 to connect the TV to an amplifier which
has ARC (Audio Return Channel) function.
If connecting to an amplifier without ARC function,
use DIGITAL AUDIO.
To enjoy multi-channel sound from external
equipment (e.g. Dolby Digital 5.1ch), connect the
equipment to the amplifier. For information about the
connections, read the manuals of the equipment and
amplifier.
TV
HDMI cable
Amplifier with speaker system
External equipment (DVD Player, etc.)
Headphones
For information about the volume settings, refer to
[eHELP] (Search by Purpose > Settings > Sound).
TV
(3.5 mm stereo mini plug)
Common Interface
Turn the TV off with Mains Power On / Off switch
whenever inserting or removing the CI module.
If a smart card and a CI module come as a set, first
insert the CI module, then insert the smart card into
the CI module.
Insert or remove the CI module completely in the
correct direction as shown.
Normally encrypted channels will appear. (Viewable
channels and their features depend on the CI
module.)
If encrypted channels do not appear
[Common Interface] in the Setup Menu
There might be some CI modules in the market
with older firmware versions that do not work fully
interoperable with this new CI+ v1.4 TV. In this case,
please contact your content provider.
For details, refer to [eHELP] (Search by Purpose >
Functions > Common Interface), read the manual of
the CI module, or check with the content provider.
Be sure to remove the CI module card, etc. before
repairing, transferring or discarding.
TV
CI module
USB HDD (for recording)
Use USB 2 port for connecting the USB HDD.
For details, refer to [eHELP] (Search by Purpose >
Recording).
VIERA Link
Use HDMI1 - 2 for VIERA Link connection.
For details, refer to [eHELP] (Search by Purpose >
Functions > VIERA Link “HDAVI Control™”).
Summary of Contents for TX-32FST606
Page 37: ... TX 32FST606 ...
Page 38: ... 2 J Z 3 4 7 7 8 9 13 15 16 17 18 19 20 21 23 24 25 26 27 29 30 31 33 34 34 ª ...
Page 39: ... 3 J _ _ _ ª µ µ º ª µ º ªª µ µ º ª µ º ªª µ µ º ª µ º ªª Z ª ª ª ª ª ª µ ÀÀÁ ÃÃà ÄÁ ÅÆ Ä ...
Page 40: ... 4 J Â J Ç º J J ª ...
Page 41: ... 5 J Â ª È J _ Z _ J É J J J J ª Ç ...
Page 43: ... J J Ê Ó Ô Õ R6 _ Í Ö Ö Z ª ...
Page 44: ... 8 1 A D C 3 2 B Z 2 3 4 ª _ _ _ _ __ _ _ _ __ ª J ...
Page 45: ... È ª _ 9 8 7 6 5 4 1 2 3 _ _ _ _ Z Ç º Ò ª J _ ...
Page 46: ... ª ª ª ª ª ÆÎ Ì Ø _ _ _ Ù Ú Ù Ù Ú ÆÎ Ì Ø Û Ù ...
Page 47: ... ª ª ª Ü ÜÊ Ê ª ª ª _ ܪ ª ª ...
Page 48: ... ª È Ù ª Ù È µ Ü ÆÐØ Å À Æ ª ª ª È Í ª Z ª Z _ Ý Þ ª ª Ç Ù Ï Ù Ï ÀÌ Æß ª ...
Page 49: ... Z _ _ _ J _ J _ J _ Ê à á _ J _ _ ª J ª J _ Ç Ç ª ª ...
Page 50: ... 20 22 23 24 _ 25 _ _ _ Ý ª º Í 1 2 3 4 5 6 7 _ _ J Z J ª J _ _ Í ª ª _ _ ª Â ...
Page 51: ... _ âÇ ª ª 2 _  _ _ _ ª _ Ê ã ä ª Z _ J _ _ _  ª  _ _ _ _ _ _ _ _ ...
Page 52: ... _ ª ª ª ª 2 J _ 3 Íââ ...
Page 53: ... å È Z 2 _ ª _ _ _ J ª 3 Â ª ª ª ª ...
Page 55: ... _ J Z _ 2 J _ _ 3 J _ J _ _ J _ µ æ ç ç æ Ù Ò µ ª _ J Z _ 2 J _ 3 J _ ª _ ...
Page 56: ... 20 _ Ê _ ª 2 Z _ 3 4 _ è Ê 2 Ê 3 Ê 4 5 6 J _ J _ Z J J J_ ª _ J 2 Z _ 3 4 5 _ ª ...
Page 60: ... 24 _ Ù ª ª Z _ 2 _ Ü ÜÊ Ê Ü _ _ _ J_ J J _ J ÆÎ Ì Ø 70 ÆÎ Ì Ø 71 Ù 72 Ê Ù Ï 73 ª ...
Page 63: ... ª _ È Z _ 2 3 USB Drive A USB Flash Disk Z _ 2 ã Íä ª _ _ _ 1 2 Õ ...
Page 64: ... 28 ã Íä ª J_ Ù Ñ Ù Ñ â ª Ù Ñ Ù Ñ Ù Ñ Ù Ñ Â Ù Ñ ª ª ...
Page 66: ... 30 _ ª    ªÂ _ _ È _ 2 Z J 3   4 5 Z J J _ _  _ ã Íä ª ...
Page 68: ... 32 _ _ _ É Ê ÌÀ ê Ë Z J 2 _ 3 _ ã Íä ª _ _ _ _ ª ª ...
Page 69: ... 33 _ ª J _ J _ ë ë Í ª J Ü ÜÊ Ê Ü ª æ ç ë Z J J _ _ _ _ _ _ J _ _ _ _ Z ...
Page 72: ... Z _ _ J _ _ _ _ _ Web Site http www panasonic com Panasonic Corporation 2018 Ó Õͺ º Õ ...


