background image

18

Getting Started

Usef

ul Inform

ation

Troubleshooting

Appendix

Handling and Maintenance

z

Place the computer on a flat stable surface. Do not place the computer upright. If the computer is exposed to an 

extremely strong impact, it may become inoperable.

z

Temperature:

Operation: 5 °C to 35 °C {41 °F to 95 °F}

Storage: -20 °C to 60 °C {- 4 °F to 140 °F}

Humidity:

Operation: 30% to 80% RH (No condensation)

Storage: 30% to 90% RH (No condensation)

Even within the above temperature/humidity ranges, using for a long time in an extreme environment will result in 

the product deterioration and will shorten the product life.

• Be sure to use the computer in an environment with sufficient heat ventilation.

- Avoid using the computer on a highly heat retentive surfaces (e.g., rubber pads and blankets). If possible, use 

the computer on surfaces that can dissipate heat, such as a steel desk.

- Do not cover the computer with towels, keyboard covers, etc., as this prevents heat dissipation.

- When using the computer, always keep the display open. (Note, however, that closing the display while the com-

puter is in use does not cause generation of heat, ignition, or other malfunctions.)

z

Do not place the computer in the following areas, otherwise the computer may be damaged.

• Near electronic equipment. Image distortion or noise may occur.

• Near magnets or in magnetic fields.

• In extremely high or low temperature.

z

As the computer can become hot during operation, keep it away from items that are sensitive to heat.

This computer is designed to minimize shock to parts such as the hard disk drive, but no warranty is provided against 

any trouble caused by shock. Be extremely careful when handling the computer.

z

Note for the carrying handle

• Do not pull out and push the carrying handle when using the computer.

• When you store the carrying handle, take care you do not nip your finger between the handle and computer or at 

both handle edges.

z

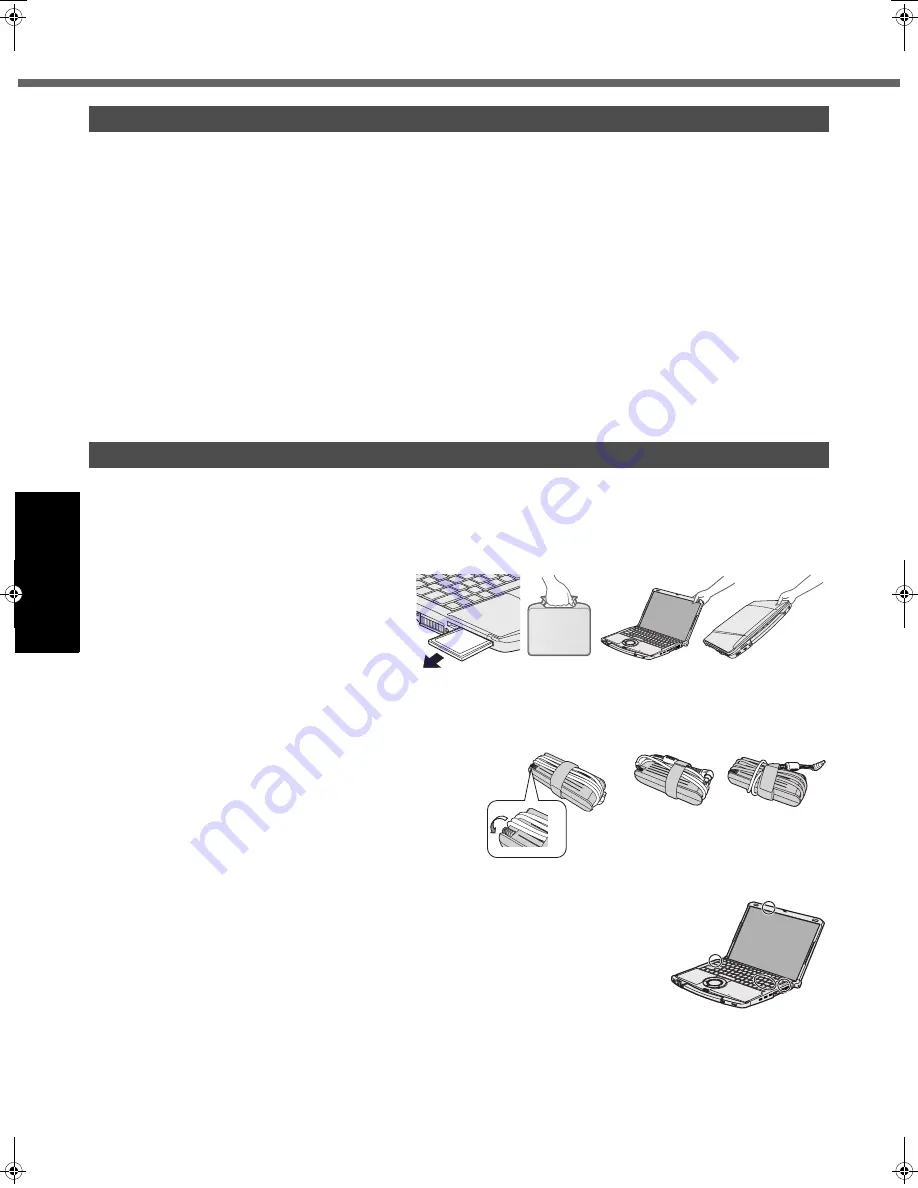
When carrying the computer:

• Turn off the computer.

• Remove all external devices, cables, cards 

and other protruding things.

• Remove a disc in the CD/DVD drive.

• Do not drop or hit the computer against solid 

objects.

• Do not leave the display open.

• Do not pick up or hold the computer by the 

display part.

• Make sure the display is firmly closed when you carry 

the computer with the handle.

z

When you carry the AC adaptor with the cord rolled up, 

roll it up as shown in (A).

Do not roll up the cord in the opposite direction or crossed 

direction as shown in (B).
• Be sure not to roll up the cord around the AC adaptor in use.

• Pull out the AC cord. Also, do not roll up the AC cord.

z

When you board an airplane, take the computer with you 

and never put it in your checked luggage. When using the computer on airplane, follow the airline’s instructions.

z

When carrying a spare battery, put it in a plastic bag to protect its terminals.

z

This computer contains a magnet and magnetic products at the locations circled in the 

illustration at right. Avoid leaving metallic object or magnetic media in contact with these 

areas.

z

The touch pad is designed to be used with a finger tip. Do not place any object on its sur-

face and do not press down strongly with sharp-pointed or hard objects that may leave 

marks (e.g., nails, pencils and ball point pens).

z

Avoid any harmful substances such as oil from getting into the touch pad. The cursor 

may not work correctly.

z

If the computer is being carried in a soft bag with the battery pack removed, avoid undue 

pressure on the body of the computer in a crowded place, etc., as this may result in damage to the LCD.

„

When the battery indicator does not light on

The AC adaptor’s protection function may be working when the battery indicator does not light on even if the AC adap-

tor and the battery pack are correctly connected with the computer.

z

Pull out the AC cord and wait for more than 1 minute to reconnect the AC cord.

z

If the problem persists, contact your technical support office.

Operation Environment

Handling Cautions

OK

NG

NG

(A)

NG

NG

(B)

04_Useful_Information_1_DFQW5315ZA_F8mk1.5-OI_V_M.fm  18 ページ  2009年7月10日 金曜日 午後1時59分

Summary of Contents for Toughbook CF-F8EWAZZJM

Page 1: ...First time Operation 13 On screen Manual 17 Handling and Maintenance 18 Expanding Memory 22 Hard Disk Backup Restore Function 24 Hard Disk Data Erase Utility 25 Reinstalling Software 26 Intel Active...

Page 2: ...nic Corporation assumes no liability for damage incurred directly or indirectly from errors omissions or discrepancies between the computer and the manu als Trademarks Microsoft Windows Windows Vista...

Page 3: ...xposure requirements a minimum of 20 cm 8 inches must be maintained between the WWAN antenna located in top of LCD and all person s body excluding extremities of hands wrist and feet during wireless m...

Page 4: ...corporate these guidelines into all manuals supplied with the product Failure to comply with these precautions violates safety standards of design manufacture and intended use of the product Panasonic...

Page 5: ...nnect the equipment Users should ensure for their own protection that the electrical ground connections of the power utility telephone lines and internal metallic water pipe system if present are conn...

Page 6: ...Modem The terminal equipment includes the following features DTMF dialing Maximum bitrate receiving mode 56 kbit s Maximum bitrate sending mode 33 6 kbit s 18 E 1 When using your telephone equipment b...

Page 7: ...ns fil tels que les t l phones portables L utilisation de ce produit ne comporte aucun risque pour le consommateur du fait que cet appareil op re dans les limites des directives concernant les normes...

Page 8: ...t and Cable When It Starts Thundering Electric shock may result Do Not Connect the AC Adaptor to a Power Source Other Than a Standard Household AC Outlet Otherwise a fire due to overheating may result...

Page 9: ...wise heat will build up inside possibly resulting in a fire Hold the Plug When Unplugging the AC Plug Pulling on the cord may damage the cord resulting in a fire or electric shock Do Not Move This Pro...

Page 10: ...f the battery by recharging only when the remaining power is less than approx 95 when Economy Mode ECO is enabled 75 of capacity z The battery pack is not charged when the computer is first purchased...

Page 11: ...cover is locked I CD DVD Drive Power Open Switch Slide the switch to the right to open the disc cover Slide the switch to the left to turn on off the drive power CD DVD Drive Indicator Off Drive powe...

Page 12: ...t be pos sible or malfunctions may occur F Headphone Jack You can connect headphones or amplified speakers When they are connected audio from the internal speakers is not heard G SD Memory Card Slot R...

Page 13: ...out the bat tery pack in parallel with the computer CAUTION z Make sure the latches are securely locked Otherwise the battery pack may fall when you carry the computer z Do not touch the terminals of...

Page 14: ...y z Do not change the Setup Utility until completing step 5 If you do so Windows setup may not operate properly Follow the on screen instructions z After turning on the computer Please wait while wind...

Page 15: ...outlet When using with 115 V AC z Note that the computer consumes electricity even when the computer power is off If the battery pack is fully charged the battery will be fully discharged in the foll...

Page 16: ...cation software which is not used Lower the temperature in the environment Click on the notification area and select High performance When using the computer in hot location lower the temperature in t...

Page 17: ...n Line Manuals Important Tips Hard Disk Handling The Hard Disk Handling will provide you with the helpful information on how to use the hard disk To access the Hard Disk Handling Click Start All Progr...

Page 18: ...ndle edges z When carrying the computer Turn off the computer Remove all external devices cables cards and other protruding things Remove a disc in the CD DVD drive Do not drop or hit the computer aga...

Page 19: ...ns z Connect to the connectors in the correct direction z If it is hard to insert do not try forcibly but check the connector s shape direction alignment of pins etc z If screws are included fasten th...

Page 20: ...n the bottom of the computer so that vir tually no water is left inside the computer However this is not a guarantee against damage to the hard disk or other internal parts or against the loss or dele...

Page 21: ...disc cover The computer should be kept level without tilting while the disc cover is being opened Move the computer to the edge of the desk or table to perform this oper ation 6 Check to see whether t...

Page 22: ...internal components insert objects other than the module or allow foreign particles to enter Doing so has been known to cause damage fire or electric shock z Panasonic Corporation will bear no respon...

Page 23: ...y and will return after locking z If it is hard to press down the RAM module do not try forcibly but check the module s direction 4 Set the cover and battery pack back NOTE z If the RAM module is reco...

Page 24: ...elect Repair Your Computer and press Enter System Recovery Options appears 4 Select the keyboard layout and click Next 5 Select User name and input Password then click OK 6 Click Windows Complete PC R...

Page 25: ...ord 2 Write down all of the contents of the Setup Utility and press F9 At the confirmation message select Yes and press Enter 3 Select the Main menu then select Optical Drive Power and press Enter 4 S...

Page 26: ...drive 8 Select the Exit menu then select MATSHITAXXXX in Boot Override 9 Press Enter The computer will restart 10 Click Reinstall Windows and click Next The License Agreement screen appears 11 Click...

Page 27: ...message select Yes and press Enter The computer will restart The following procedures are example It is different according to your environment Contact your technical sup port office A Press Ctrl P w...

Page 28: ...ss F2 or Del while Panasonic boot screen is displayed The Setup Utility starts up z If the password is requested enter the Supervisor Password 2 If the Supervisor Password is not set select the Securi...

Page 29: ...sing the following procedure start up in Safe Mode and check the error details A Turn on the computer and when the Panasonic boot screen disappears after enter ing the password 1 if one is set hold do...

Page 30: ...e ten key mode and then input z If lights up press Caps Lock to disable the Caps Lock mode and then input Display When the screen becomes black for a moment z When you set Intel R video driver power s...

Page 31: ...Pad The cursor does not work z When using the external mouse connect it correctly z Restart the computer by using the keyboard Press and press three times and press to select Restart and press Enter...

Page 32: ...ohibited by Hard Disk Lock Please enter the Setup Utility and change the values correctly to permit access The hard disk access is prohibited z Start the Setup Utility and select Disabled in Hard Disk...

Page 33: ...internal keyboard instead Note however that the touch pad and internal keyboard may not function temporarily dur ing diagnostic check If this happens wait for a moment before operating them z If the t...

Page 34: ...tic check currently running During memory diagnostic check the display may freeze for a long period of time Wait until the process is complete Green No problems discovered Red Problems discovered NOTE...

Page 35: ...message Check Result TEST FAILED is still displayed you can assume that there is a problem with the internal RAM module 9 After the diagnostic check is complete click close or press Ctrl Alt Del to r...

Page 36: ...ion with your transfer of the single Product which was accompanied by the Programs to such other party At the time of such a transfer you must also transfer all copies whether in printed or machine re...

Page 37: ...giciels Vous ne pouvez ni modifier ni tenter de modifier les Logiciels E Vous ne pouvez c der les Logiciels et en octroyer la licence une autre partie qu en rapport avec votre cession du Produit uniqu...

Page 38: ...5 zDVD RAM 9 1 4 GB 2 8 GB 4 7 GB 9 4 GB 5 z R 4 7 GB 5 z R DL 8 5 GB 5 z RW 4 7 GB 5 zCD Audio zCD ROM XA compatible zCD R zPhoto CD multiple session compatible zVideo CD zCD EXTRA zCD RW zCD TEXT W...

Page 39: ...pe Utility Touch Pad Utility PC Infor mation Viewer PC Information Popup WinDVD 8 OEM Version Hotkey Settings Optical Disc Drive Letter Setting Utility Roxio Creator LJB Wireless Switch Utility Wirele...

Page 40: ...acity of up to 32 GB Operation on other SD equipment is not guaranteed 19 Only a RAM module designed for DDR2 PC2 5300 can be used Panasonic CF BAK1024U CF BAB2048U 172 pin Micro DIMM and PC 4200 200...

Page 41: ...Station 3 Years Port Replicator I O Box Device Cradle like CF 08 3 Years Antenna Pass through Cable 3 Years Backlit or Full sized keyboard 3 Years or assumes warranty of the unit in which it is instal...

Page 42: ...only covers failures due to defects in materials or workmanship which occur during normal use THIS PRODUCT IS NOT INTENDED FOR USE AS OR AS PART OF NUCLEAR EQUIPMENT SYSTEMS AIR TRAFFIC CON TROL EQUI...

Page 43: ...Canada Inc Computer Products Marketing 5770 Ambler Drive Missis sauga Ontario L4W 2T3 within the warranty period together with a copy of your purchase receipt and an explanation of the sus pected def...

Page 44: ...pay son service de Marketing produits informatiques 5770 Ambler Drive Mississauga Ontario L4W 2T3 dans les soix ante 60 jours suivant la date d achat original Joignez votre envoi une pi ce justificat...

Page 45: ...45 Getting Started Operation Troubleshooting Appendix MEMO...

Page 46: ...46 MEMO...

Page 47: ...47...

Page 48: ...x cfm c power_mgt pr_power_management Outline of the International ENERGY STAR Office Equipment Program The international ENERGY STAR Office Equipment Program is an international program that promotes...

Reviews: