background image

36

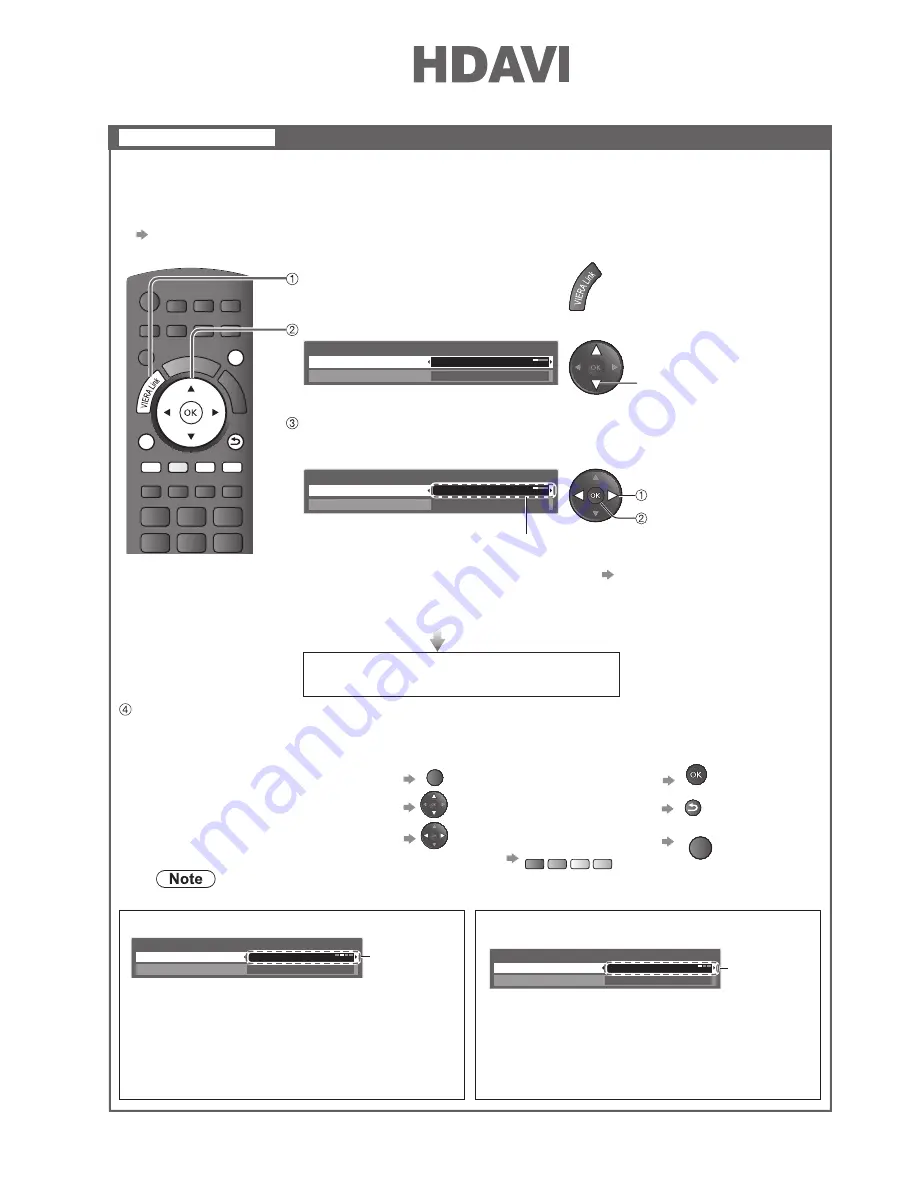
VIERA Link “

 Control

TM

Features available 

(Using VIERA Link Menu)

Access and operate the menu of the equipment

You can control some functions of the connected equipment with this TV remote control by pointing 

at the TV’s signal receiver.

If you cannot operate, check the settings and the equipment


  “Summary of features”, “Connection”, “Preparations” (p. 34, 35)

For details of the operations for the connected equipment, read the manual of the equipment.


INDEX HOLD

INPUT

MENU

ASPECT

TV

AV

POWER

OFF TIMER

STTL

TEXT

OPTION

R

G

Y

B

EXIT

RETURN

 Display “VIERA Link Menu”

 Select “VIERA Link Control”

VIERA Link Menu

VIERA Link Control

Speaker Selection

Recorder
Home Cinema

 Select the equipment you want to access

The type of the connected equipment is displayed.

Select the type of the equipment and access.

Recorder / Player / Home Cinema / Video Camera / LUMIX / Digital Camera / Other

VIERA Link Menu

VIERA Link Control

Speaker Selection

Recorder
Home Cinema

 access

 select

You can also access VIERA Link control by using VIERA TOOLS. 


 p. 20 

The displayed item may vary depending on the connected equipment.


“Home Cinema” means Player theatre, Blu-ray Disc theatre or Recorder theatre.


“Other” means Tuner set top box.


The menu of the accessed equipment 

(Input mode will be changed automatically)

 Operate the connected equipment

1. Set the remote control code to “73” (p. 19)
2. Follow the operation guide

To display the operation guide

Move the cursor / select the menu 

Move the cursor / access / adjust

OPTION

RETURN

Store / set / access

Return to the previous menu

EXIT

Exit the menu

When the key words are displayed on colour bar

B

Y

G

R

If multiple recorders or players are connected

You can access the menu of the equipment. 

But you cannot operate it.

Use its own remote control to operate the 

equipment.


Some operations may not be available depending on the equipment. If so, use its own remote control.

 select

Recorder1-3 / 

Player1-3

VIERA Link Menu

VIERA Link Control

Speaker Selection

Recorder2
Home Cinema

The number is given from the TV’s lower 

HDMI terminal number connected to the 

same type equipment. For example, two 

recorders to HDMI2 and HDMI3, in this case 

the recorder connected to HDMI2 is displayed 

as “Recorder1”, and the recorder connected 

to HDMI3 is displayed as “Recorder2”.

If you access non-VIERA Link equipment

Type of the 

connected 

equipment is 

displayed. 

VIERA Link Menu

VIERA Link Control

Speaker Selection

Recorder
Home Cinema

VIERA Link Control

  Operate the connected equipment with VIERA remote control 

Summary of Contents for THP50X20

Page 1: ...L v2 4 software licensed under the GNU LESSER General Public License LGPL and or 5 open source software other than software licensed under the GPL and or LGPL For the software categorized as 3 or 4 please refer to the terms and conditions of GPL v2 and LGPL as the case may be at http www gnu org licenses old licenses gpl 2 0 html and http www gnu org licenses old licenses lgpl 2 1 html In addition...

Page 2: ...46X20V TH P46X20R TH P46X20P TH P50X20K TH P50X20M TH P50X20R TH P50X20V TH P50X20P English TQB3EC0013 Thank you for purchasing this Panasonic product Please read these instructions before operating your set and retain them for future reference The images shown in this manual are for illustrative purposes only ...

Page 3: ...essories Pedestal types vary between models REC TV AV POWER MUTE RECALL TEXT F P INDEX HOLD R G Y B OPTION RETURN EXIT ASPECT MENU SURROUND OFF TIMER INPUT PROGRAMME REC TV PC AV POWER Remote Control N2QAYB000370 Batteries for the Remote Control 2 R6 AA Operating Instructions Check that you have the accessories and items shown Pedestal p 6 TH P42X20K TH P42X20M TH P42X20P TH P42X20R TH P42X20V TH ...

Page 4: ...assemble or modify the remote control Quick Start Guide Accessories Options 6 Basic Connection 8 Identifying Controls 10 Auto Tuning 12 Basic Features Watching TV 13 Viewing Teletext 16 Watching External inputs 18 Advanced Features How to Use VIERA TOOLS 20 How to Use Menu Functions 21 Tuning and Editing Channels 27 Child Lock 29 Input Labels 30 Shipping Condition Reset settings 31 Viewing from SD...

Page 5: ... sure to ask your local Panasonic dealer to perform setup Use approved pedestals p 6 wall hanging brackets p 7 Do not place the TV on sloped or unstable surfaces The TV may fall off or tip over Do not allow children to handle SD Card As with any small object SD Cards can be swallowed by young children Please remove SD Card immediately after use and store out of reach of children Power source This ...

Page 6: ...onnected to a live socket outlet Transport only in upright position Transporting the TV with its display panel facing upward or downward may cause damage to the internal circuitry Allow sufficient space around the TV for radiated heat When using the pedestal keep a space between the bottom of the TV and the surface where the TV is set In case of using Wall hanging bracket follow the manual of it 1...

Page 7: ...re that the TV does not fall over If the TV is knocked or children climb onto the pedestal with the TV installed the TV may fall over and personal injury may result Two or more people are required to install and remove the TV If two or more people are not present the TV may be dropped and personal injury may result Attaching the pedestal Assembly screw 4 silver Assembly screw 4 black Pole 2 Base S...

Page 8: ...lways ensure that there are no electrical cables or pipes in the wall before hanging bracket To prevent fall and injury remove the TV from its fixed wall position when it is no longer in use Rear of the TV View from the side Holes for wall hanging bracket installation Depth of screw minimum 15 mm maximum 30 mm Screw for fixing the TV onto the wall hanging bracket not supplied with the TV 400 mm 30...

Page 9: ... to the mains lead to avoid noise Do not place the RF cable under the TV To obtain optimum quality picture and sound an aerial the correct cable 75 Ω coaxial and the correct terminating plug are required If a communal aerial system is used you may require the correct connection cable and plug between the wall aerial socket and the TV Your local Television Service Centre or dealer may be able to as...

Page 10: ...art Guide Mains lead supplied 9 AC 220 240 V 50 60 Hz TH P42X20P TH 46X20P TH 50X20P AC 110 240 V 50 60 Hz Rear of the TV Aerial RF cable RF cable DVD Recorder or VCR RCA cable TV DVD Recorder or VCR Connecting DVD Recorder VCR ...

Page 11: ...he time the TV automatically turns off 20 Return Returns to the previous menu page 22 Hold Freeze unfreeze picture p 13 Holds the current teletext page teletext mode p 16 18 SD Card p 32 Switches to SD Card viewing mode 1 Standby On Off switch Switches TV On or Off standby 4 Aspect p 15 Changes aspect ratio from Aspect Selection list Also possible by pressing this button repeatedly until you reach...

Page 12: ...0 AV3 terminals 9 Headphone jack 8 HDMI3 terminal 1 Remote control signal receiver Do not place any objects between the TV remote control signal receiver and remote control 2 C A T S Contrast Automatic Tracking System sensor Senses brightness to adjust picture quality when Eco Mode in the Picture Menu is set to On p 23 3 Power LED Standby red On green When using the remote control indicates the TV...

Page 13: ...her press the OK button and then select the Channel Plan from Indian CATV South Africa American System American CATV or Japan Auto Tuning starts select set Auto Tuning is complete 4 Select Home Please select your viewing environment Home Shop Viewing environment mode Home Recommended mode for viewing at home Select Home for optimal picture power consumption Viewing Mode is set as Normal p 23 Shop ...

Page 14: ...be On p 11 To select the two digit channel number e g 35 in a short time If one digit channel number quickly changes the channel Hold Other useful functions Freeze unfreeze picture HOLD Also possible to set the time from Off timer in the Setup Menu p 25 To cancel Set to 0 or turn the TV off To display the remaining time Information banner p 14 When the remaining time is within 3 minutes the remain...

Page 15: ...n banner Also appears when changing channels To hide EXIT I II Audio mode p 41 Sound mute On 1 90 Off Timer remaining time For settings p 13 Teletext varies depending on the broadcasters Teletext service available TV 1 CH08 5 5MHz PAL 16 9 Input mode Channel position Channel number Sound system Colour system 1 Aspect ratio RECALL Setup Menu Tuning Menu OSD Language Display Settings Off Timer Off C...

Page 16: ...ox or 4 3 image without distortion Zoom2 Zoom3 Displays a 16 9 letterbox anamorphic image full screen without distortion Displays a 2 35 1 letterbox anamorphic image full screen without distortion At 16 9 displays the image at its maximum with slight enlargement Only 16 9 and 4 3 are available in PC input mode Aspect is fixed to 16 9 when Viewing Mode is set to Game in the Picture Menu Not availab...

Page 17: ...viewed pages p 17 Functions Teletext mode Stop automatic updating If you wish to hold the current page without updating To resume HOLD HOLD INDEX F P Return to the main index page View a favourite page stored Call up the page stored in blue List mode Factory setting is 103 MENU R Reveal hidden words e g quiz page answers To rehide R Hold Reveal hidden data 1 Switch to Teletext TEXT Displays Index ...

Page 18: ...bottom of the screen Enter the 4 digit number Sub pages The number of sub pages varies depending on the broadcasters It may take some time for searching during which time you can watch TV example P6 The news page provides a function that indicates arrival of latest news News Flash View the TV picture while searching for a teletext page Teletext automatically updates itself when new information bec...

Page 19: ...ton on the remote control or the side panel of the TV p 11 Press the button repeatedly until the desired input is selected You can label or skip each input mode Input Labels p 30 Skipped inputs will not be displayed when the AV button is pressed Example AV2 Input Selection AV1 AV2 AV3 PC HDMI1 HDMI2 HDMI3 TV 3 View The selected mode is displayed on the screen If the external equipment has an aspec...

Page 20: ...with the below buttons of this TV remote control How to change the code for each equipment Each type of Panasonic equipment has its own remote control code Please change the code for each equipment you want to operate If you operate the connected equipment in VIERA Link p 34 select the code 73 Press and hold POWER during the following operations Enter the appropriate code see table below Press Typ...

Page 21: ...n To return to TV EXIT or 3 Follow the operation of each feature 1 Display icons of the feature 2 Select a feature VIERA Link Control select access 1 VIERA Link Control VIERA Link Control p 36 2 Speaker Selection Speaker Selection p 37 When two or more compatible equipments are connected a selection screen will be displayed Please select the correct description and access 3 Slideshow Slideshow p 3...

Page 22: ...et Normal x v Colour Auto 0 0 90 50 50 0 example 4 Adjust or select Picture Menu 1 2 Viewing Mode Normal Contrast Brightness Colour Sharpness Tint Colour Balance Channel Colour Set Normal 0 0 90 50 50 0 x v Colour Auto example Displays the functions that can be set varies according to the input signal access select store or access Required by some functions change select To reset the settings Choo...

Page 23: ...ction Speaker Distance to Wall Over 30cm 0 12 0 0 0 Access Equalizer Sound p 25 26 Setup Menu OSD Language Display Settings VIERA Link Settings System Menu Off Timer Off Child Lock Other Settings Access PC Setup Access Access Tuning Menu Access Access Access Access Access Setup Manual Tuning Channel List Edit Access Auto Tuning Access Access Tuning Menu p 25 p 25 Power off Link Standby Power Save ...

Page 24: ...annel Colour Set Colour density varying between broadcast channels can be adjusted to three levels for each reception channel Select the channel you want to adjust and set this function x v Colour Increases the colour gradations Off Auto This is effective when watching HD moving pictures with extended gamut xvYCC from external equipment HDMI input mode only Eco Mode Automatically adjusts the scree...

Page 25: ...e the treble sound raise the level of the higher frequency To reset the levels of each frequency to the default settings select the Reset to Defaults by using cursor button and then press the OK button Balance Adjusts the volume level of right and left speakers Headphone Volume Adjusts the volume of the headphones Surround Surround sound settings Off V Audio V Audio Provides a dynamic enhancer of ...

Page 26: ... the time the TV automatically goes to Standby mode Off 15 30 45 60 75 90 minutes p 13 Child Lock Locks a channel AV input to prevent access to it p 29 Tuning Menu Channel List Edit Skips the unwanted channels p 28 Auto Tuning Sets all TV channels automatically p 28 Manual Tuning Sets the TV channels manually p 28 OSD Language Changes language for on screen displays English Thai Chinese Vietnamese...

Page 27: ...nals in a natural colour from digital equipment connected to AV1 component or HDMI1 HDMI2 HDMI3 terminals Select SD or HD to adjust suitable colour parameters for SD standard definition or HD high definition SD Input signal is a normal TV system HD Input signal is a high definition system Auto Standby Sets the time the TV automatically goes to Standby mode when no operation is performed for the se...

Page 28: ...channels when moving house To return to TV EXIT 6 Set see next page 4 Select Tuning Menu access select Setup Menu Off Timer Off Access Child Lock Tuning Menu OSD Language Display Settings VIERA Link Settings System Menu Other Settings 5 Select a function access select Tuning Menu Auto Tuning Manual Tuning Channel List Edit Access Access Access 1 Select TV mode TV access select 3 Select Setup Main ...

Page 29: ... to the tuning of an individual channel affected by weather conditions etc Manual Tuning Set channel manually after Auto Tuning Set Sound System and Colour System and then perform this function Set Colour System Auto normally If a VCR is connected only with the RF cable select channel position 0 All tuning data will be erased Auto Tuning EXIT RETURN Start Auto Tuning All the previous tuning settin...

Page 30: ...s System Menu Off Timer Off Child Lock Other Settings Access 4 Set see below Child Lock Control channel audience Performing Shipping Condition p 31 erases the PIN number and all settings Child Lock PIN Entry Please enter new PIN PIN Child Lock Change PIN Child Lock List Access select access select lock Enter the PIN number 4 digits Select Child Lock List Select the channel input to be locked Enter...

Page 31: ...set AV3 PC HDMI3 AV1 AV1 AV2 AV2 AV3 PC HDMI3 HDMI1 HDMI2 HDMI1 HDMI2 Input Labels 2 Select Setup 3 Select Display Settings Setup Menu Tuning Menu OSD Language Display Settings VIERA Link Settings System Menu Off Timer Off Child Lock Other Settings Access The labels you set will be displayed in Input Selection menu p 18 or banner If Skip is selected you cannot select the mode access select select ...

Page 32: ... Setup Menu Tuning Menu OSD Language Display Settings VIERA Link Settings System Menu Off Timer Off Access Child Lock Other Settings 1 Display the menu MENU 2 Select Setup access select select access 5 Set see below 4 Select Shipping Condition System Menu Software Licence System Information Shipping Condition Access access select Main Menu Picture Sound Setup Check the message and reset Follow the...

Page 33: ...older name Number of pictures 100_PANA 1 23 38 pictures 200_PANA 20 pictures 102_PANA 14 pictures 101_PANA 3 pictures 100_PANA 38 pictures Nature 14 pictures Fruit 18 pictures ROOM 1 picture 201_PANA 7 pictures Photo View Mode Folder view Select EXIT Select RETURN All pictures View 4 Select a photo from the thumbnail to be viewed thumbnail select Thumbnail File name Date Pixel p1010001 1 38 2008 1...

Page 34: ...elect To display all the photos Display the thumbnail of all the photos in SD Card To sort by date or month recorded Display the list of groups sorted by the same date or the same month Folder name Number of pictures 100_PANA 1 23 38 pictures 200_PANA 20 pictures 102_PANA 14 pictures 101_PANA 3 pictures 100_PANA 38 pictures Nature 14 pictures Fruit 18 pictures ROOM 1 picture 201_PANA 7 pictures Ph...

Page 35: ...nics Control is a unique function that we have developed and added As such its operation with other manufacturers equipment that supports HDMI CEC cannot be guaranteed Please refer to individual manuals for the equipments About applicable Panasonic equipment consult your local Panasonic dealer 1 HDMI Connection only 2 HDMI and Audio out connections 3 available with the equipment which has HDAVI Co...

Page 36: ...ts playback or direct navigator function menu for the equipment are activated the TV is automatically turned on Only when the TV is in Standby mode Set Power off Link On in Setup Menu to use this function Power off Link p 26 When the TV is set to Standby mode the connected equipment is also automatically set to Standby This function will work even if the TV enters standby mode automatically by Off...

Page 37: ...Recorder theatre Other means Tuner set top box The menu of the accessed equipment Input mode will be changed automatically Operate the connected equipment 1 Set the remote control code to 73 p 19 2 Follow the operation guide To display the operation guide Move the cursor select the menu Move the cursor access adjust OPTION RETURN Store set access Return to the previous menu EXIT Exit the menu When...

Page 38: ...pointing at the TV s signal receiver If you cannot operate check the settings and the equipment Summary of features Connection Preparations p 34 35 Display VIERA Link Menu Select Speaker Selection VIERA Link Menu VIERA Link Control Speaker Selection Recorder Home Cinema select set Set to Home Cinema or TV Home Cinema Player theatre Blu ray Disc theatre or Amplifier will be automatically turned on ...

Page 39: ...Audio Return Channel function Side of theTV External Equipment These diagrams show our recommendations for how to connect the TV to your various equipment For other connections consult the instructions for each piece of equipment the table below and the specifications p 47 Viewing Listening PC Conversion adapter if necessary Computer Headphones Viewing Listening To adjust volume Headphone Volume i...

Page 40: ... but N C on device 12 TMDS Clock 10 TMDS Clock 8 TMDS Data0 Shield 6 TMDS Data1 4 TMDS Data1 2 TMDS Data2 Shield HDMI terminal To watch satellite broadcasts Set top box To record playback DVD Recorder VCR Fully wired HDMI compliant cable or RF cable To watch DVDs DVD player HDMI equipment DVD Recorder HDMI connection p 34 42 Fully wired HDMI compliant cable Viewing Satellite dish Satellite cable L...

Page 41: ...1 62 63 69 6 12 S11 S40 S41 21 24 25 31 21 62 63 69 62 63 69 62 63 62 C13 70 73 74 75 76 77 78 79 S 1 S 2 S 3 S 1 S 1 S 2 S 3 S 1 S 2 S 3 32 41 S 1 S 2 S 3 80 81 89 S1 S2 S10 S1 S2 S10 Z1 Z9 S1 S2 S10 S1 S2 S10 42 51 S1 S2 S10 90 91 92 93 94 95 96 97 98 99 S11 S12 S13 S14 S15 S16 S17 S18 S19 S20 S11 S12 S13 S14 S15 S16 S17 S18 S19 S20 Z10 Z11 Z12 Z13 Z14 Z15 Z16 Z17 Z18 Z19 S11 S12 S13 S14 S15 S16...

Page 42: ...sia etc Type of broadcast Regular broadcast Standard Audio BILINGUAL or DUAL MONO MAIN I SUB II STEREO Mode Indicator No Indicator I II If the stereo signal is poor or the receiving conditions are not optimum or if STEREO MONO automatic switching occurs it is recommended you switch from STEREO to MONO Even when the contents of the receiving signal undergo changes selection mode is kept intact When...

Page 43: ...nnected equipment has an aspect adjustment function set the aspect ratio to 16 9 These HDMI connectors are type A These HDMI connectors are compatible with HDCP High Bandwidth Digital Content Protection copyright protection An equipment having no digital output terminal may be connected to the input terminal of either COMPONENT or VIDEO to receive analogue signals This TV incorporates HDMI technol...

Page 44: ...24 768 60 Hz 48 36 60 00 1 024 768 70 Hz 56 48 70 07 1 024 768 75 Hz 60 02 75 03 1 024 768 85 Hz 68 68 85 00 1 280 1 024 60 Hz 63 98 60 02 1 280 768 60 Hz 47 70 60 00 1 366 768 60 Hz 48 39 60 04 Macintosh13 640 480 35 00 66 67 Macintosh16 832 624 49 73 74 55 Macintosh21 1 152 870 68 68 75 06 PC from HDMI terminal Applicable input signal for PC is basically compatible to HDMI standard timing Signal...

Page 45: ...r camera file system Unified standard established by Japan Electronics and Information Technology Industries Association JEITA Format the card with the recording equipment The picture may not appear correctly on this TV depending on the recording equipment used Display may take some time when there are many files and folders This function cannot display Motion JPEG and still image not JPEG formatt...

Page 46: ...ure and dust may lead to fire or electrical shock Maintenance Display panel Cabinet Pedestal Mains plug FAQs Before requesting service or assistance please follow these simple guides to resolve the problem If the problem still persists please contact your local Panasonic dealer for assistance White spots or shadow images noise Check the position direction and connection of the aerial Neither image...

Page 47: ... 3 Input setting in the Sound Menu p 24 If digital sound connection has a problem select analogue sound connection p 42 Pictures from external equipment are unusual when the equipment is connected via HDMI Is the HDMI cable connected properly p 34 38 39 Turn Off the TV and equipment then turn them On again Check an input signal from the equipment p 43 Use an equipment compliant with EIA CEA 861 86...

Page 48: ...D 21 69 PAL G H I SECAM G K K1 28 69 PAL B AUST 13 57 PAL D K 13 62 NTSC M Japan 14 69 NTSC M USA CATV S1 S20 OSCAR 1 125 USA CATV C13 C49 JAPAN S21 S41 HYPER Z1 Z37 CHINA 5A 9A AUST Aerial Rear VHF UHF Operating Conditions Temperature 0 C 40 C Humidity 20 80 RH non condensing Connection Terminals AV1 Input AUDIO L R RCA PIN Type 2 0 5 V rms VIDEO RCA PIN Type 1 1 0 V p p 75 Ω COMPONENT Y PB CB PR...

Reviews: