background image

7

Menyambungkan 

T

V

HDMI 1/2/3

HDMI 1/2/3

HDMI 1/2/3

HDMI 1/2/3

HDMI 1

(eARC)

Pemutar Blu-Ray

Pemutar Blu-Ray

AV/Peralatan Permainan


Menggunakan terminal AV

Peralatan

Kabel AV mini

TV

AV in

Kabel HDMI

■  

Menggunakan terminal HDMI

TV

TV

Kabel HDMI

Peralatan

Perekam DVD/VCR

Perekam DVD/

VCR

TV

Kabel HDMI


DIGITAL 

AUDIO OUT

Set top box

TV

Set top box

Piring Satelit

Kabel HDMI

Sistem Speaker

Amplifier

Kabel optikal

Amplifier dengan

Amplifier dengan

sistem speaker

sistem speaker

TV

Untuk menikmati suara dari perangkat suara eksternal 
dalam banyak kanal (misal Dolby Digital 5.1ch), 
sambungkan perangkat ke amplifier. Untuk 
penyambungan, baca manual dari perangkat dan 
amplifier. 

Gunakan HDMI1 untuk menyambungkan TV ke amplifier 
yang mempunyai fungsi eARC/ARC (Audio Return 
Channel). Jika sambungan ke amplifier tidak mempunyai 
fungsi eARC/ARC, gunakan DIGITAL AUDIO OUT.


Peralatan

TV

Kabel HDMI

Summary of Contents for TH-85MX800G

Page 1: ...tories Dolby Dolby Audio dan sombol D ganda adalah merek dagang dari Dolby Laboratories Licensing Corporation Terima kasih Anda telah membeli produk Panasonic ini Harap baca petunjuk ini dengan saksama sebelum mengoperasikan produk ini dan simpan untuk rujukan di kemudian hari Citra yang tertera pada buku petunjuk ini hanya untuk penjelasan saja Beberapa ilustrasi disediakan sebagai gambar konsep ...

Page 2: ...kejut listrik jangan membuka penutup atau belakang karena tidak ada bagian yang bisa diservis oleh pengguna didalamnya Serahkan servis ke teknisi yang berkualifikasi Tanda seru dalam segitiga sama sisi dimaksudkan untuk mengingatkan pengguna akan adanya tindakan dan petunjuk pemeliharaan penting dalam literatur yang menyertai perangkat ini Baterai baterai atau beberapa baterai atau paket baterai ja...

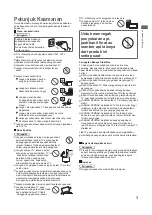
Page 3: ...kan benda yang dapat menggoda anak untuk dipanjat seperti mainan dan remote kontrol di bagian atas TV atau furnitur tempat TV diletakkan Jika TV yang ada akan dipertahankan dan dipindahkan pertimbangan yang sama seperti di atas harus diterapkan Untuk membantu mencegah risiko kejut listrik kebakaran kerusakan atau cedera ikuti peringatan dan perhatian di bawah ini Apabila dideteksi adanya ketidakla...

Page 4: ...n oleh gangguan gelombang radio jauhkan TV dari perangkat seperti perangkat LAN nirkabel lainnya perangkat Bluetooth lain microwave ponsel dan perangkat yang menggunakan sinyal 2 4 GHz Pindahkan TV dengan setidaknya dua orang Lakukan seperti yang ditunjukkan untuk menghindari cedera karena TV terbalik atau terjatuh Pemasangan yang tidak benar dapat membuat baterai bocor Jangan mencampur jenis bate...

Page 5: ...ekan ke bawah penutupnya Bagian belakang TV Tampak samping Memasang TV pada dinding opsional Sekrup untuk memasang TV pada siku siku yang menggantung di dinding tidak disediakan Harap hubungi dealer Panasonic setempat untuk membeli siku siku menggantung pada dinding yang disarankan Kedalaman sekrup Memasang tumpuan Merakit tumpuan 1 Rebahkan TV pada matras busa atau kain lembut yang tebal diatas m...

Page 6: ...gkan TV Terminal V 7 8 9 5 2 3 USB 3 0 1 USB 2 0 4 ETHERNET 5 HDMI 2 6 7 9 10 DIGITAL AUDIO OUT HDMI 1 eARC HEADPHONE AV IN 6 ANTENNA 3 4 2 1 HDMI 3 10 8 Menyambungkan TV M V V V V Sambungan Antena Antena V Ω V ...

Page 7: ...top box Piring Satelit Kabel HDMI Sistem Speaker Amplifier Kabel optikal Amplifier dengan Amplifier dengan sistem speaker sistem speaker TV Untuk menikmati suara dari perangkat suara eksternal dalam banyak kanal misal Dolby Digital 5 1ch sambungkan perangkat ke amplifier Untuk penyambungan baca manual dari perangkat dan amplifier Gunakan HDMI1 untuk menyambungkan TV ke amplifier yang mempunyai fungsi eA...

Page 8: ...telah diselesaikan oleh dealer lokal Anda 1 Langkah 3 Pilih Negara Kawasan Anda Catatan English United State direkomendasikan Ilustrasi dalam publikasi ini disediakan untuk referensi saja Langkah 6 Baca untuk menerima persyaratan layanan dan kebijakan privasi Google AC 220 240 V 50 60 Hz 1 Jika kita memilih Set up basic TV Langkah 1 Fungsi ini digunakan untuk kode pasangan remote kontrol Setelah k...

Page 9: ...nfirmasi dan pindah ke langkah berikutnya Langkah 9 Instalasi Saluran Langkah 10 Masukkan kode pos lokal Jika semua pengaturan selesai antarmuka Please check settings muncul di layar dan tekan OK untuk menyelesaikan pengaturan awal Anda juga dapat kembali ke langkah sebelumnya dan melakukan perubahan apa pun dengan menggunakan tombol Langkah 11 Periksa setelan pengaturan 9 Pengaturan Awal 2 Jika ki...

Page 10: ...vasi Google Langkah 9 Cari semua aplikasi di TV Anda Langkah 10 Pilih langganan Anda Langkah 11 Lingkungan Tekan untuk memilih lingkungan Anda Kemudian tekan OK untuk masuk ke langkah berikutnya Home Anda dapat melihat pengaturan standar untuk mode Gambar dan Suara Shop Anda dapat menikmati penyetelan yang disempurnakan untuk mode Gambar dan Suara Your account Catatan Untuk menggunakan GOOGLE TV h...

Page 11: ...Langkah 13 Instalasi Saluran Langkah 14 Masukkan kode pos lokal Jika semua pengaturan selesai antarmuka Please check settings muncul di layar dan tekan OK untuk menyelesaikan pengaturan awal Anda juga dapat kembali ke langkah sebelumnya dan melakukan perubahan apa pun dengan menggunakan tombol Langkah 15 Periksa setelan pengaturan Catatan Harap perhatikan bahwa ini akan memakan waktu 11 Indonesia ...

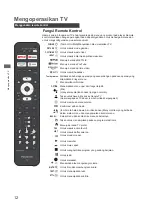
Page 12: ...ra Untuk menampilkan teks Untuk menampilkan subtitle Keluar menu dan kembali ke menu sebelumnya Menampilkan menu opsi dari fungsi terpilih Untuk masuk acara favorit Untuk masuk daftar saluran Mic Untuk mundur cepat Untuk menghentikan program yang sedang berjalan Hanya tersedia jika koneksi jaringan normal Fungsi Remote Kontrol Hampir seluruh fungsi dari TV anda tersedia pada menu yang muncul pada ...

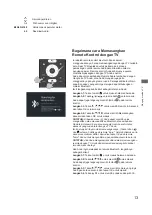
Page 13: ...menggantinya jika yang lama rusak Perangkat Bluetooth lain seperti speaker pengontrol game juga dapat dihubungkan melalui Bluetooth Ikuti langkah langkah berikut sebagai referensi Anda Pilih nomor kunci digital Saluran naik turun Untuk masuk pemutar pintar Deskripsi Audio MEDIA PLAYER 1 9 AD Mengoperasikan TV Langkah 4 Tekan untuk memilih Memasangkan aksesori dan tekan OK untuk masuk Langkah 3 Tek...

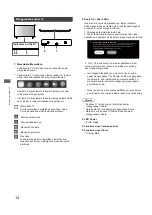
Page 14: ...inyal Suara LED Power Suara On Suara Mati Putih Siaga Kuning Mati Geser ke kiri untuk menyalakannya lampu indikator akan menyala dan kemudian mati ikuti langkah langkah di bawah ini untuk mengatur Suara Pastikan TV terhubung ke Internet sebelum menggunakan Suara Harap setel ke On sebelum menggunakan Suara Harap masuk ke akun GOOGLE Anda sebelum menggunakan Suara Catatan Control your TV with Hey Go...

Page 15: ...opsi tertentu tidak tersedia Anda dapat memilih semua fitur dari beranda Pertama tama pastikan Anda masuk ke akun Google Anda Tekan untuk menampilkan beranda Tekan untuk memilih ikon dari daftar layar Tekan OK untuk masuk setiap opsi Tekan atau untuk keluar dari APLIKASI 1 Telusuri Tahan tombol Asisten dan bicara pada Telusuri acara film aplikasi dan lainnya 2 Beranda Pilih ikon dari daftar layar 3 ...

Page 16: ... Audio Pilih bahasa audio Opsi saluran Atur opsi fungsi saluran pilih Sembunyikan Saluran Kontrol utama Bahasa Audio Konfigurasi pergeseran waktu Pilih perangkat penyimpanan rekaman Kondisi sinyal Lisensi sumber terbuka dan Versi Keyboard virtual Nyalakan keyboard virtual tekan tombol BACK untuk menutup Tekan lalu tekan untuk memilih input yang diinginkan lalu tekan OK untuk konfirmasi Catatan Input...

Page 17: ... yang diinginkan Pilih Antena dan masuk Negara dan Kawasan Menampilkan negara atau kawasan Anda Pindai Otomatis Tekan OK untuk memulai proses pemindaian otomatis Pemindaian mungkin memakan waktu beberapa menit Selama proses Anda dapat menekan Back dan memilih YA untuk keluar Pindai Manual Pilih nomor saluran dan mulai memindai 2 Bahasa Pilihan Utama Tekan OK lalu gunakan untuk memilih Bahasa Pilih...

Page 18: ... PC AV Untuk memilih Video PC dan Auto Pindai atas Untuk memilih AKTIF atau NONAKTIF Pengurangan Bising Untuk memilih Off Low Middle High dan Auto Reset Gambar Untuk mengatur ulang gambar Estimasi Gerak dan Kompensasi Gerak MEMC Untuk memilih Off Low Middle dan High Gamma Untuk memilih 2 2 atau 2 4 Layar Untuk memilih opsi ini untuk menyesuaikan ukuran gambar Suara Pilih opsi ini untuk pengaturan su...

Page 19: ...V Reset Setel ulang Google Setelah reset Akun Google Anda dan aplikasi yang Anda terpasang akan dihapus Untuk memilih Tanggal waktu otomatis Setel tanggal Setel waktu Setel zona waktu dan Gunakan format 24 jam Catatan Setel tanggal dan setel waktu tersedia saat Tanggal waktu otomatis disetel ke NONAKTIF Bahasa Untuk memilih bahasa menu sesuai keinginan Anda Untuk memilih Keyboard saat ini Setelan ...

Page 20: ...Bantuan Masukan 20 Menggunakan Fungsi Menu Berikan umpan balik ke Google atau gunakan layar penelusuran web untuk mengakses Pusat Deskripsi Google ...

Page 21: ...ih ikon Foto lalu tekan tombol OK untuk melihat gambar 2 Tekan tombol arah Naik Turun Kiri atau Kanan untuk memilih file gambar yang Anda inginkan dan tekan OK untuk menampilkan 3 Selama menampilkan gambar tekan OK untuk menampilkan konsol putar Untuk Sebelumnya dan Selanjutnya gunakan tombol remote kiri dan kanan 4 Gunakan tombol OK untuk melihat lebih banyak opsi Rotasi ke kiri Rotasi ke kanan Me...

Page 22: ...usak data atau perangkat Panasonic tidak bertanggung jawab atas setiap penurunan kualitas atau kerusakan data atau perangkat selama pengoperasian TV Sebaiknya hubungkan USB Flash Memori langsung ke port USB TV Beberapa perangkat USB atau USB HUB tidak dapat digunakan dengan TV ini Anda tidak dapat menghubungkan perangkat apa pun dengan menggunakan pembaca kartu USB Informasi tambahan untuk perangk...

Page 23: ...ersambung dengan kabel ekstensi USB Jangan lepaskan perangkat USB saat sedang mentransfer file Saat menyambungkan hard drive eksternal gunakan port USB HDD Kami menyarankan Anda menggunakan hard drive eksternal dengan adaptor dayanya sendiri Kamera digital dan perangkat audio tertentu mungkin tidak kompatibel dengan TV TV mendukung sistem file FAT Setelah menyortir file dalam mode Tampilan folder TV ...

Page 24: ...ru atau hitam Hal ini tidak berpengaruh pada kinerja TV Anda dan ini bukan masalah kualitas Arahkan remote secara langsung pada penerima sinyal remote TV pada jarak kurang dari 7 meter dan sudut 30 derajat Jauhkan TV dari sinar matahari atau halangi sumber cahaya terang agar tidak menyinari remote kontrol penerima sinyal TV Perangkat USB yang terhubung mungkin menyebabkan kesalahan ini Lepaskan pe...

Page 25: ... Sambungan terminal Keluaran Speaker Berat AV in Input HDMI 1 2 3 USB EARPHONE Keluaran audio Model 85 inci Model 85 inci Model 85 inci Model 85 inci Mini Mini 150 mV rms 250 mV rms 5 V 5 V Model 85 inci 215 cm Model 85 inci 3 840 L 2 160 T 1894 x 1198 x 479 mm Dengan Tumpuan 1894 x 1097 x 110 mm TV saja TH 85MX800G 375 W 0 5 W Model 85 inci 42 4 kg Dengan Tumpuan 38 6 kg TV saja ...

Page 26: ... 4 SECAM B G 5 SECAM D K 7 PAL 60 Hz 5 5 MHz 8 PAL 60 Hz 6 0 MHz 9 PAL 60 Hz 6 5 MHz Memutar dari Pemutar Disk Khusus dan VCR atau DVD Khusus Catatan berubah tanpa pemberitahuan Berat dan Dimensi yang tertera adalah ukuran pendekatan Rancangan dan Spesifikasi sewaktu waktu dapat Bluetooth terpasang 2 4 2 485 GHz Bluetooth V5 0 LAN nirkabel terpasang Standar pemenuhan dan rentang Frekuensi IEEE 802 ...

Page 27: ... the hope that it will be useful but WITHOUT ANY WARRANTY without even the implied warranty of MERCHANTABILITY or FITNESS FOR A PARTICULAR PURPOSE Please refer to the detailed terms and conditions thereof Settings System Device Preferences Settings OSS License At least three 3 years from delivery of this product Panasonic will give to any third party who contacts us at the contact information prov...

Page 28: ...urian atau hilang dan untuk keperluan Layanan Garansi 2023 Panasonic Entertainment Communication Co Ltd Panasonic Entertainment Communication Co Ltd Simbol ini hanya berlaku di Uni Eropa Bila ingin membuang produk ini harap hubungi pihak berwenang lokal atau dealer dan tanyakan metode pembuangan yang benar Situs Web http www panasonic com Indonesia Dicetak di Cina 72 MX800G X51Z1 Diimpor oleh PT P...

Page 29: ...rt only in upright position Model No TH 85MX800G LED TV Operating Instructions 85 inch model The Adopted Trademarks HDMI HDMI High Definition Multimedia Interface HDMI trade dress and the HDMI Logos are trademarks or registered trademarks of HDMI Licensing Administrator Inc in the United States and other countries Dolby Dolby Vision Dolby Atmos Dolby Audio and the double D symbol are trademarks of...

Page 30: ... on the country area broadcaster and service provider This TV has the capability for Digital broadcasting specifications But future Digital broadcasting services cannot be guaranteed Even if no special notation has been made of company or product trademarks these trademarks have been fully respected 1 The mains plug appliance coupler is used as disconnect device the disconnect device shall remain ...

Page 31: ...ture This TV must not be exposed to dripping or splashing water and objects filled with liquid such as vases must not be placed on top of or above the TV Do not insert foreign objects into the TV through the air vents Do not use an unapproved pedestal mounting equipment Be sure to ask your local Panasonic dealer to perform the setup or installation of approved wall hanging brackets Do not apply st...

Page 32: ...t to any wireless network SSID usage rights Such networks may be listed as a result of searches However using them may be regarded as illegal access SSID is a name for identifying a particular wireless network for transmission Do not subject the built in wireless LAN to high temperatures direct sunlight or moisture Data transmitted and received over radio waves may be intercepted and monitored The...

Page 33: ...n the wall bracket installation To prevent fall and injury remove the TV from its fixed wall position when it is no longer in use Warning Pedestal Preparation Illustrations shown may be different between models and countries Note 85 inch model Assembly screws M6 35 4 Base Inserting remote s batteries Note the correct polarity or push down the cover Please contact your local Panasonic dealer to pur...

Page 34: ... DIGITAL AUDIO OUT 6 HDMI 1 eARC 9 HEADPHONE 4 ANTENNA 6 3 2 1 4 HDMI 3 8 10 Keep RF aerial cable away from the mains lead to avoid and minimise mains interference pickup Do not place the RF cable under the TV An aerial correct cable 75 Ω coaxial and correct terminating plug are required to obtain optimum quality picture and sound If a communal aerial system is used you may require the correct con...

Page 35: ... equipment and amplifier To enjoy the sound from the external equipment in multi channel sound e g Dolby Digital 5 1ch connect the equipment to the amplifier For the connections Amplifier Use HDMI1 to connect the TV to an amplifier which has eARC ARC Audio Return Channel function If connecting to an amplifier without eARC ARC function use DIGITAL AUDIO OUT Optical cable TV Amplifier with speaker s...

Page 36: ...s function is used for the remote control pair code After the code is successful you can use the Bluetooth remote control to operate the TV Step 2 Select the menu language as you need Note English United States is recommended llustrations within this publication are provided for reference only Step 3 Select your Country Region Step 4 Only for some countries Select whether or not to use and Google ...

Page 37: ... confirm and move to next step Step 11 Please check settings When all setup is done the Please check settings interface displays on the screen and press OK to finish the initial setup You can also go back to former step and make any changes by using button 2 When we select Set up Google TV INDONESIA User activity will be visible to other users of the device including recommendations and YouTube ac...

Page 38: ...10 Choose your subscriptions Step 11 Environment Initial Setup Your account Your account environment then press to Home You Would be able to view the standard settings for Picture and sound modes Shop You can enjoy enhanced setting for Picture and Sound modes Press to select your enter next step OK Step 5 Select Connect your TV to a WIFI network Note To use GOOGLE TV must connect to WIFI ...

Page 39: ...ce is ready Step 16 Installing your apps Please notice that this will take some time Note Initial Setup Step 12 Terms Conditions Use to read Terms Conditions then press OK to confirm and move to next step Step 15 Please check settings When all setup is done the Please check settings interface displays on the screen and press OK to finish the initial setup You can also go back to former step and ma...

Page 40: ...ter the sleep timer OFF TIMER To enter source selection interface INPUT Goes to the prime video homepage To select the apps Exit the menu and return to the previous menu Mic Available only when the network connection is normal Displays the options menu of selected functions OPTION To enter the Favorite shows To enter the channel list FAV BACK To fast backward To fast forward To play To end the run...

Page 41: ... or set up a remote control or accessory that s already connected to your TV Follow the on screen instructions to pair it Press hold and for 5 seconds on the new remote Once it is discovered it will appear in the list And then press OK on your old remote to confirm adding this new remote If you want to unpair the Bluetooth remote follow these steps NOTE If you experience difficulties in pairing yo...

Page 42: ...to yellow Control your TV with Hey Google Say Hey Google to get your Assistant s attention hands free When your TV hears Hey Google it ll record and send what you say to Google so your Assistant can help you You can turn Hey Google off anytime with your TV s mic switch Yes I m in No thanks 3 Select Yes I m in to activate the system to start the voice module and the prompt disappears and it can be ...

Page 43: ...e Press to select icons from the screen list Press OK to enter each option Press or to exit the APP 1 Search Hold the Assistant button down and talk Search movies shows apps and more 2 Home Select icons from the screen list 3 Apps Show the list of favorite applications or access the application center 4 Library Your Library is empty Find your purchases rentals and watchlistedcontent across TV mobi...

Page 44: ... use to select an item use OK to enter and operate according to the on screen display or guide Press to return the previous menu 3 2 Set up Google TV If you selected Set up basic TV during setup you can log in to your Google account here There are two ways to enter First in the HOME interface press the to select Set up Google TV and proceed to the next step Recorded programs View burned videos or ...

Page 45: ... the automatic search process The search may take a few minutes During the process you can press Back and choose YES to exit Auto service Update Select On or Off LCN Select on or off Update Scan Include Off and On Country and Region Show your country or region Teletext Setup Press OK and then use to select preferred teletext or Decoding Page Language Press OK to enter the Program Guide menu EPG Se...

Page 46: ... this option to set the Audio adjustments Output Device To select TV Speaker SPDIF Optical and HDMI ARC Digital Output To select PCM ByPass and Auto Digital Audio Delay ms Digital Audio Volume To select the level of 0 100 eARC To select Off or Auto Network Internet MTC GUEST MTC MES OTHER OPTIONS ETHERNET Add new network Not connected Scanning always available Proxy settings IP settings Select Wi ...

Page 47: ...e information of TV Date Time To select Automatic date time Set date Set time Set time zone and Use 24 hour format Note Set date and set time are available when Automatic date time is set to OFF Language To select the menu language as you need Keyboard To select Current keyboard Gboard Settings and Manage keyboards Storage Display internal shared storage if there is an external device you can also...

Page 48: ...20 Using the Menu Functions Help Feedback Provide feedback to Google or use the web search screen to access the Google Description Center ...

Page 49: ...tion ZOOM ZOOM 4 Document icon Select the mode Access Select Photo 1 Select Photo icon then press OK button to view the picture 2 Press Up Down Left or Right direction button to select your desired picture file and press OK to show 3 While showing picture press OK to display the play console For Previous and Next use remote left and Right key 4 Use OK key to see more option Left rotation Right rot...

Page 50: ... you need to expand the memory you can format the USB expansion memory Home Settings System Storage VendorCo USB drive Delete and format as device storage If want to restore USB functionality following below format again Home Settings System Storage VendorCo USB drive Erase format as removable storage This operation has the risk of damaging the USB please proceed with caution 22 Additional Informa...

Page 51: ...with a USB extension cable Do not disconnect USB devices while they are transferring files When connecting an external hard drive use the USB HDD port We recommend that you use an external hard drive with its own power adapter Certain digital cameras and audio devices may not be compatible with the TV The TV supports the FAT file systems After sorting files in the Folder view mode the TV can displ...

Page 52: ...ate the TV away from sunshine or block sources of bright light from shining on the remote control signal receiver of the TV Parts of the TV become hot Even if the temperature of parts of the front top and rear panels has risen these temperature rises do not cause any problems in terms of performance or quality The TV panel moves slightly when it is pushed with a finger Clattered sound might be hea...

Page 53: ...l Display resolution 85 inch model 215 cm 85 inch model 3 840 W 2 160 H Mass Connection terminals Speaker Output 85 inch model Audio output 20 W 10 W 10 W 85 inch model 42 6 kg With Pedestal 38 6 kg TV only 1894 x 1198 x 479 mm With Pedestal 1894 x 1097 x 110 mm TV only 85 inch model HDMI 1 2 3 input TYPE A Connectors USB USB 2 0 3 0 TYPE A Connectors EARPHONE Mini 150mV rms 250mV rms AV in Mini 1...

Page 54: ... Disc Players and Special VCR s or DVD 26 Built in wireless LAN Standard compliance and Frequency range IEEE 802 11 a b g n ac 2 4 2 5GHz and 5 15 5 825GHz Security Support for WPA WPA2 Bluetooth V5 0 Built in Bluetooth 2 4 2 485GHz Digital TV DVB T T2 Standard Aerial input VHF UHF Operating conditions Temperature 0 C 45 C Humidity 20 80 RH non condensing Note Design and Specifications are subject...

Page 55: ... the hope that it will be useful but WITHOUT ANY WARRANTY without even the implied warranty of MERCHANTABILITY or FITNESS FOR A PARTICULAR PURPOSE Please refer to the detailed terms and conditions thereof Settings System Device Preferences Settings OSS License At least three 3 years from delivery of this product Panasonic will give to any third party who contacts us at the contact information prov...

Page 56: ...ecord of your purchase to aid in identification in the event of theft or loss and for Warranty Service purposes Model Number Serial Number Information on Disposal in other Countries outside the European Union This symbol is only valid in the European Union If you wish to discard this product please contact your local authorities or dealer and ask for the correct method of disposal Diimpor oleh PT ...

Reviews: